Start Implementing Google Auth With MongoDB Realm in Your Android App
Henna Singh9 min read • Published Jan 28, 2022 • Updated Mar 13, 2024
Rate this tutorial
Hello, everyone. I am Henna. I started with Mobile Application back in 2017 when I was a lucky recipient of the Udacity Scholarship. I had always used SQLite when it came to using databases in my mobile apps. Using SQLite was definitely a lot of boilerplate code, but using it with Room library did make it easier.
I had heard about Realm before but I got so comfortable using Room with SQLite that I never thought of exploring the option.
At the time, I was not aware that Realm had multiple offerings, from being used as a local database on mobile, to offering Sync features to be able to sync your app data to multiple devices.
I will pen down my experiments with MongoDB Realm as a series of articles. This is the first article in the series and it is divided into two parts.
Part A will explain how to create a MongoDB Realm back end for your mobile app.
Part B will explain how to implement Google Authentication in the
app.
Pre-Requisites: You have created at least one app using Android Studio.
Let's get some coffee and get the ball rolling. :)
MongoDB Realm is a back end as a service. When you want to use MongoDB Realm Sync functionality, you need to create a MongoDB Realm account and it is free
MongoDB’s Atlas offering of the database as a service is what makes this database so amazing. For mobile applications, we use Realm DB locally on the mobile device, and the local data gets synced to MongoDB Atlas on the cloud.
An account on MongoDB Cloud can be easily created by visiting
https://account.mongodb.com/account/login.
Once you sign-in to your account, you will be asked to create an Organization
Once you click on the Create button, you will be asked to enter organization name and select MongoDB Atlas as a Cloud Service as shown below and click Next.
Add members and permissions as desired and click on Create Organization. Since I am working on my own I added only myself as Project Owner.
Next you will be asked to create a project, name it and add members and permissions. Each permission is described on the right side. Be cautious of whom you give read/write access of your database.
Once you create a project, you will be asked to deploy your database as shown below

Depending on your use-case, you can select from given options. For this article, I will choose shared and Free service :)
Next select advance configuration options and you will be asked to select a Cloud Provider and Region
A cluster is a group of MongoDB Servers that store your data on the cloud. Depending on your app requirement, you choose one. I opted for a free cluster option for this app.

Be mindful of the Cloud Provider and the Location you choose. Realm App is currently available only with AWS and it is recommended to have Realm App region closer to the cluster region and same Cloud Provider. So I choose the settings as shown.
Give a name to your cluster. Please note this cannot be changed later.
And with this, you are all set with Step 1.
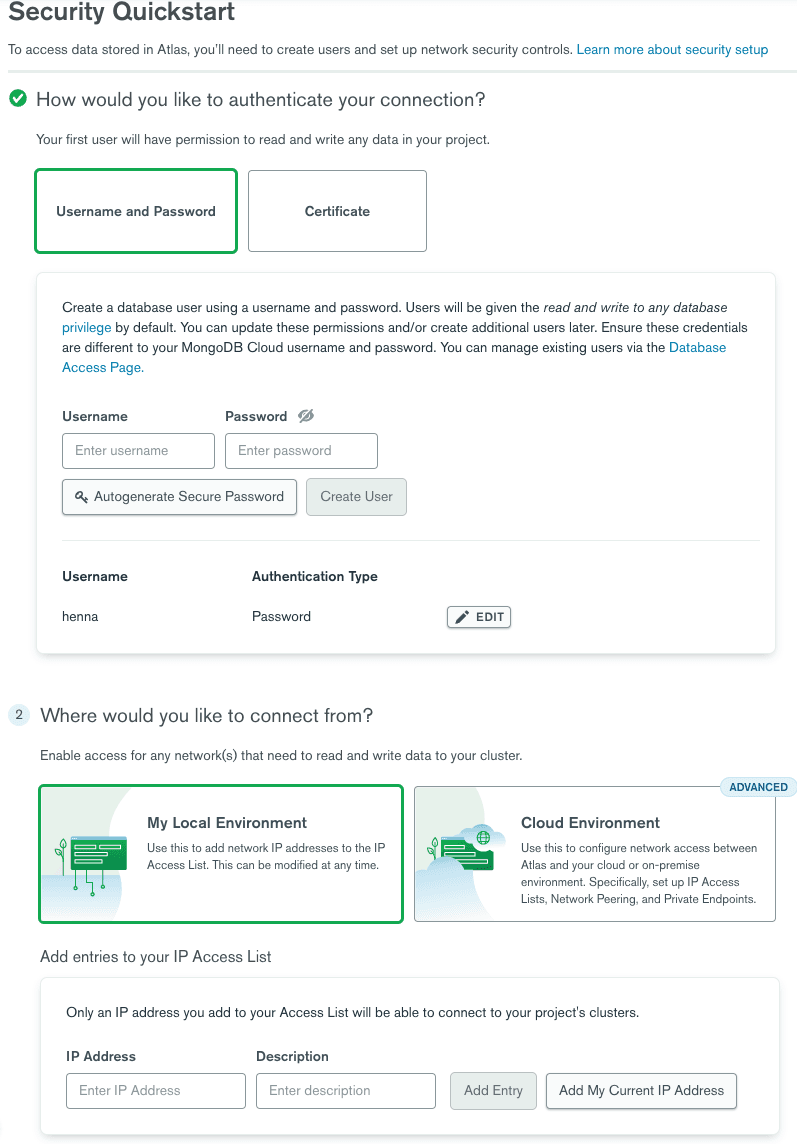
Once you have created your cluster, you will be asked to create a user to access data stored in Atlas. This used to be a manual step earlier but now you get the option to add details as and when you create a cluster.
These credentials can be used to connect to your cluster via MongoDB Compass or Mongo Shell but we will come to that later.
You can click on “Add My Current IP Address” to whitelist your IP address and follow as instructed.

If you need to change your settings at a later time, use Datasbase Access and Network Access from Security section that will appear on left panel.
With this Step 2 is done.
We have set up our cluster, so the next step is to create a Realm app and link it to it. Click on the Realm tab as shown.

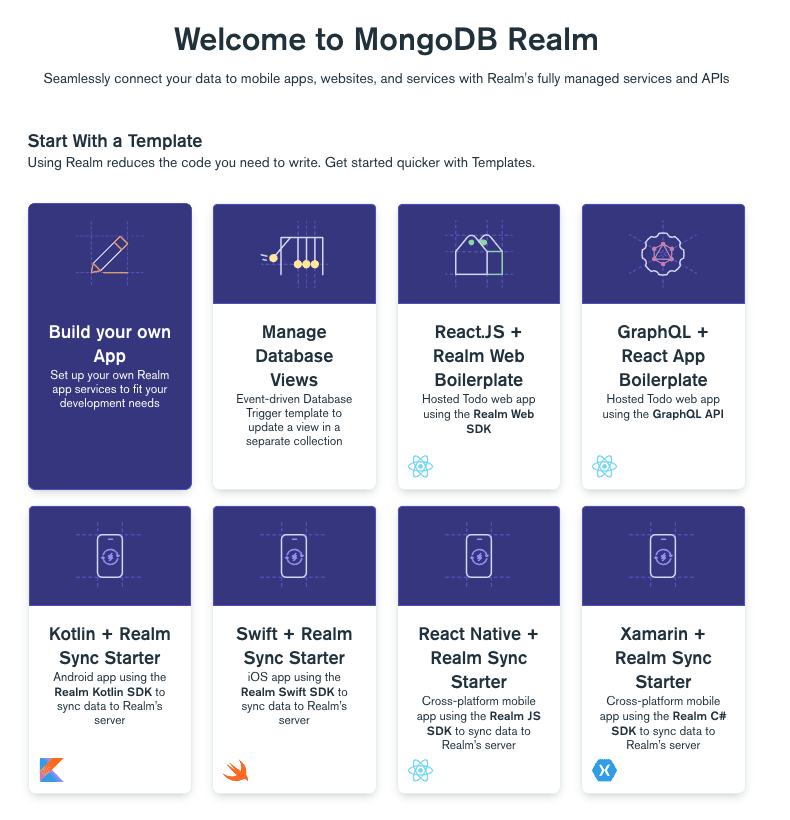
You will be shown a template window that you can choose from. For this article, I will select “Build your own App”

Next you will be asked to fill details as shown. Your Data Source is the Atlas Cluster you created in Step1. If you have multiple clusters, select the one you want to link your app with.
Please note, Realm app names should have fewer than 64 characters.

For better performance, It is recommended to have local deployment and region the same or closer to your cluster region.
Check the Global Deployment section in MongoDB's official documentation for more details.
You will be shown a section of guides once you click on “Create a Realm Application”. You can choose to follow the guides if you know what you are doing, but for brevity of this article, I will close guides and this will bring you to your Realm Dashboard as shown
Please keep a note of the “App Id”. This will be needed when you create the Android Studio project.

There are plethora of cloud services that comes with MongoDB Realm. You can use functions, triggers, and other features depending on your app use cases. For this article, you will be using Authentication.
With this, you are finished with Part A. Yayyy!!
I presume you all have experience creating mobile applications using Android Studio. In this step, you would "Start a new Android Project." You can enter any name of your choice and select Kotlin as the language and min API 21.
Once you create the project, you need to add dependencies for the Realm Database and Google Authentication.
For Realm, add this line of code in the project-level
build.gradle file. This is the latest version at the time of writing this article.Edit 01: Plugin is updated to current (may change again in future).
After adding this, the dependencies block would look like this.
Now we add Realm plugin and Google Authentication in the app-level
build.gradle file. Add this code at the top of the file but below the kotlin-kapt extension. If you are using Java, then this would come after the Android plugin.In the same file, we would also add the below code to enable the Realm sync in the application. You can add it anywhere inside the Android block.
For Google Auth, add the following dependency in the app-level gradle file. Please note, the versions may change since the time of this article.
Edit 02: gms version is updated to current.
With this, we are finished with Step 1. Let's move onto the next step to implement Google Authentication in the project.
Now, I will not get into too much detail on implementing Google Authentication to the app since that will deviate from our main topic. I have listed below the set of steps I took and links I followed to implement Google Authentication in my app.
- Configure a Google API Console project. (Create credentials for Android Application and Web Application). Your credential screen should have 2 oAuth Client IDs.
- Configure Google Sign-in and the GoogleSignInClient object (in the Activity's onCreate method).
This is what the activity will look like at the end of the four steps.
Please note: This is only a guideline. Your variable names and views can be different. The String server_client_id here is the web client-id you created in Google Console when you created Google Auth credentials in the Google Console Project.
When you run your app, your app should ask you to sign in with your Google account, and when successful, it should open SampleResult Activity. I displayed a random text to show that it works.
Now, we will move onto the next step and configure the Google Auth provider on the MongoDB Realm cloud account.
Return to the MongoDB Realm account where you created your Realm app. On the left panel, click on the Authentication tab and you will see the list of auth providers that MongoDB Realm supports.
Edit 03: Updated Screenshot as there is now a new option OpenID connect.

Toggle the Provider Enabled switch to On and enter the Web-Client ID and Web Client Secret from the Google Console Project you created above.
You can choose the Metadata Fields as per your app use case and click Save.
Keeping old UI here as OpenID Connect is not used.
This is the last step of Part 2. We will use the Google Auth token received upon signing in with our Google Account in the previous step to authenticate to our MongoDB Realm account.
We already added dependencies for Realm in Step 3 and we created a Realm app on the back end in Step 2. Now, we initialize Realm and use the appId (Remember I asked you to make a note of the app Id? Check Step 2. ;)) to connect back end with our mobile app.
Create a new Kotlin class that extends the application class and write the following code onto it.
An "App" is the main client-side entry point for interacting with the MongoDB Realm app and all its features, so we configure it in the application subclass for getting global access to the variable.
This is the simplest way to configure it. After configuring the "App", you can add authentication, manage users, open synchronized realms, and all other functionalities that MongoDB Realm offers.
Don't forget to add the RealmApp class or whatever name you chose to the manifest file.
Now come back to the
handleSignInResult() method call in the MainActivity, and add the following code to that method.Add a TextView with a Successful Login message to the SampleResult layout file.
Now, when you run your app, log in with your Google account and your SampleResult Activity with Successful Login message should be shown.
When you check the App Users section in your MongoDB Realm account, you should notice one user created.

Well done, everyone. We are finished with implementing Google Auth with MongoDB Realm, and I would love to know if you have any feedback for me.❤
You can post questions on MongoDB Community Forums or if you are struggling with any topic, please feel free to reach out.
In the next article, I talk about how to implement Realm Sync in your Android Application.