You will need to create a MongoDB database in this tutorial. The easiest way is to create a free cluster in MongoDB Atlas, MongoDB's fully-managed, multi-cloud document database service.
Microsoft developed TypeScript as a superset of JavaScript that has a single open-source compiler. It has all the same features of JavaScript, but with an additional layer on top: the type system. This allows for optional static typing, as well as type inference. In addition to many other languages, MongoDB also supports TypeScript through the MongoDB NodeJS Driver. The driver has the types for Typescript already built in so there is no need for any other packages.
JavaScript has long been one of the most used languages when developing web applications. It can be used either on the front end, or in the back end using Node.js.
However, JavaScript isn’t without its limitations, such as a lack of static typing, making it much harder to spot issues at compile-time and leading to harder-to-debug errors at runtime. As the size of a project increases, the maintainability and readability of the code reduces as well.
This is where TypeScript comes in. It’s an extra layer on top of JavaScript, but adds static types. Because it’s an extra layer and not a separate framework, it actually uses a transpiler at build time to convert the TypeScript code into JavaScript. Therefore, you can continue using any JavaScript libraries in your project.
But at the application layer, when working on the code, developers get types and type-checking. This means knowing what data types can be used with no unexpected changes. Plus, by being limited by types, errors will be raised at time of coding, or build time, reducing the number of bugs.
Knowing that you have the advantages of type-safety means being able to focus on writing the code and generally being more productive.
In this post, you will learn how to get started using MongoDB Atlas, MongoDB’s Database-as-a-Service, with a web API for listing games, created with Express, with the object-oriented power of TypeScript.
Prerequisites
You will need to have Node installed in order to follow along with this tutorial. It has access to npm out of the box for package management in your projects.
You will also need to create a MongoDB database. The easiest way to get started with MongoDB is to create a free cluster in MongoDB Atlas, MongoDB's fully-managed, multi-cloud document database service.
Setting Up Your Project
This article focuses on how to add MongoDB and enjoy the power of TypeScript. To get you into coding faster, a companion repository was created on GitHub.
The default ‘main’ branch gives you the basic boilerplate code required to follow this tutorial. However, if you want to run the completed version, there is another branch on the repo called ‘finish’.
This project is already set up with Express and TypeScript configurations. Out of the box, when run, it will print “Hello world!” to the page. The steps listed under each heading will walk you through adding MongoDB access and creating a model. Then, test your newly created endpoints with each of the Create, Read, Update, and Delete (CRUD) operations before adding schema validation at database level.
In order to connect to the database later on, follow the steps outlined below.
Adding the MongoDB NodeJS Driver
The first thing you will need to do is add the MongoDB npm package. From the root of the project in your terminal of choice, use the following command to install the MongoDB NodeJS Driver:
Adding MongoDB Atlas Connection String
The companion repository already has the dotenv package installed. This package allows the loading of config from a .env file. Combining your connection string with a .env file allows for a separation of user secrets from functionality. It’s good practice to add the .env file to a .gitignore file to avoid leaking API keys, connection strings, and other private config settings. This has already been done in the project so you don’t have to do it.
Add a .env file to the root of the project and add the following, populating the value strings with the details from Atlas:
You should already have your database and MongoDB cluster created. However, if you need help with getting your connection string, the MongoDB documentation can help.
Your .env file should look similar to this when complete.
Make sure your connection string has had any templated values such as replaced with your password you set when creating the user.
Creating Models with TypeScript
In TypeScript, classes or interfaces can be used to create models to represent what our documents will look like. Classes can define what properties an object should have, as well as what data type those properties should be. This is like an application-level schema. Classes also provide the ability to create instances of that class and take advantage of the benefits of object-orientated programming.
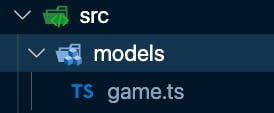
To keep the code clean, we will create folders under the src/ directory to hold the relevant files. Create a new “models” folder inside the src folder.
Inside this folder, create a file called game.ts and paste the following outline into it:
Your src folder should like the following image at this stage:
Next, under the ‘External Dependencies’ section, add:
ObjectId is a unique MongoDB data type which is used for the ‘_id’ field that every document has and is used as a unique identifier and acts as the primary key.
Now it’s time to create our class. Paste the following code under the “Class Implementation” heading:
Here we are adding properties for our game model and their data types, to take advantage of TypeScript as part of the constructor. This allows the objects to be created, while also defining the properties. The id property has a ? after it to denote that it’s optional. Although every document in MongoDB has an id, it won’t always exist at code level, such as when you are creating a document. In this instance, the ‘_id’ field is auto-generated at creation time.
We now have a model of our data represented in code so that developers can take advantage of autocomplete and type checking.
Creating Services
Now we need to create our service that will talk to the database. This class will be responsible for configuring the connection.
Create a new folder under src/ called ‘services’ and inside that, create a database.service.ts file and paste the following outline:
As this service will be connecting to the database, it will need to use the MongDB NodeJS driver and .env config. Paste the following under the “External Dependencies” heading:
We want to access our collection from outside our service, so, under the “Global Variables” heading, add:
Now we are ready to start coding in the key functions in this service. We want to have a function that can be called to initialize the connection to the database so it’s ready for when we want to talk to the database later in the code. Under “Initialize Connection,” paste the following:
There is quite a lot happening here, so let’s break it down. dotenv.config(); pulls in the .env file so the values can be accessed when calling process.env. The .config() call is empty as we use the default location for a .env file, which is the root of the project.
It then creates a new MongoDB client, passing it the connection string, including valid user credentials. Then it attempts to connect to MongoDB, the database, and the collection with the names specified in .env, persisting this to the global collection variable for access externally.
Creating Routes
Now that we have the functionality available to communicate with the database, it’s time to provide endpoints for the client side to communicate using Express and perform CRUD operations.
In order to keep the code clean, we are going to create a router which will handle all calls to the same endpoint, in this case, ‘/game’. These endpoints will also talk to our database service.
Under ‘/src’, create a ‘routes’ folder, and inside that folder, create a file called games.router.ts and paste the following outline:
Under ‘External Dependencies’, paste the following import statements:
We then need to set up our router before we can start coding the endpoints, so paste the following under ‘Global Config’:
In MongoDB, information is stored in BSON Documents. BSON is a binary, JSON-like structure. It supports the same data types as JSON with a few extras, such as date and raw binary, as well as more number types such as integer, long, and float.
Because of this, we are able to accept JSON input to our application when creating or updating documents. We do, however, have to tell our router to use the json parser middleware built into Express, which is why we call use(express.json());.
Next we will begin to add in handlers to the router for each endpoint we want on our API.
GET
The first endpoint we will add is our default GET route:
Later on, you will see how we configure the app to send all ‘/games’ traffic to our router. But for now, know that because we are inside this router, we only have to specify ‘/’ to handle calls to it.
Here we are calling find on the collection. The find function takes an object in the first argument, which is the filter we want to apply to the search. In this case, we want to return every document in the collection so we pass an empty object.
The find function actually returns a special type called a Cursor which manages the results of our query, so we cast it to an array, which is a basic TypeScript data type easier to work with across the codebase. Since we know it will be a document matching our Games model, we also add the additional as Game[]; to the line so we have an array of specifically Game objects.
This array is then sent back to the front end to be displayed on screen. This is where the ‘res’ Response object built into Express is used. We send a status code of 200, which means success, back as well as the array of games documents. This is useful when using API clients such as Postman.
Next, we will add an endpoint to GET a specific document:
This endpoint looks slightly different. The ‘:id’ is a route parameter that gives us a named parameter at that location in the URL. For example, the route we have specified here would look like '/game/' where the templated id string in brackets would be replaced with the document id. This makes it much easier to use than query parameters.
It takes the id and uses this in a query object we build. Since _id is of type ObjectId, we create a new ObjectId, passing in the string id to convert. We then call findOne, passing in that query, so we filter the results by the first one matching that id and cast it to our Game model.
We then return a 200 status code and the game object if one was found, or we return 404 a.k.a. not found, and an error message to the client.
POST
Express and TypeScript make handling POST requests to create a new document in your collection super easy. Paste the following under the ‘POST’ heading:
Here we create our new game object by parsing the request body. We then use the insertOne method to create a single document inside a collection, passing the new game. If a collection does not exist, the first write operation will implicitly create it. The same thing happens when we create a database. The first structure inside a database will implicitly create it.
We then do some simple error handling, returning a status code and message, depending on the outcome of the insert.
Use InsertMany to insert multiple documents at once.
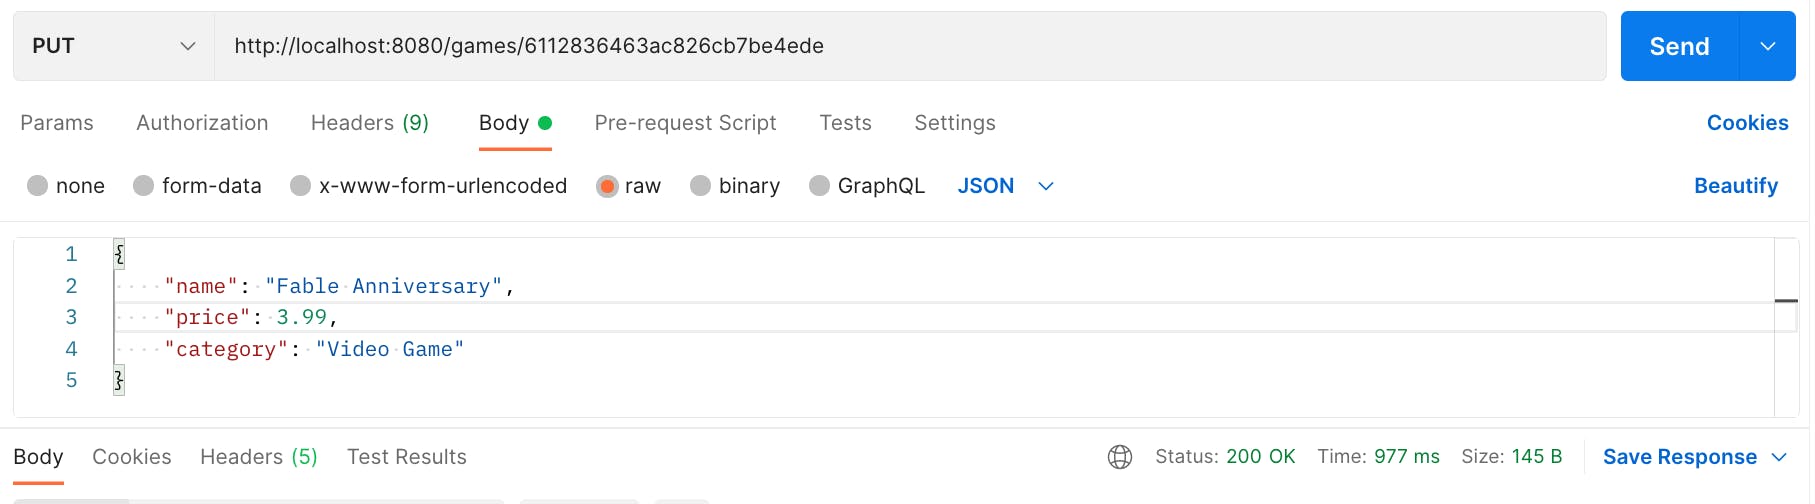
PUT
The PUT method is used when requesting an update to an existing document. Paste the code under the ‘PUT’ heading:
This is very similar to the POST method above. However, we also have the ‘:id’ request parameter you learned about in GET.
Like with the findOne function, updateOne takes a query as the first argument. The second argument is another object, in this case, the update filter. Because we have a whole object and we don’t need to care what is new or not, we pass in ‘$set’ which is a property that adds or updates all fields in the document.
Instead of passing a 500 error if it fails this time, however, we pass 304, which means not modified to reflect that the document hasn’t changed.
Although we don’t use it here as the default settings are fine, the function takes an optional third argument which is an object of optional parameters. One example is upsert, which if set to true, will create a new document if it doesn’t exist when being requested to be updated. You can read more about updateOne and optional arguments in our .
DELETE
Finally we come to delete. Paste the following code under the “Delete” heading:
Nothing much different to earlier functions such as read is happening here. We create a query from the id and pass that query to the deleteOne function. See our reference documentation to learn more about deleting multiple documents.
If it was able to be deleted, a 202 status is returned. 202 means accepted as we only know it accepted the deletion. Otherwise we return 400 if it wasn't deleted, or 404 if the document couldn't be found.
Pulling Together
Woo! You now have a service that connects to the database and a router that handles requests from the client and passes those through to your service. But there is one last step to pull it all together and that is updating index.ts to reflect our new service and router.
Replace the current import statement with the following:
Next, we need to replace the app.get and app.listen calls with:
This first calls the connectToDatabase function to initialize the connection. Then when that is complete, as long as it was successful, it tells the app to route all “/games” traffic to our gamesRouter class and starts the server.
Testing Our Methods
Now it’s time to test out our methods! First we need to start the application, so in your CLI, enter the following to build and run the application:
This will then start the application at http://localhost:8080 that you can use your API client of choice (such as Postman) to test your application via the endpoints.
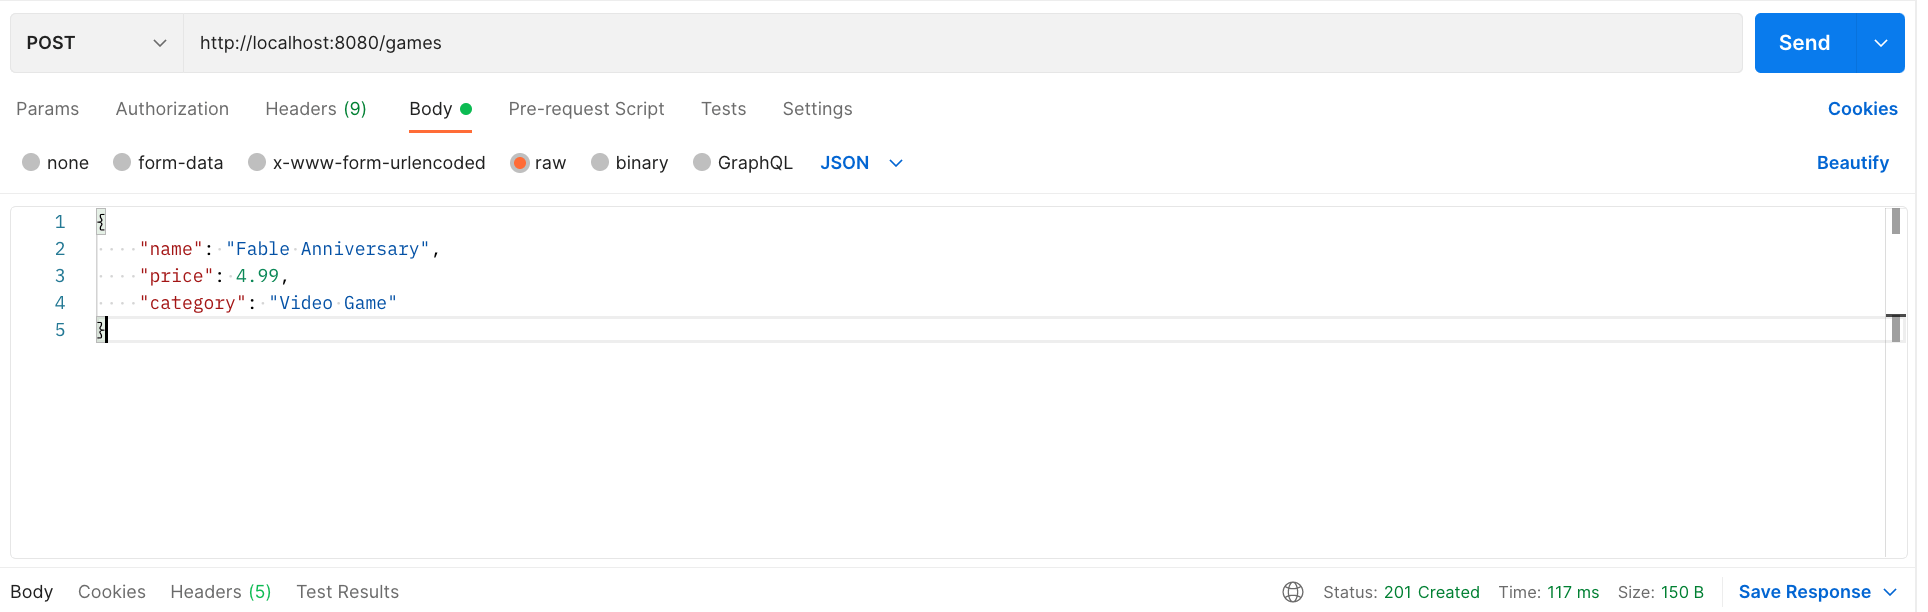
Create
Make a POST request to http://localhost:8080/games, passing it a JSON object in the body which defines the fields for the new game.
You will also need to specify ‘Content-Type’ as ‘application/json’ in the header of your request. Once you press send, you should get back a ‘201 Created’ status that we set in our code earlier.
You can use the following JSON snippet or create your own:
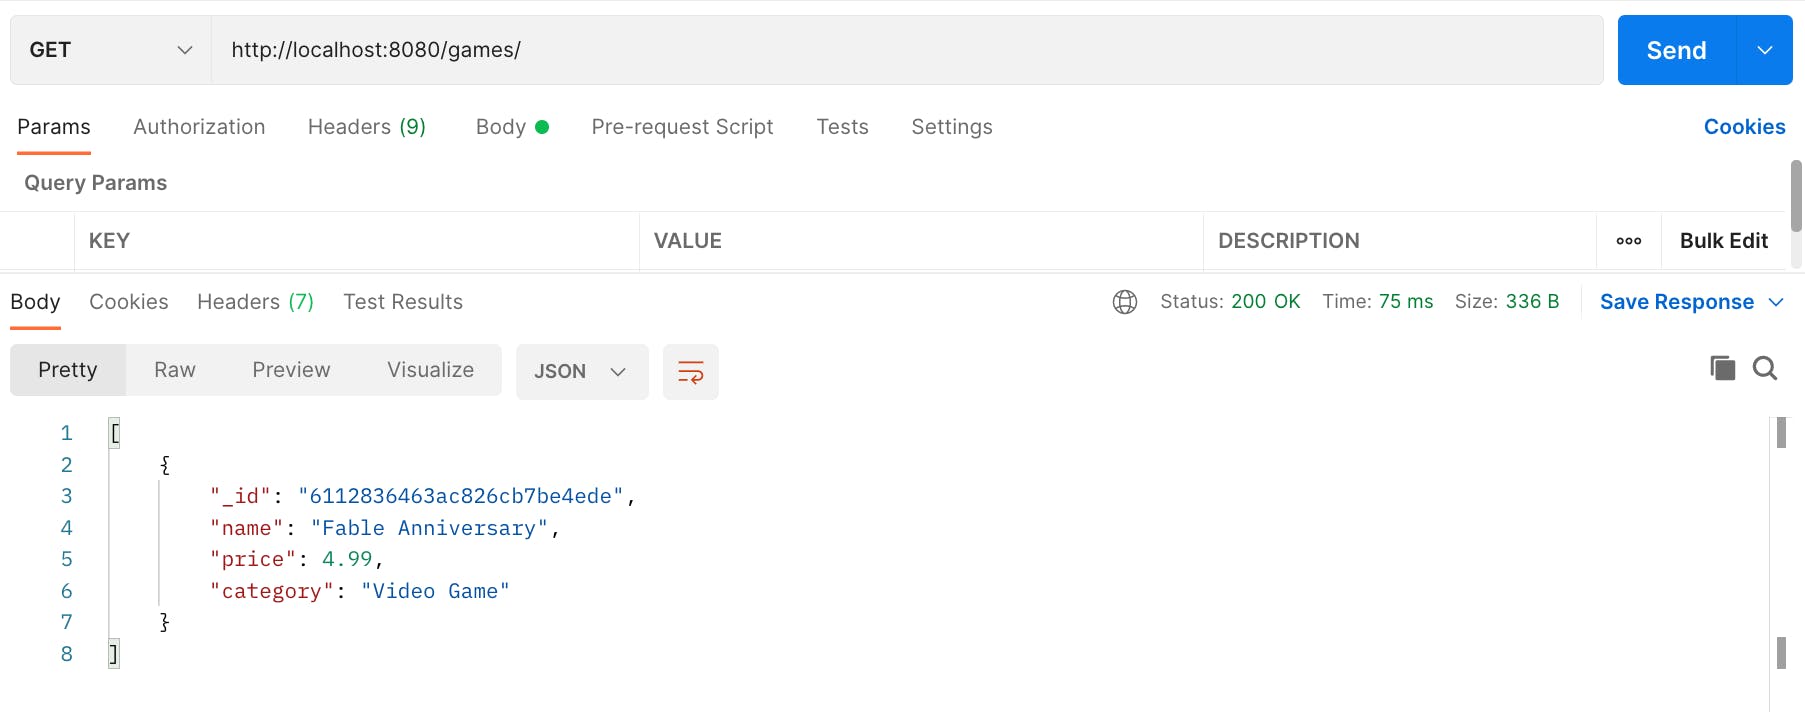
Read
Make a GET request to http://localhost:8080/games. You don’t need to specify any headers or a body for this. It will return an array of documents in your collection. The collection will only contain the one document that you created in the previous step.
From this list, copy the ‘_id’ value of your document, we will now use this to test the GET for a specific document.
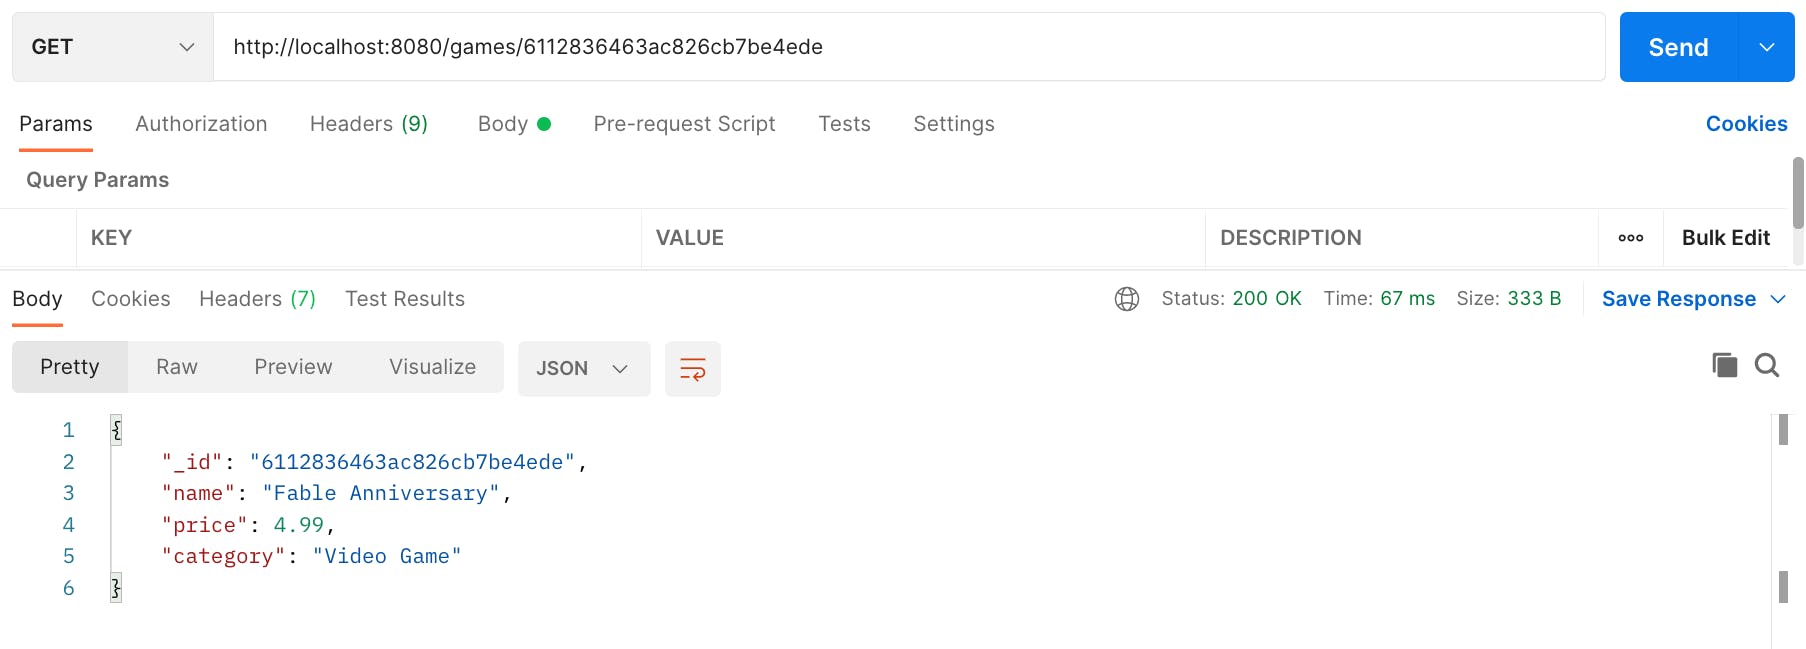
Make a GET request to http://localhost:8080/games/ to see your document successfully returned.
Update
Next we can update our existing document to test the update endpoint as we already have the document id from the last step.
Make a PUT request to http://localhost:8080/games/, ensuring that you still have the content-type set to application/json in the header. In the body, use the same details as when you created the document but change something, such as price.
Delete
Make a DELETE request to http://localhost:8080/games/. You should get back a 202 status.
Adding Schema Validation with the MongoDB NodeJS Driver
You have a working API written with TypeScript that talks to MongoDB Atlas and your database in the cloud. Woo! However, TypeScript and its advantages, such as static typing, are at application level for the developer.
In the past, developers have used a library called Mongoose to help address this with application level schemas. However, this only impacts the application and not the database, which means if another project or user decides to insert a document or update an existing document with a different set of fields or data types, your code will break.
For this reason, it’s important to think about adding validation at a database level instead, so that no external changes can be made to the data that would break your TypeScript code.
This is where MongoDB’s schema validation comes into play. This will allow us to restrict the database as well to only accept the fields and data types that we expect in our models.
Going into detail about schema validation is outside the scope of this post as it’s such a powerful and broad topic.
However, if you want to learn more, there is a great article on Schema Validation. If you would like a more hands-on example, we have a JSON Schema Tutorial that you can follow.
For now, we will simply apply some JSON schema validation to our existing collection to ensure all future documents match the model we expect.
In database.service.ts, add the following after const db: mongoDB.Db = client.db(process.env.DB_NAME;:
If you haven’t seen a JSON schema before, this might look a bit intimidating but don’t worry—let’s talk through what is going on.
We send a command to our database that tells it to moderate the collection with the name defined in process.env. We then pass an object of the schema to the validator property. This schema specifies that name, price, and category are required fields. It also specifies their data type in our BSON document and a description.
The collection modification command we are sending is specifically for existing collections. However, you can also apply schema validation when creating a collection for the first time, by passing a schema object to the validator property of the createCollection command.
With the new command added, the next time you run the project, it will apply this validation to your collection. If you were then to try and create or update documents with a different shape to that which it is expecting, you will get a message that the document has failed validation. Useful!
Summary
In this tutorial, you have learned how to use TypeScript with MongoDB Atlas to add a powerful NoSQL document database to your application, enjoying the benefits of a statically typed language at developer level.
We also used Express to create a Web API to allow for communicating with our database via RESTful calls.
We then added schema validation to our collection at database level, to apply a model across all applications that use our database, not just our own. A database being used by multiple projects is common at the enterprise level, so having this schema applied to your collection could save a lot of bugs and code updates, should anyone try to change something.
FAQ
Connecting to MongoDB from your TypeScript application is done via the MongoDB NodeJS Driver
Yes! Thanks to the power of database-level schema validation introduced in MongoDB version 3.2, you no longer need it. Not only is it extra code to maintain, but it doesn’t help if your database is used by other projects that might change your data accidentally. To learn more about why your Node.js and MongoDB applications don’t need Mongoose, read this discussion article
Get started with Atlas today
Get started in seconds. Our free clusters come with 512 MB of storage so you can play around with sample data and get oriented with our platform.