EVENTGet 50% off your ticket to MongoDB.local NYC on May 2. Use code Web50! Learn more >

MongoDB Auto-Increment

Learn how to implement auto-incremented fields with MongoDB Atlas triggers.

Introduction

In a relational database, setting a field to auto-increment a number so that its value increases automatically every time you insert a new record is a readily available feature. On the other hand, NoSQL databases such as MongoDB let applications manage their data more freely and servers limit auto-generated data. You can still easily auto-increment a field in a NoSQL database by using a counter collection on the _id field. In this tutorial, we will learn the steps to auto-increment a field in MongoDB Atlas, MongoDB’s Database-as-a-Service platform.

Table of Contents

Prerequisites

This tutorial assumes that you have installed and configured a MongoDB Atlas account and cluster. If you have not done so, follow the steps below:

  • Ready a cluster or create one. You can create a MongoDB Atlas cluster for free. Learn more about MongoDB Atlas.
  • Create a database user and add your public IP to get network access to the cluster.
  • Download the mongo shell and then add <your mongo shell's download directory>/bin to your $PATH variable.
  • Use the cluster’s connection string on your command line to connect to the cluster and access it via the mongo shell.

Note: All the commands in this tutorial are run on the mongo shell.

Considerations

To ensure your database remains scalable with a large number of documents, we recommend avoiding the use of an auto-increment pattern for the _id field or any field in MongoDB. In case of a concurrency failure, the use of such a pattern can result in data duplication.

The default value ObjectId is ideal for the auto-generated _id rather than an auto-incremented value. Consult MongoDB’s official documentation on Object Id for more information.

How Does Auto-increment Work in MongoDB?

Although MongoDB does not support auto-increment sequence as a default feature like some relational databases, we can still achieve this functionality using a counter collection. The counter collection will have a single document that tracks the current unique identifier value. Learn how to create a counter collection and implement auto-increment below.

Step-by-Step Guide for Auto-Incrementing a Field in MongoDB Atlas Using a JavaScript Function

We will implement auto-increment functionality using Triggers in MongoDB Atlas. Triggers allow you to schedule the execution of server-side logic or execute it in response to database events. Learn more about what database triggers are.

Create Collections

For this approach, you need at least two collections.

The first collection will hold the details of students; hence we will name it students. Run the following command to create a students collection.

db.createCollection("students");

The second collection will hold the current unique identifier value for the students. Let’s name it counters. Run the following command to create a counters collection.
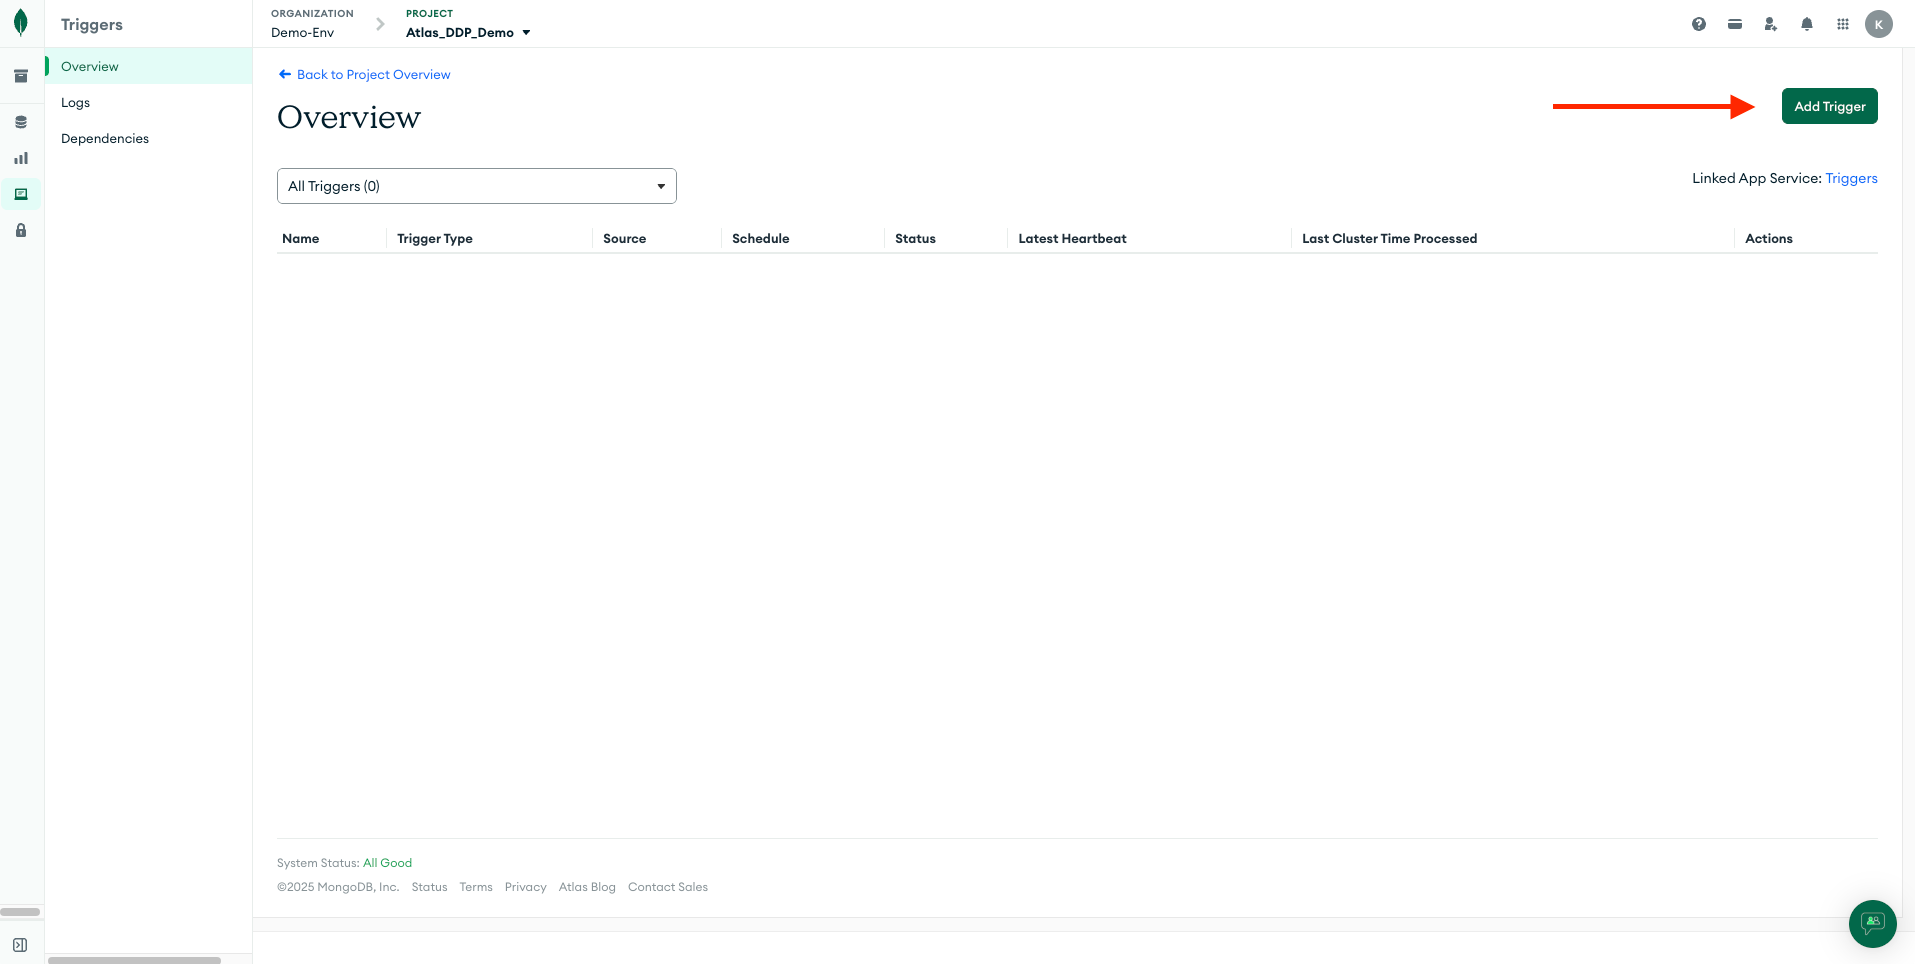
db.createCollection("counters");

Create Trigger

To implement triggers for auto-increment, log into your MongoDB Atlas account, open the cluster you want to work on. and click on Triggers.

navigate to Triggers in left hand nav and click "Add Trigger" button

Click on Add Trigger and set the following values to the corresponding fields.

  • Trigger Type: Database
  • Name : Auto_Increment_Trigger
  • Enabled : ON
  • Event Overriding : ON
  • Link Data Sources(s) : <the clusters and data lakes you like to access>
  • Cluster Name : <your cluster name>
  • Database Name : <your database name>
  • Collection Name : students
  • Operation Type : Insert
  • Full Document : ON
  • Select An Event Type : Function

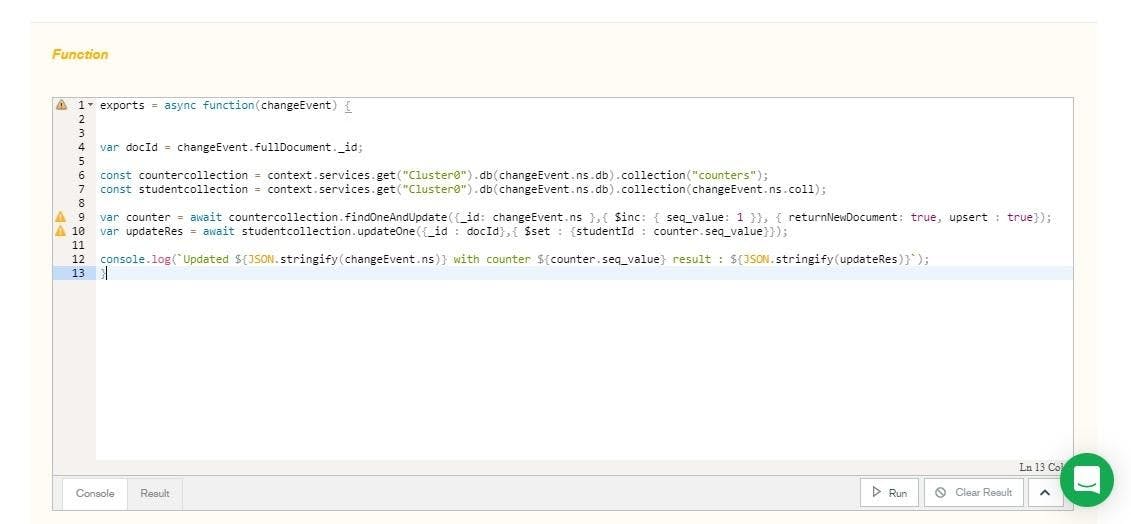
In the Function field, add the following code.

exports = async function(changeEvent) {
    var docId = changeEvent.fullDocument._id;
    
    const countercollection = context.services.get("<ATLAS-CLUSTER>").db(changeEvent.ns.db).collection("counters");
    const studentcollection = context.services.get("<ATLAS-CLUSTER>").db(changeEvent.ns.db).collection(changeEvent.ns.coll);
    
    var counter = await countercollection.findOneAndUpdate({_id: changeEvent.ns },{ $inc: { seq_value: 1 }}, { returnNewDocument: true, upsert : true});
    var updateRes = await studentcollection.updateOne({_id : docId},{ $set : {studentId : counter.seq_value}});
    
    console.log(`Updated ${JSON.stringify(changeEvent.ns)} with counter ${counter.seq_value} result : ${JSON.stringify(updateRes)}`);
    };
  • Replace <ATLAS-CLUSTER> with your cluster service name.

Your code should look like this.

sample code

Click Save to save the trigger.

Run Trigger

In the above code, we have first initialized the counters collection and defined an insert event trigger for the students collection. When you insert a document into the students collection, the trigger function executes, which updates the seq_value field in the counters collection and adds the seq_value to the students collection as studentId field.

The mongodb inc operator increments a field by the specified value (1 in our case). The returnNewDocument parameter, when set to true, atomically returns an incremented number, while the upsert parameter, when set to true, adds a new studentId counter if the current namespace doesn’t have it.

To see the trigger in action, run the following commands to insert a few documents into the students collection.

db.students.insert({
   "name":"Jhon Doe"
});
db.students.insert({
   "name":"David Smith"
});
db.students.insert({
    "name":"Amanda Herny"
});

Run the following code to ensure the results are consistent.

db.students.find().pretty();

Once the code execution is complete, you will get the following results.

{
        "_id" : ObjectId("60b3a7fa1ce57d7f961a2c12"),
        "name" : "Jhon Doe",
        "studentId" : NumberLong(1)
}
{
        "_id" : ObjectId("60b3a8021ce57d7f961a2c13"),
        "name" : "David Smith",
        "studentId" : NumberLong(2)
}
{
        "_id" : ObjectId("60b3a8091ce57d7f961a2c14"),
        "name" : "Amanda Herny",
        "studentId" : NumberLong(3)
}

You can also view the results graphically in MongoDB Atlas by traversing to the students collection.

view of students collection

To check the document in the counters collection, run the following code.

db.counters.find().pretty();

You will get the following results.

{ "_id" : ObjectId("60b39cf75886657cb75527bb"), "seq_value" : "0" }
{
        "_id" : {
                "db" : "myFirstDatabase",
                "coll" : "students"
        },
        "seq_value" : NumberLong(3)
}

Notice the value of seq_value field in the counters collection. It has increased to 3 from 0, as we have inserted 3 documents into the students collection.

Summary

Though auto-incrementing in MongoDB isn’t a standard feature, you can still obtain a similar result by implementing a counter collection on the _id field. You just need to maintain a different collection and document for tracking the counts. The biggest advantage of this approach is that it is driver agnostic, meaning any client inserting the documents fires the trigger to set the correct counter value. If you want to learn about more approaches, read our blog on generating globally unique identifiers for MongoDB.

FAQs

How do I auto-increment a field in MongoDB?

You can implement auto-increment in MongoDB by using a counter collection, findOneAndUpdate with $inc, and a JavaScript function.

How do I auto-increment a column in MongoDB?

MongoDB uses a field-value document oriented data model. The incremented value is a field value similar to a column increment on other databases’ tables.

How do I insert value in an auto-incremented field in MongoDB?

You can insert values to the auto-incremented field by using database commands and a JavaScript function. See the full tutorial here.

Ready to get started?

Launch a new cluster or migrate to MongoDB Atlas with zero downtime.