The Journey of #100DaysofCode (@eliehannouch)

100daysofcode - Day 35

Hello friends, a new day is up and some new informations are a must. In yesterday’s post, we talked about the iterative model, its advantages, disadvantages, and when to use it.
In today’s post we will talk about the spiral model. Where we will dive together into its building blocks to learn more about how it merges the waterfall approach with the iterative one. :smiling_face_with_three_hearts::rocket:

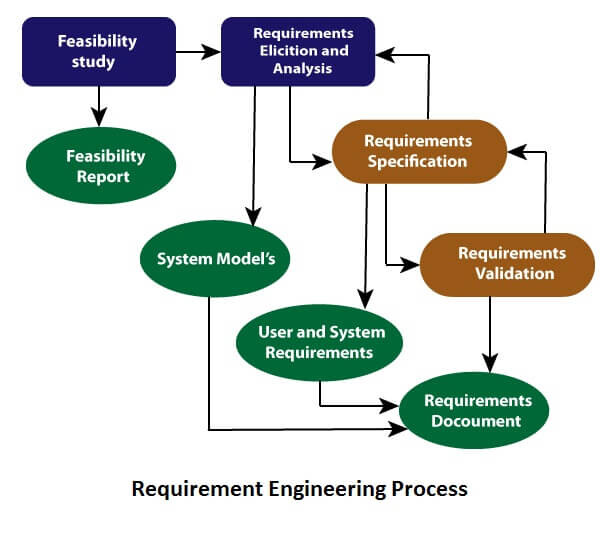
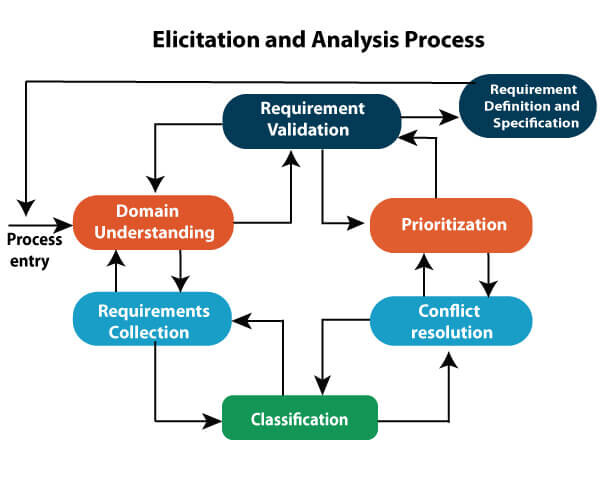
What is the spiral model ? :thinking:

  • A software process model that couples the iterative feature of prototyping with the controlled and systematic aspects of the linear sequential model. It implements the potential for rapid development of new versions of the software. Using the spiral model, the software is developed in a series of incremental releases. During the early iterations, the additional release may be a paper model or prototype. During later iterations, more and more complete versions of the engineered system are produced.


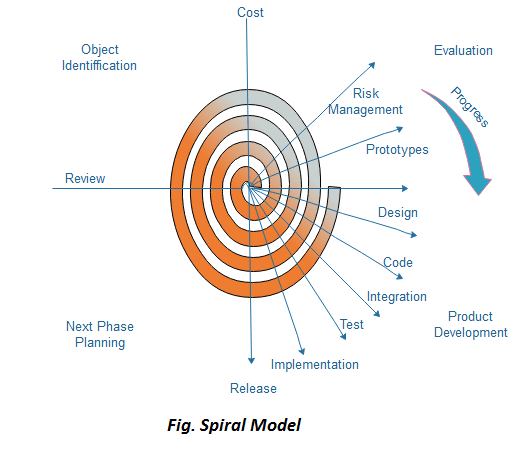
Each cycle in the spiral is divided into four parts:

  • Objective setting: Each cycle in the spiral starts with the identification of purpose for that cycle, the various alternatives that are possible for achieving the targets, and the constraints that exists.
  • Risk Assessment and reduction: The next phase in the cycle is to calculate these various alternatives based on the goals and constraints. The focus of evaluation in this stage is located on the risk perception for the project.
  • Development and validation: The next phase is to develop strategies that resolve uncertainties and risks. This process may include activities such as benchmarking, simulation, and prototyping.
  • Planning: Finally, the next step is planned. The project is reviewed, and a choice made whether to continue with a further period of the spiral. If it is determined to keep, plans are drawn up for the next step of the project.

Spiral Model Advantages :white_check_mark:

  • High amount of risk analysis
  • Useful for large and mission-critical projects.

Spiral Model Disadvantages :x:

  • Can be a costly model to use.
  • Risk analysis needed highly particular expertise
  • Doesn’t work well for smaller projects.
4 Likes

100daysofcode - Day 36

Hello folks, a new day is here the 36/100. A dose of new informations, is required to end the day successfully. Yesterday we discussed the spiral model, how to work with it and what are the advantages and disadvantages of it. :hugs::rocket: In today’s post we will dive into a new and important model, the V-model. :handshake::star_struck:

What is the V-Model ? :thinking:

  • The V-model is an SDLC model where execution of processes happens in a sequential manner in a V-shape. It is also known as Verification and Validation model . It is an extension of the waterfall model and is based on the association of a testing phase for each corresponding development stage. This means that for every single phase in the development cycle, there is a directly associated testing phase. This is a highly-disciplined model and the next phase starts only after completion of the previous phase.

            *

Verification & Validation :thinking:

  • Verification: It involves a static analysis method (review) done without executing code. It is the process of evaluation of the product development process to find whether specified requirements meet.

  • Validation: It involves dynamic analysis method (functional, non-functional), testing is done by executing code. Validation is the process to classify the software after the completion of the development process to determine whether the software meets the customer expectations and requirements.

Verification Phases of V-model: :heavy_check_mark::heavy_check_mark:

  1. Business requirement analysis: This is the first step where product requirements understood from the customer’s side. This phase contains detailed communication to understand customer’s expectations and exact requirements.

  2. System Design: In this stage system engineers analyze and interpret the business of the proposed system by studying the user requirements document.

  3. Architecture Design: The baseline in selecting the architecture is that it should understand all which typically consists of the list of modules, brief functionality of each module, their interface relationships, dependencies, database tables, architecture diagrams, technology detail, etc. The integration testing model is carried out in a particular phase.

  4. Module Design: In the module design phase, the system breaks down into small modules. The detailed design of the modules is specified, which is known as Low-Level Design

  5. Coding Phase: After designing, the coding phase is started. Based on the requirements, a suitable programming language is decided. There are some guidelines and standards for coding. Before checking in the repository, the final build is optimized for better performance, and the code goes through many code reviews to check the performance.

Validation Phases of V-model:

  1. Unit Testing: In the V-Model, Unit Test Plans (UTPs) are developed during the module design phase. These UTPs are executed to eliminate errors at code level or unit level. A unit is the smallest entity which can independently exist, e.g., a program module. Unit testing verifies that the smallest entity can function correctly when isolated from the rest of the codes/ units.

  2. Integration Testing: Integration Test Plans are developed during the Architectural Design Phase. These tests verify that groups created and tested independently can coexist and communicate among themselves.

  3. System Testing: System Tests Plans are developed during System Design Phase. Unlike Unit and Integration Test Plans, System Tests Plans are composed by the client?s business team. System Test ensures that expectations from an application developer are met.

  4. Acceptance Testing: Acceptance testing is related to the business requirement analysis part. It includes testing the software product in user atmosphere. Acceptance tests reveal the compatibility problems with the different systems, which is available within the user atmosphere. It conjointly discovers the non-functional problems like load and performance defects within the real user atmosphere.

V-Model advantages :star_struck: :rocket:

  • This is a highly-disciplined model and Phases are completed one at a time.

  • Works well for smaller projects where requirements are very well understood.

  • Simple and easy to understand and use.

  • Easy to manage due to the rigidity of the model. Each phase has specific deliverables and a review process.

V-Model disadvantages :x: :smiling_face_with_tear:

  • High risk and uncertainty.

  • Not a good model for complex and object-oriented projects.

  • Poor model for long and ongoing projects.

  • Not suitable for the projects where requirements are at a moderate to high risk of changing.

  • Once an application is in the testing stage, it is difficult to go back and change a functionality.

  • No working software is produced until late during the life cycle.

5 Likes

G’Day @eliehannouch , :wave:

Super Duper happy, and inspired to see :star_struck: the progress you have made in the #100Days journey. :clap: I am motivated to do a second round :wink:

Apologies for being MIA, I am coming back after a long month of activities - World, vacations, and team offsites and catching up with everything I have missed. :sweat_smile:

I am sorry to hear you got sick and I hope you are feeling better now :green_heart:

I have an idea on our #100Days concept and I will reach out to you soon. Meanwhile, please continue your journey and keep inspiring others. :partying_face:

Have a great day ahead!

Cheers, :performing_arts:

4 Likes

Hello @henna.s :smiling_face_with_three_hearts:, thank you for your kind words :innocent:
From the beginning, I was inspired by your journey :partying_face:, and I’m always happy to take your ideas into consideration :fist:
Have a great & productive day.

3 Likes

100daysofcode - Day 37

Hello folks, our daily dose, of new knowledge is ready. Let’s wrap the 37/100 day in a funny and informative way. :smiling_face_with_three_hearts: :rocket: In yesterday post we talked about the V-model, it’s importance and when to implement it.
In today post we will dive in a new amazing concept which is the requirement engineering process. :star_struck::fist:

What is requirement engineering in simple terms :thinking:

  • It’s the process of defining, documenting, and maintaining requirements in the engineering design process. Requirement engineering provides the appropriate mechanism to understand what the customer desires, analyzing the need, and assessing feasibility, negotiating a reasonable solution, specifying the solution clearly, validating the specifications and managing the requirements as they are transformed into a working system. :muscle::boom:

What is the requirement engineering process :gear::sparkles:

  1. Feasibility Study

  2. Requirement Elicitation and Analysis

  3. Software Requirement Specification

  4. Software Requirement Validation

  5. Software Requirement Management


In today post, we will talk about the feasibility study and learn more about it :saluting_face:

What is the feasibility study ? :star_struck:

  • A feasibility study is an analysis that considers all of a project’s relevant factors, including economic, technical, legal, and scheduling considerations to ascertain the likelihood of completing the project successfully.

What are the types of the feasibility study ? :handshake:

  • Technical Feasibility - Technical feasibility evaluates the current technologies, which are needed to accomplish customer requirements within the time and budget.

  • Economic Feasibility - Economic feasibility decides whether the necessary software can generate financial profits for an organization.

  • Operational Feasibility - Operational feasibility assesses the range in which the required software performs a series of levels to solve business problems and customer requirements.


In tomorrow post, we will dive in the second phase of the requirement engineering process 🥳 😎
4 Likes

100daysofcode - Day 38

Hello friends a new day is here and some new knowledge are required to end our day in a successful way :star_struck:. In yesterday post, we discussed the requirement engineering process, it’s phases. :rocket::gear:. In today post we will talk about the next phase in this process: “The Requirement Elicitation and Analysis phase

What is the requirement elicitation & analysis phase ? :thinking:

  • Known as the gathering of requirements . Here, requirements are identified with the help of customers and existing systems processes, if available. Analysis of requirements starts with requirement elicitation. The requirements are analyzed to identify inconsistencies, defects, omission, etc. We describe requirements in terms of relationships and also resolve conflicts if any.

The process of the elicitation and analysis :gear:

    image

Elicitation and Analysis problems :thought_balloon: :x:

  • Getting all, and only, the right people involved.
  • Stakeholders often don’t know what they want
  • Stakeholders express requirements in their terms.
  • Stakeholders may have conflicting requirements.
  • Requirement change during the analysis process.
  • Organizational and political factors may influence system requirements.
5 Likes

100daysofcode - Day 39

Hello folks, the 39th day is here, and a new day equal some new knowledge & a lot of fun :partying_face:. In yesterday post we talked about the analysis phase, how it works and the problems that we may face. In today post we will talk about the SRS documents, (Software Requirement Specification), it content and why we develop such document. :rocket::star_struck:

What is the SRS document ? :thinking:

  • A software requirement specifications (SRS) document lists the requirements, expectations, design, and standards for a future project. These include the high-level business requirements dictating the goal of the project, end-user requirements and needs, and the product’s functionality in technical terms. To put it simply, an SRS provides a detailed description of how a software product should work and how your development team should make it work. :boom::fist:

Why use an SRS Document? :thought_balloon:

  • An SRS gives you a complete picture of your entire project. It provides a single source of truth that every team involved in development will follow. It is your plan of action and keeps all your teams, from development to maintenance, on the same page :smiling_face_with_three_hearts:

SRS document structure :gear: :sunglasses:

  A basic SRS document outline has four parts: an introduction, system and functional requirements, external interface requirements, and non-functional requirements.

  1. Introduction

    • Product scope: The scope :mag_right: should relate to the overall business goals of the product, which is especially important if multiple teams or contractors will have access to the document. List the benefits, objectives, and goals intended for the product. :muscle:

    • Product value: Why is your product important? How will it help your intended audience? What function will it serve, or what problem will it solve? Ask yourself how your audience will find value in the product.

    • Intended audience: Describe your ideal audience. They will dictate the look and feel of your product and how you market it.

    • Intended use: Imagine how your audience will use your product. List the functions you provide and all the possible ways your audience can use your product depending on their role. It’s also good practice to include use cases to illustrate your vision.

  2. System requirements and functional requirements
    Example:

    • If/then behaviors
    • Data handling logic
    • System workflows
    • Transaction handling
    • Administrative functions
    • Regulatory and compliance needs
    • Performance requirements
  3. External interface requirements
    Functional requirements that ensure the system will communicate properly with external components, such as:

    • User interfaces: The key to application usability that includes content presentation, application navigation, and user assistance, among other components.

    • Communication interfaces: The requirements for the communication functions your product will use, like emails or embedded forms.

    • Software interfaces: The connections between your product and other software components, including databases, libraries, and operating systems.

    • Hardware interfaces: The characteristics of each interface between the software and hardware components of the system, such as supported device types and communication protocols.
  4. Non-functional requirements (NRFs)
    The final section of your SRS details non-functional requirements. While functional requirements tell a system what to do, non-functional requirements (NFRs) determine how your system will implement these features.

    The most common types of NFRs are called the ‘Itys’. They are:

    • Security: What’s needed to ensure any sensitive information your software collects from users is protected.

    • Capacity: Your product’s current and future storage needs, including a plan for how your system will scale up for increasing volume demands.

    • Maintainability: How your application should use continuous integration so you can quickly deploy features and bug fixes.

    • Usability: How easy it is to use the product.

    • Compatibility: The minimum hardware requirements for your software, such as support for operating systems and their versions.

    • Reliability and availability: How often you expect users to be using your software and what the critical failure time is under normal usage.

    • Scalability: The highest workloads under which your system will still perform as expected.

5 Likes

100daysofcode - Day 40

Hello friends, the 40th/100 day is reaching the end. Let’s make this ending a happy and informative one by learning some new informations. In yesterday post we discussed the SRS document, and it’s building blocks. In today post we will talk about the Software Requirement validation to learn more about it.

What is the software requirement validation ? :thinking: :thought_balloon:

  • It’s the process of checking that requirements defined for development, define the system that the customer really wants . It’s concerned with finding problems with the requirements. These problems can lead to extensive rework costs when they are discovered in the later stages, or after the system is in service. :hugs::sunglasses:

Requirement Checks steps :handshake::boom:

  1. Validity checks : The functions proposed by stakeholders should be aligned with what the system needs to perform. You may find later that there are additional or different functions are required instead.

  2. Consistency checks : Requirements in the document shouldn’t conflict or different descriptions of the same function

  3. Completeness checks : The document should include all the requirements and constraints.

  4. Realism checks : Ensure the requirements can actually be implemented using the knowledge of existing technology, the budget, schedule, etc.

  5. Verifiability : Requirements should be written so that they can be tested. This means you should be able to write a set of tests that demonstrate that the system meets the specified requirements.

Requirements Validation Techniques :gear::partying_face:

  • Requirements reviews/inspections: systematic manual analysis of the requirements.

  • Prototyping: Using an executable model of the system to check requirements.

  • Test-case generation: Developing tests for requirements to check testability.

  • Automated consistency analysis: checking for the consistency of structured requirements descriptions.

5 Likes

100daysofcode - Day 41

Hello folks, the 41/100 day of this amazing journey is done. Let’s learn some new stuffs and wrap the day in an amazing day :heart::star_struck:. Let’s learn something new and continue our learning streak in a funny way.

In yesterday post, we talked about software requirement validation process, techniques and more. In today post we will talk about risk management in software engineering.

What is risk management ? :thinking:

  • Risk management is the process of identifying, assessing and controlling threats to an organization’s capital and earnings. These risks stem from a variety of sources including financial uncertainties, legal liabilities, technology issues, strategic management errors, accidents and natural disasters. :boom::sunglasses:

Risk Management classifications :gear::innocent:

  1. Project risks: Project risks concern differ forms of budgetary, schedule, personnel, resource, and customer-related problems. A vital project risk is schedule slippage. Since the software is intangible, it is very tough to monitor and control a software project. It is very tough to control something which cannot be identified.

  2. Technical risks: Technical risks concern potential method, implementation, interfacing, testing, and maintenance issue. It also consists of an ambiguous specification, incomplete specification, changing specification, technical uncertainty, and technical obsolescence. Most technical risks appear due to the development team’s insufficient knowledge about the project.

  3. Business risks: This type of risks contain risks of building an excellent product that no one need, losing budgetary or personnel commitments, etc.

Risk Management benefits :white_check_mark:

  • Improved workplace safety and security for employees and customers
  • Competitive differentiator in the marketplace.
  • Increased awareness of risk across the organization
  • More confidence in organizational objectives and goals because risk is factored into strategy;
  • Better and more efficient compliance with regulatory and internal compliance mandates because compliance is coordinated;
  • Improved operational efficiency through more consistent application of risk processes and control;
4 Likes

100daysofcode - Day 42

Hello friends, a new day is already here and some new informations are required to complete our daily knowledge dose. In yesterday post I talked about the risk management, it’s classifications and the benefits of making a good management process.
In today post we will dive together in how to define the project tasks, so they can be managed in a good way without facing any problem or stucking in any conflict.

What is a project task :boom::thinking:

  • In project management, a task is an activity that needs to be accomplished within a defined period of time or by a deadline to work towards work-related goals.

Tips for transforming the project requirements to a set of workable tasks :white_check_mark::partying_face:

  1. Define project tasks in one or two sentences

    • When writing descriptions of project tasks, keep them to one or two sentences long. If you find that a certain task description needs to be longer than one or two sentences, this indicates that the task is complex and could be broken down into smaller tasks or that it may need further clarification.
  2. Look at project task dependencies :eyes:

    • When looking at how you might break certain parts of the project down into tasks, consider task dependencies, or what has to be completed or handed off from one person to another before work on each task can begin. Identifying dependencies can help you decide how much a task needs to be broken down. For instance, if you are managing a project that includes an awards ceremony and one of the tasks is to set up the stage, the dependencies for this task could include getting estimates from an audiovisual (AV) contractor, procuring necessary equipment, and constructing the stage backdrop.


  1. Enlist help from team members :couple:

    • It is often helpful for your team to be involved in the task breakdown process. You might have a meeting where you discuss each broad goal or major task with the team. This way, team members can present varying perspectives as they work together to break down tasks. For example, if someone on your team has had experience on a similar project, they may suggest a certain task actually be broken down into three different tasks.
  2. Define project tasks by the amount of time they will take to complete :saluting_face::hugs:

    • Defining project tasks by the amount of time they’re expected to take will reveal any especially lengthy tasks. If a task is expected to take a long time, it could indicate that there are additional subtasks that need to be defined. Identifying tasks by time is helpful for scheduling other tasks or events around the longer tasks. This strategy also helps you determine appropriate milestones, as milestones are often the culmination of a series of tasks. Acknowledging the completion of a large and lengthy task is also a great way to celebrate success, learn from the process, and keep the project on track.
  3. Identify project tasks by their “done :white_check_mark:” factors

    • Begin with the end in mind: What does it mean for the task to be considered “done”? From there, you can work backwards to see if you’ve missed any steps and identify checkpoints for completion along the way.
4 Likes

100daysofcode - Day 43

Hello folks, the 43th day is here, let’s learn some new stuffs and wrap the day in an amazing way. :partying_face:
In yesterday post we explored the process to define projects tasks. In today post we will explore the different Quality management concepts. :fist::smiling_face_with_three_hearts:

What does the Quality term means ? :thinking:

  • Quality is when the outlined requirements for the deliverable are fulfilled and meet or exceed the needs and expectations of customers.

Quality management concepts :star_struck: :eyes:

  1. Quality standards: provide requirements, specifications, or guidelines that can be used to ensure that products, processes, or services are fit for achieving the desired outcome.
    These standards must be met in order for the product, process, or service to be considered successful by the organization and the customer. You will set quality standards with your team and your customer at the beginning of your project. Well-defined standards lead to less rework and schedule delays throughout your project.

  2. Quality planning: involves the actions of you or your team to establish and conduct a process for identifying and determining exactly which standards of quality are relevant to the project as a whole and how to satisfy them. During this process, you’ll plan the procedures to achieve the quality standards for your project.

  1. Quality assurance, or QA: is a review process that evaluates whether the project is moving toward delivering a high-quality service or product. It includes regular audits to confirm that everything is going to plan and that the necessary procedures are being followed. Quality assurance helps you make sure that you and your customers are getting the exact product you contracted for.

  2. Quality control, or QC:, involves monitoring project results and delivery to determine if they are meeting desired results. It includes the techniques that are used to ensure quality standards are maintained when a problem is identified. Quality control is a subset of quality assurance activities. While QA seeks to prevent defects before they occur, QC aims to identify defects after they have happened and also entails taking corrective action to resolve these issues.

4 Likes

100daysofcode - Day 44

Hello friends, a new day is here the 44th/100, lets learn some new amazing concepts in the field of project management, a booming :boom: field, and skills that can be applied in any type of projects.
In yesterday post, we talked about quality management concepts and how they differ. In today post, we will talk about the best way to manage project resources to get the job done in a smooth way :smiling_face_with_three_hearts::muscle:

What are the project resources ? :thinking:

  • Project resources are who and what you depend on to complete a project, including budget, materials, and people. While each resource is a separate entity, they all depend on one another—your team cannot do the work without materials, and you cannot purchase materials without a budget.

Budget :dollar::moneybag:

  • Have you ever created a budget for yourself or your family? If you have, you know that a budget includes a wide variety of expenses. For example, a monthly personal budget can contain items that include anything from food to transportation costs to rent. With only a certain amount of funding to cover each expense, it is important to closely monitor your spending to avoid going over budget. If you go over in one category of your budget, you will impact the others and will need to make adjustments. As a project manager, you will take the same general approach with your project budget.

    Common aspects of your project budget will include:

    • Team: the cost of the people performing the work :couple:

    • Services: any outside vendors helping your project :gear:

    • Materials: any tangible items purchased to complete the project :face_holding_back_tears:

    Throughout your project management career, you will encounter various types of projects with a wide range of budgets. Some budgets will have no :x: margin for error, whereas other budgets may be more flexible. Regardless of this variability, budget issues will inevitably arise, so it is important to make sure that the budget is aligned with the project scope and the stakeholders’ asks.

People :woman_technologist::man_technologist:

  • People :two_men_holding_hands: are a vital resource on your project; you cannot complete your project on your own! You will need to rely on a strong team of people with a variety of skill sets and specialties to get the job done. As a project manager, make sure that you have commitment and buy-in on the number of hours it will take for your resources to complete their tasks. Additionally, you will find the best partners on a project are people who are aligned to the goals of the project or who are most interested in the project’s work.

Materials :cd: :floppy_disk: :books:

  • Materials can be different on every project. For example, if you were working on an IT project, materials could include hard drives and computers to handle the coding efforts. You can also have materials that are intangible. For example, on the same IT project, online storage, software programs, or employee training may also be considered materials. It is important to account for any and all potential materials in order to execute a successful project with the right people and within budget.
5 Likes

100daysofcode - Day 45

Hello friends, moving in this amazing journey. We reached the 45th/100 of this amazing journey. Yesterday post we talked about project resources and how we can manage them in an effective way. I today post we will explore more, how we can overcome budgeting challenges in a running project.

Challenge 1: Budget pre-allocation :rocket:

  • You may encounter situations where your budget is already set before you even start the project. This is known as budget pre-allocation. Some organizations follow strict budgeting cycles, which can lead to cost estimations taking place before the scope of the project is completely defined.

  • If you are given a pre-allocated budget, it is important to work with your customer to set expectations on scope and deliverables within the allocated budget. To deliver a great product within your allocated budget will require detailed planning. :sob:

  • A pre-allocated budget should also be routinely monitored to ensure the amounts you have budgeted are sufficient to meet your costs. Be sure to carefully track all expenses in your budget. Regularly match these expenses against your pre-allocated budget to ensure you have sufficient funds for the remainder of your project.:face_holding_back_tears::smiling_face_with_tear:

  • Part of that planning includes making sure that you are tracking fixed and time- and materials-based expenses. Fixed contracts are usually paid for when certain milestones are reached. Time and materials contracts are usually paid for monthly, based on the hours worked and other fees associated with the work, such as travel and meal expenses. :innocent:

Challenge 2: Inaccurately calculating TCO :boom:

  • Another budgeting pitfall you should try to avoid is underestimating the total cost of ownership (TCO) for project resources. TCO takes into account multiple elements that contribute to the cost of an item.
    It factors in the expenses associated with a product or service over its lifetime, rather than just upfront costs. :v:

  • Let’s relate TCO to something more common, like owning a vehicle. Let’s say you buy a vehicle for a certain price, but then you also pay for things related to the vehicle, such as license fees, registration fees, and maintenance. If you add all of this up, you have your TCO for that vehicle. So now that you know what your TCO is, you may consider those fees before you buy your next vehicle. For example, you might opt for a vehicle with fewer maintenance requirements than one that requires more frequent service, since you know that will save you money overall.

  • The same concept applies to budgeting on a project. If you have a service requirement for a software technology that your team is using, for example, then it is important to budget for the costs of maintenance for that service. Additional types of costs you may need to account for when calculating TCO include warranties, supplies, required add-on costs, and upgrade costs.

Challenge 3: Scope creep :smiling_face_with_tear:

  • Scope creep is when changes, growth, and other factors affect the project’s scope at any point after the project begins. Scope creep causes additional work that wasn’t planned for, so scope creep can also impact your budget.
    There are several factors that can lead to scope creep, such as:
    • A vague Statement of Work (SoW)

    • Conversations and agreements about the project that aren’t officially documented

    • Unattainable timeframes and deadlines

    • Last-minute asks from priority stakeholders

Addressing these factors as you plan your project can help prevent scope creep from impacting your budget.

4 Likes

100daysofcode - Day 46

Hello friends, a new day is on the counter, and a new dose of knowledge is ready. In yesterday post we talked about the different budgeting challenges, and how overcome them. :hugs: In today post we will talk about the scope negotiation process with the stack-holders and why we need to follow such process. :rocket::boom:

Negotiating scope with stakeholders :face_holding_back_tears:

  • Even after you’ve established the project’s scope, some stakeholders may want to discuss adjusting it. They may feel that the project’s current scope will require too much work with too few resources, that the timeline isn’t realistic given the scope, or that the project requires additional tasks and objectives. When your stakeholders ask to revisit a project’s scope, you should meet with them so they can raise their concerns. Knowing how to effectively facilitate scope negotiations will allow you to reach solutions that are suitable for everyone.

Tips for navigating scope with stakeholders :thinking::star_struck:

  • Understand motivations: Before your discussion, consider each stakeholder’s motivations for wanting to adjust the project’s scope. Some of those motivations are budgetary (such as wanting to reduce the project’s costs :moneybag:), some are interpersonal (such as wanting more time to complete tasks :spiral_calendar:), and some are related to personal career goals (such as maintaining their current position or striving for a promotion :construction_worker_woman:).
    Understanding your stakeholders’ motivations can help you work together to find a compromise. :partying_face:

  • Set the scene: Start the discussion with a reflection on why you are meeting. Remind your stakeholders why you are engaged in this project, and assure them that you all share a common goal. :sparkler:

  • Listen first: Hear what your stakeholders have to say before you present your views. This will demonstrate your desire to understand the other party’s perspective. Acknowledging their point of view may make it easier for them to accept your suggestions or solutions when their ideas or opinions differ from yours. :headphones::hear_with_hearing_aid:

  • Ask questions :question: to define goals: :goal_net: Be thorough and ask as many questions as you feel necessary to understand what the stakeholder wants. This might include getting them to define their customer or business goals. Strive for getting specific, measurable details from your stakeholders, so that later, you’ll be able to determine whether you’ve successfully met their goals. Eliciting language that is measurable (rather than subjective or unclear) will help you define goals. An example of a specific, measurable goal could be: “We want to cut the amount of time it takes customers to sign up for our newsletter by at least 30 percent.”

  • Explain the “why” before the “what” When attempting to persuade stakeholders—or anyone, for that matter—to see things your way, explain the reasons for your request before describing what you want. For instance, start by explaining the value that could be added to your company or project by defining scope in a certain way. If stakeholders understand where you’re coming from first, they’re more likely to grant your request when you ask for it.

  • Do not oversell: :persevere: Sometimes it’s best to state your case and give others some time to respond. After you have presented your reasons, position, and request, withdraw slightly to give your audience time to process what you have said. Think of your silence, in this situation, as a sign of respect for your stakeholders; it shows them you want to hear from them. And, if they are quiet for a while, it means that you have stimulated thought.

  • Be creative: Working to find alternative solutions can quickly turn a heavy negotiation into an inspiring team effort. To find real solutions to negotiation stalemates, think creatively about all the aspects of the project. You may find that there is more than one solution to differing opinions. :man_artist:

  • Do not make it personal: Always focus on what is good for the project. If personal considerations enter into the discussion, reframe the conversation by bringing up objective facts. :palms_up_together:

  • Seek a win-win outcome: Finally, consider what it will take for the other side to be satisfied. Then, try to identify a way to ensure you are satisfied as well. There will be times when one party may have to compromise more than the other, but a mutually beneficial agreement (an agreement that benefits all parties involved) should always be the goal. The next reading will cover strategies for achieving mutually beneficial agreements with stakeholders :trophy::1st_place_medal:

4 Likes

100daysofcode - Day 47

Hello friends, my daily knowledge dose is ready. The 47th / 100 day is already here. In yesterday post we talked about the negotiation with the stack-holders, and how to proceed in such process. In today post we will talk about the different metrics in project management.

Milestone :fist:

  • A milestone is a productivity metric. Milestones are important points within the project schedule that indicate progress and often signify when a team completes a deliverable or phase of the project.

  • Example: A project manager might use a tool like Smart sheet to visualize where milestones fall within a project timeline.

Task :v:

  • A task is a productivity metric. Project managers assign tasks to project team members for them to accomplish within a set period of time.

  • Example: Work management software like Asana can help project managers create and assign tasks. They can also generate reports to track their team’s productivity over time.

Projection :innocent:

  • A projection is a productivity metric. This metric helps you analyze current information to predict future outcomes.

  • Example: A project manager might use a spreadsheet and its built-in charting tools to analyze current productivity data and make projections about future productivity trends.

Duration :hourglass:

  • Duration is a productivity metric. A project’s duration is the total time it takes to complete a project from start to finish. Duration can also be used for tasks.

  • Example: Project management software can help project managers monitor the duration of a project alongside certain milestones.

Number of changes :pencil2:

  • Number of changes is a quality metric. Changes show any inconsistencies from the initial requirements of the project.

  • Example: A project manager might use a tool like a change log or a spreadsheet to measure the number of changes from stakeholders and look for areas to improve communication.

Issue :boom:

  • An issue is a quality metric and is known as a real problem that may affect the ability to complete a task.

  • Example: Project management software like Jira and Work-front can generate reports that help project managers track both the number of issues and the team’s ability to resolve them quickly.

Cost variance :moneybag:

  • Cost variance is a quality metric and illustrates the difference between the actual cost and the budgeted cost.

  • Example: A budgeting spreadsheet can help a project manager log costs over time and compare them against the actual budget.

5 Likes

100daysofcode - Day 48

Hello friends, counter++ and the 48th day is already here. In yesterday post we talked about the different metrics in project management. In today post we will learn more on how to introduce new tools to the team.

Introducing new tools to a team :gear:

  • As a project manager, it is important to be open to implementing new tools that may be beneficial to a project’s outcome. You will experience change in lots of forms throughout your project’s life cycle, and navigating change is essential. But if you choose to implement a tool that your team is unfamiliar with—especially if you decide to roll it out midway through a project—your team may be hesitant. People embrace change differently, particularly if the change will directly impact their routine and the way they work. Simply put: Change can be met with resistance. :boom::hugs:

  • Before you introduce a new tool to your team, you should be sure that this change is actually going to benefit the project, and ensure that those involved in your project understand the benefits of this change. Demonstrating to your teammates and stakeholders that you understand the tool and have evaluated its competency will help build trust, especially if this new tool is replacing an existing tool. Taking the time to introduce the new tool to your team members will also demonstrate that you have the best interest of the team in mind—not just the success of the project. :fist::star_struck:

Important considerations and keys :key: to successfully introducing :new: tools :blush:

  • Discuss the tool early and often, if possible: The team should not feel blindsided by a new change. Make sure they know the change is coming as early as possible. This will help them prepare for an introduction or migration to the new tool. :speaking_head::studio_microphone:

  • Ask for feedback from key stakeholders: You could get great feedback on features that you may have overlooked without asking for their expertise. You can solicit this feedback by requesting their input about functionality or have them list features in order of priority. The key is to create an opportunity for stakeholders to provide their feedback and allow you to incorporate their feedback into next steps. :man_artist:

  • Involve the key stakeholders in demonstrations as you get closer to making the final decision on the project tracking tool. You will be able to leverage key stakeholders’ acceptance by letting them test the product or sign up for a trial run. It is also important to make sure that the tool is actually going to meet the mark and provide a meaningful change for the project. You may want to pull in key users from your team to test and familiarize themselves with the tool prior to rolling it out. This will allow the team to get on board with your plans or discuss their concerns beforehand. This will also highlight in-house experts for future training, assistance, and implementation. :mag::gear:

  • Ensure the tool is fully functional before the team is introduced to it: Whenever possible, hold off from introducing the tool if it still has any issues. Make sure the tool is accessible for all users. Keep in mind, your team members may resist a tool that doesn’t live up to how it is supposed to function. This will impact implementation and acceptance fairly significantly, so put your best tool forward! :white_check_mark:

  • Set up training for the tool as needed before you ask the team to actually use it: Everyone has different levels of comfort with different tools. It is your job as the project manager to ensure that each team members’ needs are addressed. Setting up training also helps create positive first impressions, which will lead to higher productivity and quicker, more successful implementation and acceptance. :woman_technologist::man_technologist:

5 Likes

100daysofcode - Day 49

Hello friends, day++ and the 49th/100 is already here. We are so close to the middle of this amazing adventure. As everyday we will learn something new and discover more interesting topics in this e-world.

In today post we will explore how a project manager can handle an effective communication plan, to run the project in a smooth way.

Communication :telephone_receiver: :speech_balloon:

  • Communication is the key :key: to any successful :white_check_mark: project. As a project manager, you are central to that communication, which is an ongoing process throughout the life cycle of a project. A good project manager must be effective in communicating with all stakeholders and team members through various mediums.

Tips for effective communication :frowning_woman: :speaking_head: :pouting_man:

You can encourage open, inclusive communication by:

  • Not making assumptions about your audience’s backgrounds, identities, or experiences.

  • Being mindful of your own biases.

  • Using appropriate, professional, and neutral language.

  • Including, respecting, and being curious about diverse points of view.

As the project manager, you will undoubtedly work with a diverse group of team members and stakeholders on each project. You will need to understand each team member’s background, experiences, perspectives, and biases—as well as your own—to communicate effectively.

Communicate the right message by thinking about your intended audience. With whom are you communicating? In your communications, always be clear about your reasons for reaching out:

  • What channels can your audience use to contact you or the team?
  • Are you conveying information?
  • Are you asking for input?
  • Are you clarifying an issue?
  • Are you resolving a problem?

Some team members may require detailed information, while others may only need an overview of the situation. No matter your audience, you should be sure to identify the purpose of the message, state the information or request clearly and concisely, and stay on topic.

As you craft your message, think about which methods are available and appropriate for communicating with various members of your team, whether that is in person, in a video conference, over the phone, via email, or in a meeting. Choosing the right method is especially important if you have team members or stakeholders in different regions and time zones. Also, be sure to:

  • Avoid including any sensitive or potentially private information.
  • Assume everyone at the company will receive the communication.

Communication doesn’t end when you deliver your message, so be sure to follow up with your audience by:

  • Checking to make sure your message was clear.
  • Asking them for feedback.
  • Encouraging open communication.
  • Responding to questions quickly.

In this final step, you will obtain feedback from your audience to ensure that your message was received as you intended.

5 Likes

100daysofcode - Day 50

Hello friends, Today is a special one the first half is wrapped successfully after reaching the 50th/100. Im so happy and motivated to continue this learning journey and sharing my gained knowledge with this amazing community. In today post we will talk about the best practices to set a milestone in our project. :boom::star_struck:

Project Task :vs: Project Milestone :thinking:

  • Project task: is an activity that needs to be accomplished within a set period of time and is assigned to one or more individuals for completion. The work of a project is broken down into many different project tasks.

  • Project milestone: is an important point within the project schedule that usually signifies the completion of a major deliverable. Milestones are significant checkpoints in your project, and keeping track of them helps ensure that your project is on schedule to meet its goals.

Set tasks to identify milestones :v:

Setting tasks can help you clearly define milestones. You can do this in two ways:

  1. Top-down scheduling: In this approach, the project manager lays out the higher-level milestones, then works to break down the effort into project tasks. The project manager works with their team to ensure that all tasks are captured. :top: :hugs:

  2. Bottom-up scheduling: In this approach, the project manager looks at all of the individual tasks that need to be completed and then rolls those tasks into manageable chunks that lead to a milestone.
    Most projects have many tasks that lead to milestones. For instance, if your milestone is to receive approval on the first draft of an article that you are writing, you might complete tasks such as “develop outline,” “write first draft,” and “send to the editor.” Then, you may have another set of tasks to achieve before reaching the milestone of revising the article. Milestones serve as check-in points along your project to make sure that you are headed in the right direction toward the end goal. Milestones also make projects more manageable. :arrow_down::sunglasses:

Integrate milestones into your project schedule :handshake: :muscle:

  • There is not a consistent number :1234: of milestones in every project. Some projects will have a few milestones, while others may have dozens. Rather than aiming to hit a certain number of milestones, try to set milestones for the most important events in your project. Review your project schedule and identify important moments or checkpoints. In other words, pinpoint where in your project you will achieve major goals :goal_net: :soccer: and make those points your milestones.

Milestone-setting pitfalls :rocket::face_with_monocle:

Here are some things to avoid when setting milestones:

  • Don’t :x: set too many milestones. When there are too many milestones, their importance is downplayed. And, if milestones are too small or too specific, you may end up with too many, making the project look much bigger than it really is to your team and stakeholders.

  • Don’t :x: mistake tasks for milestones. Remember that milestones should represent moments in time, and in order to map out how you will get to those moments, you need to assign smaller tasks to each milestone.

  • Don’t :x: list your milestones and tasks separately. Make sure that tasks and milestones can be visualized together in one place, such as a project plan. This will help ensure that you are hitting your deadlines and milestones.

4 Likes

100daysofcode - Day 51

Hello friends, the first day in our second half is already here, and some special content should be delivered to wrap it in an amazing way. In yesterday post we discussed the best practices to set a milestone in a running project. Today we will explore the influencer change framework.

What does it mean to be an influencer? :muscle: :innocent:

  • These days, when we hear the word influencer, some might think of social media stardom. But being an influencer is bigger than getting “likes”—it is about someone’s ability to lead and influence others to change their behaviors, hearts, and minds to produce meaningful, sustainable results. As a project manager, you will be asked to lead efforts that require this level of change, and applying this model can lead to a big impact.

  • To influence is different than to persuade. Persuasion is short-term, while influence is lasting. In order to have real influence, you need others to trust you, consider you an authority, and have confidence in your decisions. As a project manager in Agile projects, you may use influence to facilitate organizational change or to get a team to try a new tool, process, or technology. When facilitating organizational change, influence is the difference between temporary changes in behavior and deep change in culture and values.

Three keys :key: to influence :star_struck:

  • The :three: three keys to influence, as researched by the authors of this model, are to clarify measurable results, find vital behaviors, and use the six sources of influence. Let’s break each of these down.

Clarify measurable results :straight_ruler:

  • You can’t influence others to change until you know what you want, why you want it, and when you want it. You may recall that effective results are specific, measurable, achievable, relevant, and time-bound (S.M.A.R.T). When setting goals for a project, remember to ask yourself what the “why” entails. Are the results specific and measurable? Is it what you intended? Is it time-bound? Also, make sure the measures are visible and transparent to the entire team throughout the change.

Find vital behaviors :thinking::rocket:

  • A vital behavior is the action an individual takes at a pivotal moment in the context of the change they are seeking. For example, if a member of the Development Team is seeking to increase involvement of the Product Owner throughout the development process, they might exhibit a vital behavior when they have just finished mocking up a new feature. Instead of just continuing on to the next item on their to-do list, they might send an email to the Product Owner to review their work and provide feedback. By choosing to include or exclude their Product Owner at a pivotal moment, the developer is taking a small action to enact the change they want to create.

  • As we have discussed, real change happens when you can change the behaviors of others. Whether you are changing the minds of your team, stakeholders, or customers, it is important to track their current behavior patterns and understand the behaviors you need them to adopt in order to make the change you are seeking.

  • To determine vital behaviors, you might consult experts, scan the best and most-cited articles and research, or perform a culture assessment by identifying norms and customs within the team. When identifying the behaviors, evaluate which behaviors are constructive to the change you wish to promote and notice examples of those who succeed where most others fail.

Use the six :six: sources of influence :white_check_mark:

  1. Personal motivation: Are the individuals motivated internally to engage in the new behavior? Can you help them “love what they hate”? Example: Ensure the Product Owner is timely, appreciative, and effective while giving their feedback. :pouting_man:

  2. Personal ability: Are the individuals capable of performing the behavior? Do they have the ability, knowledge, and skills to “do what they can’t”? Example: Ensure that the developer knows how to use the available demo tools and can easily send a quick video of the new feature in their email to the Product Owner.

  3. Social motivation: Are there social contacts or networks encouraging or discouraging this new behavior? Example: Have the Development Team members remind each other in the Daily Scrum to email the Product Owner before they finalize the work.

  4. Social ability: Does the team have resources within their social network to help them carry out the new behaviors? Example: Give the Development Team a tool to track all of their demos to the Product Owner during the Sprint.

  5. Structural motivation: Are there rewards or incentives that they will receive if they perform the new behaviors? Example: Provide a coffee gift card Sprint award that the Product Owner gets to award after each Sprint.

  6. Structural ability: Are there environmental factors at play that either deter or support the new behavior? Can you make the incorrect behavior harder to do than the correct behavior? Example: Add a rule to the content management system that pre-populates the name of the Product Owner in the reviewer list.

4 Likes

100daysofcode - Day 52

Hello friends, the 52/100 is already here. The daily counter is increasing and with each new increment some new knowledge are required. In yesterday post we talked about the influencer change framework, in today post we will explore the three-point estimating technique. :star_struck: :hugs: :rocket:

The three-point ❸ estimating technique :grin:

  • Estimating is a crucial aspect of project management. Project managers are expected to accurately estimate essential elements of the project, such as costs, scope, and time. There are many different estimation techniques that can be used, depending on what aspect of the project needs an estimate. Estimation techniques allow project managers to provide better forecasts to stakeholders and clients and more accurately budget the funds and resources they need for project success. :smiling_face_with_three_hearts: :handshake:

  • The three-point estimating technique can be used to help determine the most realistic time estimate for a task. It uses optimistic, pessimistic, and most likely calculations, meaning calculations are based on the “best case :white_check_mark: :hugs: ” (optimistic), “worst case :sob: :boom:” (pessimistic), and most probable scenarios.

Three-point estimation

  • In this technique, each task receives three estimates: optimistic, most likely, and pessimistic. Each of these three estimates is then associated with the corresponding amount of time that task is expected to take.

Estimating ? :thinking:

  • For each task, add a duration estimate in each category: optimistic, most likely, and pessimistic. You can get these estimates by doing research on the task or by asking a task expert. As a best practice, add notes about the conditions that determine each estimate.

Three-point estimation formulas :abacus:

  • Some projects will require you to calculate specific numeric values for task time estimates. There are many online resources that provide more instruction for how to calculate estimates, but we’ve provided two popular formulas: the Triangular Distribution and the Beta (PERT) Distribution.
    For each formula: E is Estimate (the final estimate you’ll assign to the task), o = optimistic estimate, p = pessimistic estimate, and m = most likely estimate.

The Triangular Distribution:small_red_triangle:

  • The weight of each estimate in this equation is identical, which means the most likely case does not affect the final estimate more than the optimistic or pessimistic estimates.

The Beta (PERT) Distribution :face_with_monocle:

  • The Beta (PERT) distribution is a weighted average. The most likely estimate receives a multiplier of four, while the overall divisor is increased to six.
    This method takes into account that the most likely case is more likely to occur, so it’s given more weight. The added weight is reflected in the multiplier of four.
    Placing more weight on the most likely estimate increases the accuracy of the estimate. In most cases, the Beta (PERT) Distribution has been proven to be more accurate than three-point estimating and is often used to calculate both cost and time estimates.

4 Likes