Hi, Finally I made it here to my first post for #100DaysOfCode wherein I am glad to share my 100 days of leaning and this day seems to be my Day_1.
I will be sharing a few of learnings throughout the day. Let’s begin this and would love to have more insights about the same!!
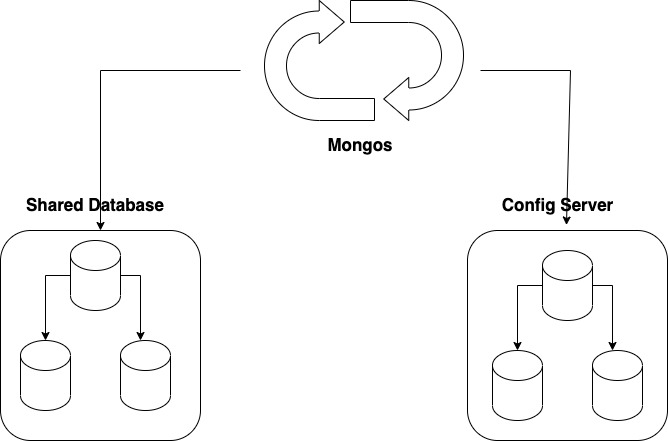
Beginning to discuss about sharding, Sharding is a method of distributing data as chunks across various servers and clusters using a key known as Shard key which is common to all the chunks of data. It is a way for horizontal scaling.
Architecture of Sharded Cluster
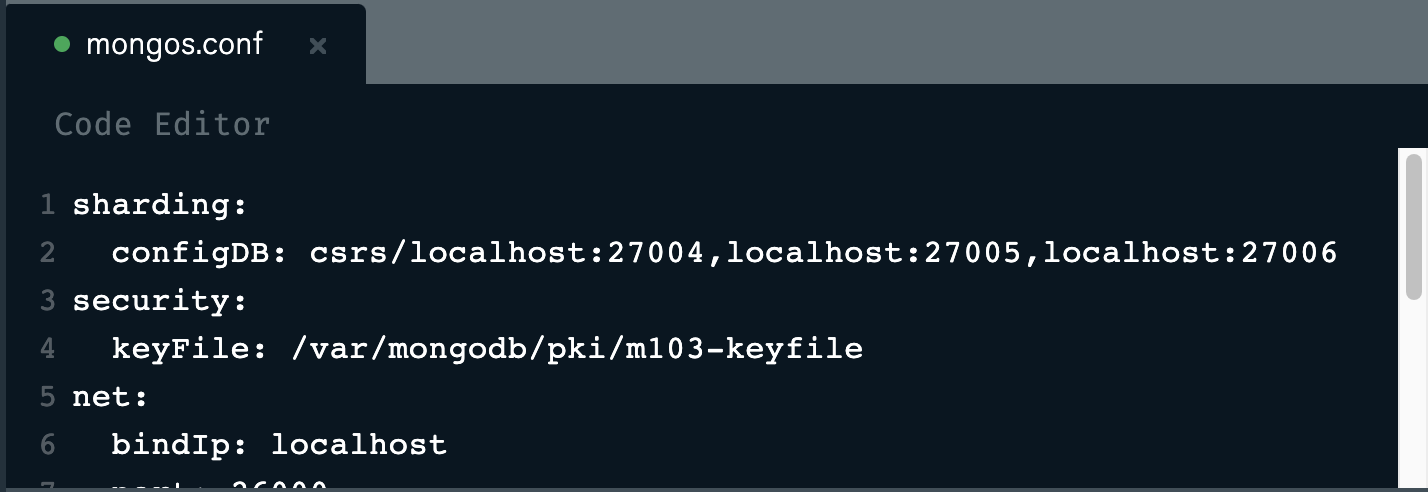
After you understand the architecture:
your configuration file should contain the path for config database as:
Once all is set, you can view the architecture being set up here:
--- Sharding Status ---
  sharding version: {
        "_id" : 1,
        "minCompatibleVersion" : 5,
        "currentVersion" : 6,
        "clusterId" : ObjectId("621f583d9f07f427acd036e8")
  }
  shards:
        {  "_id" : "shard1",  "host" : "shard1/localhost:27001,localhost:27002,localhost:27003",  "state" : 1 }
  active mongoses:
        "4.0.5" : 1
  autosplit:
        Currently enabled: yes
  balancer:
        Currently enabled:  yes
        Currently running:  no
        Failed balancer rounds in last 5 attempts:  0
        Migration Results for the last 24 hours:
                No recent migrations
  databases:
        {  "_id" : "config",  "primary" : "config",  "partitioned" : true }

mongos
Making the right choice to select the shard key in order to make out queries optimised and more efficient. So here are a few points to remember about it:
I started with the basics of aggregation concepts and came across some amazing which makes life easier.
Theoretically, aggregation is based out of pipeline concept where output of one stage(series of query/operations) becomes input for the second stage of the pipeline and so on…
Aggregation have proved to be widely and immensely used in the real time analytics, Big Data, part of Transformation of the ETL process and various other applications etc.
The syntax and structure of an aggregation pipelines db.<collection_name>.aggregate( [ { stage_1}, { stage 2}, { ... }, ...., { stage N} ] )
Beginning here with aggregation operators which has
$match and $project
where $match should make it at the beginning of the the aggregation where one can take the advantage of indexes. Below is an example to showcase the usage of $match and $project operators:
A few stages known as cursor stage allows you to calculate, process and evaluate data as per your requirements. The aggregation give you a full freedom to perform operations without having to change the schema of the database.
Sharing a query which helped to find a data from a big collection to figure out the avg max temp in 1000 cities.
I shared a very basic of the aggregation as I understand and I am sure there is more to it too and will keep posting about my learning and challenges while learning the aggregation framework better.
Here are a few challenges I faced while making the pipelines:
Understand the schema of the collection.
Understanding the usage of project and applying calculations and operation on the data.
Choosing the correct fields to apply the operations on.
The approach I followed to overcome this are:
Performing right operation on right schema definition,
optimising the aggregation pipelines using different operators and syntax.
Please feel free to add your challenges in learning aggregation and any comments and reviews would be appreciated.
The $project stage of aggregation is confusing yet very use pipeline step while we wish to query data in a specific manner. On one hand where $project allows us to figure which fields to include and exclude it however seems to be extremely confusing and inflexible at the same time.
Later in the 4.2 version of MongoDB, $set and $unset version was introduced which lead me into the ambiguity to use $set/$unset or $project operation.
The $set and $unset can be used when you require a minimal change in the output documents where as $project is recommended to be used when you need more changes in the output document than the input fields.
Consider the following dataset to understand the usage of $set and $unset
A little away from Aggregations today, will be sharing an example for a simple spring boot MVC architecture example, which tries to connect to MongoDB Atlas using a certificate(say X.509 Certificate)
The MongoDB Atlas provides the scope for deploying and managing the database to build global applications on major cloud providers.
Hence, creating a cluster over say AWS, and it will allow you to perform CRUD operations on the local application.
Here is a small example wherein I tried to insert data using a simple MVC based architecture which takes first and last name as input parameters and can be queried along the same line.
The steps used here to create a connection are:
The URI by which you are trying to connect to the MongoDB Atlas cluster should be in correct format as per the format.
If you look at the following Post where the ssl connection was not getting established.
If you look at the URI Format documentation for reference.
Try to create a MVC project with Repository class, Model Class and Controller Class in order to do CRUD operations, Insert data and Query Data through the spring boot application:
As we know that Replication in MongoDB is asynchronous hence follows a master-slave replication approach.
This means the reads from secondary may return data that doesn’t reflect the state of data on the primary
The complete basis of replication depends on the oplog which is collection that keeps a record of all the operations on the Primary dataset.
In the latest version of MongoDB oplog, the entry is deleted only when the oplog has reached specified size or entry is older than configures amount of time.
The Primary node of the replica set maintains an oplog which is then copied by the secondary nodes’ oplog and this proves to be advantageous to recover when the Primary nodes steps down and initiates an election. The secondary node with the most recent data will be elected as the primary for the replica set.
Consider a failover condition when the Primary node goes does and an election is initiated. Discussion a few factors and conditions which effect the election process.
Heartbeats: The continuous polling between replica et members to verify the state of the members.
The priority: Each of the members of the replica sets are provided with a priority which marks as a factor on selection of the next primary.
However, the priority of the member is neglected when it comes to the member having recent writes.
Mirrored Reads: However, the priority of the member is neglected when it comes to the member having the most recent accessed data.
If you have any questions with reference to the replica sets or architecture please feel free to reply below.
Extending the understanding of Replication, will be discussion few interesting insights from Write Concern in replica set.
In simple words, write concern determines the type of acknowledgement received for write operation to a standalone mongod, replica sets and sharded clusters. The Primary node of the replica set keeps a track of how well the secondaries are in sync with the oplog when compared to primary.
A write concern can specify a number of nodes to wait for, or majority .
If a write operation does not have a write concern, the default configuration is chosen. This default configuration is either cluster-wide write concern or implicit default write concern.
The cluster wide is set using setDefaultRWConcern command. and when this is not set, the default will be set and this default write concern is known as implicit default write concern. Mostly it is {w: majority}.
The calculation for the default write concern is given by: if ((#arbiters > 0) AND (#non-arbiters <= majority(#voting nodes)) then {w:1} else {w:majority}
The rule stand out to be an exception in case of sharded clusters where the write concern will always be a majority.
The Oplog maintenance:
The secondary nodes keeps itself in sync with their sync source. This is done via OplogFetcher… This OplogFetcher maintains a buffer known as OplogBuffer. A separate thread, runs an OplogBatcher which pulls from the buffer to the fetcher and creates a new batch to be applied.
Will be posting some new understanding about Replication and Topology Coordinators… Stay Tuned.
We discussed a few concepts on Write concern in my previous post, for this post, we will begin with read concern.
A Read concern is specified to determine the level of consistency in any replica set. There are 5 types of Reads concern which are common:
Local: This reads the data from most recent snapshot of the storage engine.
Majority: This reflects the entries that have been replicated to a majority of nodes .
Snapshot: Only accessible in the multi-document transaction.
Available: This works similar to local read concern.
afterOpTime: This means that read will block until the node has replicated writes after a certain OpTime.
For multi-document transaction, which write concern will be preferred and why?
By default the read concern is set to local. Showing similar kind of logic as local, the available read concern is not preferred.
The Local read concern waits to refresh the routing table when it identifies a stale data and hence maintains the consistency, however, the available read concern, does not provide consistency as it does not wait for cache to be refreshed. This also means that the available read concern would has the potential to return orphan documents.
The selection of read concern will entirely depend on the architecture of the replica set.
Will be continuing more on replication in the upcoming post.
Starting on Transactions today.
The most essential property which the database transactions should manage are ACID properties and hence committing, aborting or rolling back will be done for its operations as well as to the corresponding data changes.
The transactions are started on the server using startTransaction: true parameter. Along with these, there are several other parameters which are set.
lsid: Unique session ID
txnNumber: Transaction Number.
txnState: Maintains the state of the transaction and allows to determine legal state transactions.
In order to maintain the synchronisation and consistency among the data, the transactions acquire locks in a mutual exclusive manner, however the locks are release when preparing for transaction and acquired again while committing or aborting.
To add operations to the transactions, the user can run commands on the same session. This will be stored in memory and once the write is done, the transaction is informed accordingly.
Committing or Aborting a transaction.
After the transaction is committed, the applyOps command is applied to the oplog entry and the commit is done on storage transaction on the OperationContext. Once the commit is called, all associated transaction will commit in the storage engine. and the txtState is updated to kCommited.
To abort the transaction, the txnState is changed to kAbortedWithoutPrepare and log the transaction metrics and reset the in memory state.
ACID Properties for Sharded Clusters.
In order to main the ACID property, MongoDB used the concept of Two Phase Commit Protocol, where the concept of transaction coordinator comes into picture.
The transactionCorrdinator is supposed to coordinate between the participating shards and eventually commit or abort the transaction. When the TransactionCoordinator is told to commit a transaction, it must first make sure that all participating shards successfully prepare the transaction before telling them to commit the transaction.
Before the coordinator send the commit command, all the majority participating shards must commit the prepareTransaction command, failing to do so, the abortTransaction will be issued.
Failovers with Transactions
If a primary with transactions with a mutual exclusive lock, steps down , the node will abort all the unprepared until it can acquire the RSTL. If a secondary has a prepared transaction when it steps up, it will have to re-acquire all the locks for the prepared transaction.
Recovery for failed transactions. : The transaction must ensure the recovery for any failover transaction. This recovery will be done using the algorithm on the oplog entries. If the oplog entry contain commitTransaction, the transaction will be immediately committed else will look for prepareTransaction and get operations and prepare and commit it.
Starting the discussion for Concurrency control in Replication
In Day07 we discussed about having mutual exclusive lock on the transaction in order to maintain the atomicity of the transactions. There is yet another lock known as Parallel Batch Writer Mode lock which helps in maintaining the concurrency of the operations while a secondary is applying oplog entries.
The lastApplied is a timestamp value set when the secondary has completed the batch of writing to the oplog.
Since secondary node of the replica set writes the oplog in batched, the Parallel Batch Writer Mode lock is acquired and released when the complete batch is written in the entry.
There is yet another lock whose purpose is to maintain the concurrency among the transactions, known as, Replication State Transition Lock which is acquired when the nodes are in transition state.
It is acquired in exclusive mode for the following replication state transitions: PRIMARY to SECONDARY (step down), SECONDARY to PRIMARY (step up), SECONDARY to ROLLBACK (rollback), ROLLBACK to SECONDARY , and SECONDARY to RECOVERING.
Note: The locks must be acquired before the global lock is acquired.
The order recommended is:
Acquire Parallel Batch Writer Mode lock prior to Replication State Transition Lock in shared and exclusive mode respectively. Keep the global lock to be acquired later.
Let me know if you have questions related to the same.
Taking the replication concept ahead, will be discussing a few of Election concepts in the Replica set.
There are a few conditions when an election is initiated in a replica set:
There has been no primary for an election timeout.
If a member of replica set which is secondary but realises it has higher priority than Primary.( Priority Takeover)
I f secondary considers itself to be more updated data, it initiates the election.
If a primary steps down with replSetStepDown command. (Election Handoff)
Lets understand the Election concept from a voter as well as candidate perspective.
When an election is initiated, the candidate runs replSetRequestVotes towards all the replica sets. The candidate first votes for itself and then sends replSetRequestVotes towards all the members of the replica sets.
Now when the message is received by the voter, it evaluated the candidate on various parameters:
The configuration do not match.
The replica set name does not match.
The last applied OpTime that comes in the vote request is older than the voter’s last applied OpTime.
When a voter casts its vote, it records in local.replset.election collection.
The Stepping down of a primary can be conditional or unconditional.
In Conditional Stepdown, if
force is true and now > waitUntil deadline
At least one of the updated secondaries, runs for a candidate.
For Unconditional StepDown
As long as primary is connected to all the secondaries, it will remain as Primary and will not be eligible for step down.
In both the conditions, RSTL lock is acquired and and allow secondaries to catch up without new writes coming in.
If you have any thoughts on Replication Election, Will be more than happy to discuss.
Starting a pattern today for the next 10 days n I hope I keep up with it.
Calling it Day11 as First Day of using MongoDB in a kubernetes deployment.
Kubernetes is an orchestration framework which allows you to scale, automate and manage containerised application.
By Containerised, means, to bundle and package the application in one and run on a cloud or different deployment.
This is fir for modern applications which are based on Microservice architectures, have frequent deployments or statefulsets.
Let’s see a sample deployment where MongoDB is deployed in Kubernetes with a creation of replica sets.
The statefulsets and deployments are two ways through which the MongoDB can be deployed in a kubernetes environment.
The difference occurs when:
1. Deployment model: This is preferred when a stateless application is preferred. All the pods of the application use the same volume specified in the deployment.yaml files. The pod names are deployed with a different name every-time the pod is deleted.
2. Statefulset model : This deployment is preferred when each pod of the deployment used its own independent set and volume. The pods here are deployed with the same name every-time the pods are deleted.
Each deployment of the application has config-map and secrets which contains non-sensitive data and sensitive data respectively.
kind: Deployment.. defines the applications is of type deployment. replicas : 1 specifics that the application will have only one replica pod. livenessProbe: To make sure that the pods are not stuck and are redeployed after the timeouts mentioned. Persistent Volumes: is a storage provisioned by the admin Persistent volume Chains: Works for a dynamic volume provisioning enabled system
Once the deployments and service files created with
After Day11, where we saw how to deploy a database in kubernetes environment using both deployment as well as statefulsets model of deployments.
Let’s understand how replica sets are created in kubernetes environment and how to access these replica sets.
The replica sets in the kubernetes environment can be accessed both inside and outside of the cluster.
Creating a replica set
Once all the pods are up and running, do kubectl exec -it <pod-name> mongo/mongosh/bash
 do the following steps:
1. rs.initiate()
2. rs.add("mongo-1.mongo")
3. rs.add("mongo-2.mongo")
4. rs.status()
This setup consists of one Primary and two secondaries.
Now to access these replica sets.
Access the replica sets within the same cluster.
aasawari.sahasrabuddhe@Aasawaris-MacBook-Pro kubernetes-mongodb % kubectl run mongo --rm -it --image mongo -- sh

If you don't see a command prompt, try pressing enter.

#
# mongo mongodb://mongo-0.mongo,mongo-1.mongo,mongo-2.mongo
MongoDB shell version v5.0.6
connecting to: mongodb://mongo-0.mongo:27017,mongo-1.mongo:27017,mongo-2.mongo:27017/?compressors=disabled&gssapiServiceName=mongodb
Implicit session: session { "id" : UUID("847d3424-dc49-4242-8443-effdbf732682") }
MongoDB server version: 5.0.6
================
Warning: the "mongo" shell has been superseded by "mongosh",
which delivers improved usability and compatibility.The "mongo" shell has been deprecated and will be removed in
an upcoming release.
For installation instructions, see
https://docs.mongodb.com/mongodb-shell/install/
================
Welcome to the MongoDB shell.
For interactive help, type "help".
For more comprehensive documentation, see
	https://docs.mongodb.com/
Questions? Try the MongoDB Developer Community Forums
	https://community.mongodb.com
---
The server generated these startup warnings when booting:
        2022-03-22T13:47:54.264+00:00: Using the XFS filesystem is strongly recommended with the WiredTiger storage engine. See http://dochub.mongodb.org/core/prodnotes-filesystem
        2022-03-22T13:47:54.797+00:00: Access control is not enabled for the database. Read and write access to data and configuration is unrestricted
        2022-03-22T13:47:54.797+00:00: You are running this process as the root user, which is not recommended
---
---
        Enable MongoDB's free cloud-based monitoring service, which will then receive and display
        metrics about your deployment (disk utilization, CPU, operation statistics, etc).

        The monitoring data will be available on a MongoDB website with a unique URL accessible to you
        and anyone you share the URL with. MongoDB may use this information to make product
        improvements and to suggest MongoDB products and deployment options to you.

        To enable free monitoring, run the following command: db.enableFreeMonitoring()
        To permanently disable this reminder, run the following command: db.disableFreeMonitoring()
---

rs0:PRIMARY> cfg.members
[
	{
		"_id" : 0,
		"host" : "mongo-0.mongo:27017",
		"arbiterOnly" : false,
		"buildIndexes" : true,
		"hidden" : false,
		"priority" : 1,
		"tags" : {

		},
		"secondaryDelaySecs" : NumberLong(0),
		"votes" : 1
	},
	{
		"_id" : 1,
		"host" : "mongo-1.mongo:27017",
		"arbiterOnly" : false,
		"buildIndexes" : true,
		"hidden" : false,
		"priority" : 1,
		"tags" : {

		},
		"secondaryDelaySecs" : NumberLong(0),
		"votes" : 1
	},
	{
		"_id" : 2,
		"host" : "mongo-2.mongo:27017",
		"arbiterOnly" : false,
		"buildIndexes" : true,
		"hidden" : false,
		"priority" : 1,
		"tags" : {

		},
		"secondaryDelaySecs" : NumberLong(0),
		"votes" : 1
	},
	{
		"_id" : 3,
		"host" : "mongo-3.mongo:27017",
		"arbiterOnly" : false,
		"buildIndexes" : true,
		"hidden" : false,
		"priority" : 1,
		"tags" : {

		},
		"secondaryDelaySecs" : NumberLong(0),
		"votes" : 1
	}
]
rs0:PRIMARY>
Accessing the MongoDb outside the cluster
In this case, the pods are needed to be exposed as LoadBalancers and then one can access the replica set outside the kubernetes cluster
kubectl expose pod mongo-0 27017 --target 27017 --type LoadBalancer
kubectl expose pod mongo-1 27017 --target 27017 --type LoadBalancer`
kubectl expose pod mongo-3 27017 --target 27017 --type LoadBalancer`
Taking the Replication on kubernetes environment ahead, let us learn about how to do sharding in a kubernetes Environment.
A MongoDB sharded cluster consists of:
shards: A replica set where each shard contains a subset of sharded cluster.
mongos: Which acts as a query router
config servers: Which store the meta data and configurations settings.
Here, we will be using docker containers to design a sharded structure with one sharded cluster, which is basically a replica set, one config server and one mongos.
Hence, 7 docker containers will be needed.
All the members of shard and config map and mongos will be running on different ports.
Deploying a sharded replica set using docker containers.
The command here, mongod --shardsvr means the mongod is started as sharded cluster.
The config server compose file would look similar with the command as mongod --configsvr --replSet cfgrs --port 27017 --dbpath /data/db.
defining the mongod as config server.
Lastly the yaml file for mongos
Starting Day 14 in continuatin to Day 13, by adding a new sharded collection to the same deployement.
Create a similar yaml for shard2 using different name and different port from all the mentioned ports earlier and then
aasawari.sahasrabuddhe@M-C02DV42LML85 sharding % docker ps
CONTAINER ID   IMAGE                                 COMMAND                  CREATED        STATUS          PORTS                                                                                                                                  NAMES
ce46540cdd3d   mongo                                 "docker-entrypoint.s…"   3 hours ago    Up 3 hours      0.0.0.0:50006->27017/tcp                                                                                                               shard2svr3
54fcb0fa8aff   mongo                                 "docker-entrypoint.s…"   3 hours ago    Up 3 hours      0.0.0.0:50004->27017/tcp                                                                                                               shard2svr1
017c62afcacb   mongo                                 "docker-entrypoint.s…"   3 hours ago    Up 3 hours      0.0.0.0:50005->27017/tcp                                                                                                               shard2svr2
a89092ce4415   mongo                                 "docker-entrypoint.s…"   24 hours ago   Up 16 minutes   0.0.0.0:60000->27017/tcp                                                                                                               mongos
fea4644bc0e0   mongo                                 "docker-entrypoint.s…"   24 hours ago   Up 16 minutes   0.0.0.0:50001->27017/tcp                                                                                                               shard1svr1
da83eb637ae4   mongo                                 "docker-entrypoint.s…"   24 hours ago   Up 16 minutes   0.0.0.0:50003->27017/tcp                                                                                                               shard1svr3
4c7f0f0ecf86   mongo                                 "docker-entrypoint.s…"   24 hours ago   Up 16 minutes   0.0.0.0:50002->27017/tcp                                                                                                               shard1svr2
39418f832da9   mongo                                 "docker-entrypoint.s…"   25 hours ago   Up 5 minutes    0.0.0.0:40003->27017/tcp                                                                                                               cfgsvr3
9297b1bc78ab   mongo                                 "docker-entrypoint.s…"   25 hours ago   Up 5 minutes    0.0.0.0:40001->27017/tcp                                                                                                               cfgsvr1
b1804155e587   mongo                                 "docker-entrypoint.s…"   25 hours ago   Up 5 minutes    0.0.0.0:40002->27017/tcp                                                                                                               cfgsvr2
shows 2 sharded deployment with a config server and mongos.
use mongo mongodb:192.168.29.4:60000 to get inside mongos and add the shrad2.
Lets create sharded collection with sample data.
mongos> use shard
switched to db shard
mongos> show collections
movies
movies2
mongos> db.movies2.getShardDistribution()
Collection shard.movies2 is not sharded.  $Since the collection is not yet sharded.

mongos> sh.enableSharding("shard")
{
	"ok" : 1,
	"$clusterTime" : {
		"clusterTime" : Timestamp(1648221933, 2),
		"signature" : {
			"hash" : BinData(0,"AAAAAAAAAAAAAAAAAAAAAAAAAAA="),
			"keyId" : NumberLong(0)
		}
	},
	"operationTime" : Timestamp(1648221933, 2)
}


mongos> db.movies2.getShardDistribution()
Collection shard.movies2 is not sharded.
mongos> sh.enableSharding("shard")
{
	"ok" : 1,
	"$clusterTime" : {
		"clusterTime" : Timestamp(1648223161, 7),
		"signature" : {
			"hash" : BinData(0,"AAAAAAAAAAAAAAAAAAAAAAAAAAA="),
			"keyId" : NumberLong(0)
		}
	},
	"operationTime" : Timestamp(1648223161, 7)
}
mongos> sh.shardCollection("shard.movies2", { "title" : "hashed" } )
{
	"collectionsharded" : "shard.movies2",
	"ok" : 1,
	"$clusterTime" : {
		"clusterTime" : Timestamp(1648223203, 6),
		"signature" : {
			"hash" : BinData(0,"AAAAAAAAAAAAAAAAAAAAAAAAAAA="),
			"keyId" : NumberLong(0)
		}
	},
	"operationTime" : Timestamp(1648223202, 17)
}
mongos> db.movies2.getShardDistribution()

Shard shard2rs at shard2rs/192.168.29.4:50004,192.168.29.4:50005,192.168.29.4:50006
 data : 0B docs : 0 chunks : 2
 estimated data per chunk : 0B
 estimated docs per chunk : 0

Shard shard1rs at shard1rs/192.168.29.4:50001,192.168.29.4:50002,192.168.29.4:50003
 data : 0B docs : 0 chunks : 2
 estimated data per chunk : 0B
 estimated docs per chunk : 0

Totals
 data : 0B docs : 0 chunks : 4
 Shard shard2rs contains 0% data, 0% docs in cluster, avg obj size on shard : 0B
 Shard shard1rs contains 0% data, 0% docs in cluster, avg obj size on shard : 0B

mongos>
Here, in the above example it shows, how to enable sharding for a database and hence the collection will be sharded.
Also, the sharding is enabled when the data is not present in the collection.
Let us understand how to create sharding where the data set is already present.
Create random generated data in collection movies
now, when you do : db.movies.getShardDistribution()
you get an error saying
Index not created for the collection movies
Futher when index is created on the collection using db.movies.createIndex( {"title": "hashed"})
and then apply sharding to the collection, the sharding can be performed in this case.
Let me know if you have any question/views or doubts related to the topic, will be happy to help in all ways we can.
Let us understand what kubernetes and containerisation implies.
Docker:
To understand the concept of docker, let’s understand the tern Containers.
A container is way to package an application with all the required dependencies and configurations need to the the application and hence makes the application
Platform independent
Makes development and deployment process easy.
Have an isolated environment.
These containers are stored on public or private spaces known as registries where the image/application can be pulled and use in different environments.
Docker vs Virtual Machine
A entire system or a machine is composed of
-----------------
| Application |
-----------------
-----------------
| OS…Kernel |
-----------------
-----------------
| Hardware |
-----------------
Both docker and VM being virtualisation tools, the Docker comprises of virtualising the Application Layer where as VM virtualising the Application with the OS Kernel layer.
Also, the size of docker images are smaller and are more efficient faster as compared to VM.
Kubernetes:
An open source orchestration tools which allows you to deploy containers.
Useful in the microservice architecture applications where the application is composed of various services deployed over a cloud infrastructure.
The basic characteristics would be:
Highly available.
Scalability
Disaster Recovery
A kubernetes works on the master-slave model where there is at least one Master node which manager the slave nodes knows and kubelets which helps in running application processes.
A Master Node runs several kubernetes process which are necessary to run the application. Eg API Server, Controller Manager, Schedular etc.
Service and Ingress in Kubernetes
The nodes and pods communicate using the service.
Each pod communicates using its own IP address but when a pod crash a new IP address is assigned which makes it difficult while making connections to different pods.
A service gives a static IP address assigned to each pod which makes it easier.
To make the pod or a service in a microservice architecture accessible in a browser. the Node Ip address with a default port is used.
To make the pods communicate using the IP address, the request goes through the ingress.
Config Map and Secrets
Now we know that the pods communicate using the service, the URLs and other configurations necessary are written inside the config maps which makes the mapping easier.
Therefore every time a service is changed , only the URLs needs to be modified.
However, the config maps cannot store confidential information, and hence are stored inside the Secrets. The username and passwords to access them are stored inside the secret.yaml files in a base64 encoding mechanism.
All the above mentioned theory has been implemented inside the
If you have any questions, feel free to post on the forums.
Starting off after a long break from all the relocation to a completely new place. Settling up everything by yourself is always a challenge but the most interesting part of adulting.
From buying the furniture to keeping everything in place for the entire day and not making a mess around is always a challenge. Growing up with the adulting everyday and hence has become a part of my learning now.
Meanwhile I have been working about a stand alone Spring boot application with MongoDB as a database layer in a Kubernetes Environment.
Stuck at some issues here, while I try to resolve this, I started learning about Atlas Search and various aspects it provides us with.
Starting with a new 10 days of MongoDB product provided my MongoDB: Atlas Search
MongoDB Atlas search available on MongoDB 4.2+ versions, provides you with the functionality for indexing and querying the data in the Atlas Cluster.
It uses a mongot process with Apache Lucene along with mongod process running different atlas servers.
The following documentation here will help you load a sample data and introduce you towards the Atlas Search feature provided my MongoDB.
You can perform several queries by loading the sample data and perform various queries over the same data.
There are few insights which are restricted in M0, M2 and M5 clusters:
Only 50 pipeline stages are allowed on a free tier.
With the new version of MongoDB 5.0, allowDiskUse is not allowed in M0, M2 or M5.
You cannot modify an M0 free cluster using the Clusters API.
I recently came across something very interesting important when you come across MongoDB which is Wired Tiger.
I found it to very effective part of discussion topic and hence this has made it here to my 100DaysofLearning MongoDB
Wired Tiger data engine is a high performance, scalable, transactional, production quality, open source, NoSQL data engine.
What Wired Tiger provides?
Wired Tiger comes with the benefit of
Document level concurrency
In-memory Performance
Multiple-core scalability
Checksums
Compression
Durability with and without journaling
Background
The question arrises is why do we need a new storage engine?
The answer to is as:
The need to minimal contention between the threads
Can make maximum use of available cache
Take the advantage of parallel programming
Getting the data on every query from the disk, is always very costly. hence making use of Hazard pointers in wiredTiger was an effective solution.
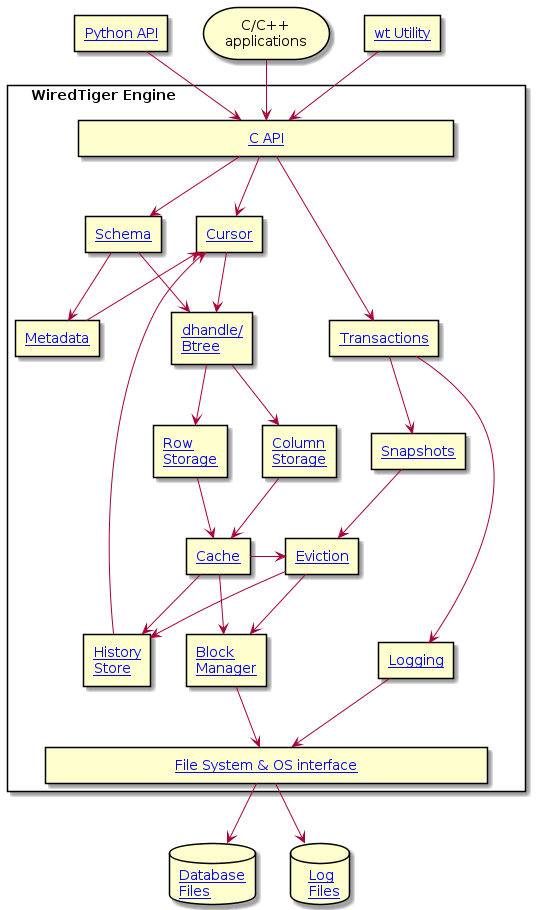
Architecture
The WiredTiger architecture remains independent of the way you access the data and also the driver for the query language, only the way data is being stored in the changes.
The WiredTiger stores the data in tow formats:
WiredTiger supports both row-oriented storage (where all columns of a row are stored together), and column-oriented storage (where groups of columns are stored in separate files), resulting in more efficient memory use
Let’s understand more about how the data is stored in WiredTiger and different aspects which it provides in the next upcoming posts.
In the previous post, we had discussion on how and why wiredTiger was introduced.
Let us understand how WiredTiger stored the data.
WiredTiger uses the concept of Log Structured Merge Trees, where the update gets stored first into small files and then merged with the larger files in the background so they maintain the read latency of B trees.
WiredTiger has B tree structure internally, which maximise the data transfer rate in each I/O and minimise the miss rate.
WiredTiger supports static encoding with a configurable Huffman engine, which typically reduces the amount of information maintained in memory by 20-50%.
Block Manager: This manages the reading and writing in disk blocks. This is also responsible for the data compression and encryption.
Cache: This represents various data structures which makes up in memory B trees. The memory exists only temporary during the I/O operation whereas the data is transferred from the disk.
Checkpoint: A point of recovery in case of a crash or an unexpected shutdown.
This comprise of 5 stages:
3.1.The prepare stage
3.2 The data files checkout
3.3 The history store checkpoint
3.4 Flushing the files to disk
3.5 The metadata checkout
Column store: This is a 64 bit unsigned integer, which has the record Id.
Data file format: The format of the WiredTiger data file is given by structures in block.h , defining the overall structure of the file and its blocks.
Will include more of the architecture details in the upcoming posts and add more interesting facts about the wired-tiger.
DataHandle and Btrees
The Datahandle also known as dhandle represents the B trees. This are created when a collection is created and destroyed when no longer in use.
This contains the following information:
Name
References to the global data list
Statistical data
Type of underlying data object.
The lifecycle of dhandle comprise of three stages:
dhandle creation: When a cursor attempts to access the table, it tries to look for the dhandle in the cache first and then into the global list. If not present, it creates a dhandle and puts them to the global list with its reference in the cache.
The reading for dhandle and writing a new dhandle, requires the read and write lock to the global list respectively.
For the creating of dhandle, two counter values are created:
session_ref which counts the number of session dhandle cache lists contain dhandle.
session_inuse: counts the open and operating of dhandle.
dhandle cache sweep: The dhandle that have not been in use for a longer period are removed.
sweep server:
If the session_ref counts to 0, comparison of configured times with current time is calculated and are marked then as dead and the resources are released.
However. if the value is not 0 and the dhandle is not referenced by any session, the servers removes from the global list and frees the remaining resources.
Eviction:
This is the process of removing old data from the cache. It uses a dedicated set of eviction threads that are tasked. This cannot be triggered by APIs.
File System/ Operating System Interface:
An abstraction layer allowing main line WiredTiger code to make call to interface. History Store:
This has old version of records and used to service long running transactions. Logging:
This are write-ahead-log when configured. The sole purpose is to retain the changes made after the last checkpoints and helps in recovery in case of crash.
There are three log related files created:
WiredTigerLog.* has 10 digit postfix vales for every log file created.
WiredTigerTmpLog: contains the header content and once they have all data synced to disk, this is renamed to WiredTigerPrepLog
MetaData:
This is a key value pair with key as the uri string and value as the configuration string which contains other key values pairs describing data encoding for uri.
RawStores:
This are B trees without the record id
Schema:
This defines the format of application data
Snapshots:
They are implemented by storing set of transactions id committed before transaction started.
Rollback:
This has modifications which are stable according to stable timestamp and recovered checkpoint snapshots.
This scans all tables except the metadata.
This involves three phrases:
WT startup
WT shutdown
Application initiated
The prerequisites for a rollback is that there should NOT be any transaction activity happening in the WiredTiger.
The checks performed includes:
Table is modified
The checkpoint durable start/stop timestamp is greater than the rollback timestamp.
There is no durable timestamp in any checkpoint.
Has prepared updates
Has updates from transactions greater than checkpoint snapshot (only in restart phase)
This describes the WiredTiger from the architectural perspective.
Discussing on how WiredTiger uses Transactions and how are WiredTiger helpful in Transactions.
WiredTiger uses Transactions within the API to start and stop the transactions within a session. If the user doesn’t not explicitly enables the transaction, it gets enabled for the operations.
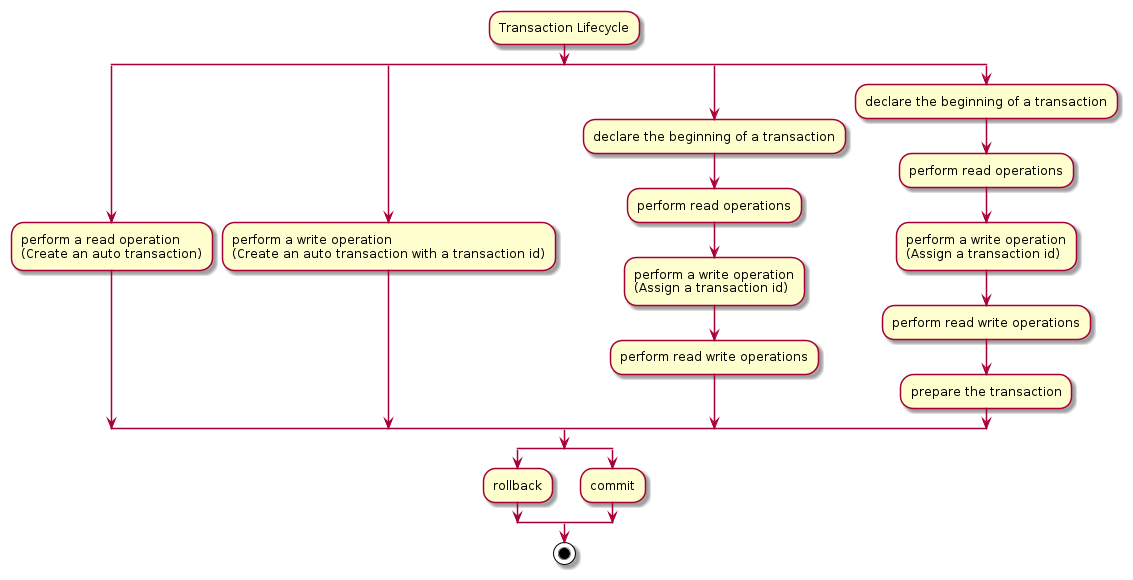
The Lifecycle of Transactions
It can be explained through the following diagram:
The transaction gets committed automatically when when explicitly enabled else, when enabled via WT_SESSION::begin_transaction , it will be active until committed or rolled back.
Like any other database, the WiredTiger enforce the ACID properties in the Transactions.
Along with the ACID properties, WiredTiger provides a mechanism of Timestamps.
These are sequence numbers associated with each operations. Users can assign a read timestamp at the beginning of the transaction. And updates smaller or equal to read timestamp would be visible.
Users can use any 64 bit unsigned integer as logical timestamps.
A stable timestamp is the minimum timestamp that a new operation can commit it.
Along with the timestamp, transaction also provides the Visibility feature.
The operation is visible only when both transaction-id and timestamp are visible.
In order to read the key, WiredTiger traverses until a visible update ifs found. WiredTiger are organise as singly linked list with latest transaction at head, known as the update chain. If unavailable, WiredTiger will search the history store to check if there is a version to the reader.
WiredTiger also has prepared Transactions which work under snapshot isolations.
By introducing the prepared stage, a two-phase distributed transaction algorithm can rely on the prepared state to reach consensus among all the nodes for committing.
The WiredTiger also has prepared timestamp and durable timestamp which prevents the slow transaction with stable global timestamp.
If you have any questions and suggestions related to wired tiger, feel free to post on the community platforms.