#100DaysOfCodeChallenge

Day 41: What Are Microservices

Microservices are an architectural style for building software applications that divide a large, monolithic application into smaller, independently deployable services. Each microservice focuses on a specific business function and communicates with other microservices through well-defined APIs (usually HTTP or messaging queues).

Here are the key characteristics of microservices:

  1. Independent Deployment: Each microservice is a standalone unit that can be developed, tested, deployed, and scaled independently. This makes it easier to maintain and update individual components without affecting the entire application.
  2. Focused on a Specific Function: A microservice is designed around a specific business capability (e.g., user authentication, payment processing, product catalog). This allows for better alignment with the organization’s needs and easier adaptation over time.
  3. Loose Coupling: Microservices are loosely coupled, meaning changes in one service have minimal impact on others. This promotes flexibility and ease of updates and scalability.
  4. Technology Diversity: Since microservices are independent, each service can be built using different technologies, frameworks, or programming languages, depending on the needs of that service. This allows teams to choose the best tool for each job.
  5. Scalability: Microservices can be scaled individually, meaning you can allocate more resources to a specific service (e.g., payment processing) without affecting other services. This improves overall system performance and efficiency.
  6. Resilience: If one microservice fails, it doesn’t bring down the entire system. This is often achieved through techniques like redundancy, failover mechanisms, and graceful degradation.
  7. Data Management: Microservices often manage their own database, reducing dependency on a single, centralized database. This enables each service to control its data model and structure, making it easier to manage and scale.
  8. Communication: Microservices communicate with each other through lightweight protocols like REST, gRPC, or messaging systems (e.g., Kafka, RabbitMQ). This ensures that services can share data and collaborate to perform more complex tasks.
100daysofcode lebanon-mug

Day 42: How to Reduce Latency in Web Applications: Best Practices for Faster Performance

Latency can make or break the user experience in web applications. A slow-loading website frustrates users and can negatively impact engagement, conversions, and SEO rankings. Whether you’re developing an eCommerce store, a SaaS platform, or a content-heavy site, reducing latency is crucial for success. In this blog, we’ll explore the best practices to minimize latency and improve web performance.

1. Optimize Server Response Time

Your server’s response time plays a critical role in how quickly your web application loads. Here’s how you can optimize it:

  • Use a Content Delivery Network (CDN) to serve static assets from edge locations closer to users.
  • Implement caching strategies (e.g., browser caching, server-side caching, and database query caching).
  • Reduce the number of database queries and optimize them using indexing and proper schema design.
  • Use faster backend technologies, such as upgrading to HTTP/3 or using efficient programming frameworks.

2. Minimize HTTP Requests

Each HTTP request adds overhead and increases latency. To minimize HTTP requests:

  • Combine and minify CSS and JavaScript files.
  • Use image sprites and inline SVGs for UI elements.
  • Reduce the number of third-party scripts and dependencies.
  • Implement lazy loading for non-essential images and scripts.

3. Optimize Frontend Performance

The frontend is just as important as the backend in reducing latency. Here are some key optimizations:

  • Use modern JavaScript frameworks and libraries that focus on performance (e.g., React with Server Components, Svelte, or Vue 3).
  • Reduce JavaScript execution time by optimizing code and using tree-shaking techniques.
  • Leverage asynchronous loading techniques like defer and async attributes for scripts.
  • Optimize images by using next-gen formats like WebP and AVIF.

4. Implement Efficient Networking Strategies

Network-related bottlenecks can significantly increase latency. Consider the following strategies:

  • Enable HTTP/2 or HTTP/3 for multiplexed, faster communication.
  • Use TCP/TLS optimizations such as session resumption and keep-alive connections.
  • Compress assets using Brotli or Gzip to reduce payload size.
  • Implement efficient data fetching techniques like GraphQL or gRPC.

5. Monitor and Analyze Performance

Continuous monitoring and performance analysis help identify and fix bottlenecks. Use these tools:

  • Google PageSpeed Insights and Lighthouse for frontend analysis.
  • WebPageTest for detailed network performance insights.
  • Application Performance Monitoring (APM) tools like New Relic or Datadog for backend monitoring.
  • Real User Monitoring (RUM) to track real-world user experience.

100daysofcode lebanon-mug

Day 43: The Power of ROS: Revolutionizing Robotics with Open-Source Innovation

Robotics is no longer the stuff of science fiction—it’s transforming industries, from autonomous vehicles to medical surgery. But behind the scenes, what powers these intelligent machines? Enter ROS (Robot Operating System), an open-source framework that has become the backbone of modern robotics development.

What is ROS?

Despite its name, ROS is not an operating system in the traditional sense. Instead, it’s a flexible middleware that provides a set of tools, libraries, and conventions for building and managing robotic applications. Think of it as the glue that connects different hardware and software components, allowing them to communicate seamlessly.

Developed by Willow Garage and later maintained by the Open Source Robotics Foundation (OSRF), ROS enables developers to focus on creating intelligent robot behavior rather than reinventing the wheel for every project.

Why is ROS a Game-Changer?

  1. Modular & Scalable Architecture
    ROS is built around a distributed computing system, where different components (or nodes) handle specific tasks. A robotic arm’s motor control, camera processing, and AI-based decision-making can all run independently yet communicate effectively.
  2. Strong Community & Open-Source Ecosystem
    With thousands of contributors worldwide, ROS boasts an extensive collection of pre-built libraries (or packages). Want to integrate LiDAR for obstacle detection? There’s a ROS package for that. Need SLAM (Simultaneous Localization and Mapping) for navigation? ROS has you covered.
  3. Simulation with Gazebo
    Testing robots in the real world can be expensive and risky. ROS integrates with Gazebo, a high-fidelity robot simulation tool that lets developers test algorithms in a realistic 3D environment before deploying them on physical robots.
  4. Hardware Agnostic
    Whether you’re working with Raspberry Pi, NVIDIA Jetson, or industrial-grade robotic arms, ROS provides compatibility across a wide range of hardware platforms.
  5. Bridges AI & Robotics
    Modern robots rely on AI for perception and decision-making. With ROS 2, developers can integrate machine learning models, deep learning vision systems, and reinforcement learning with ease. It even supports communication with frameworks like TensorFlow and PyTorch.

The Future with ROS 2

While ROS 1 dominated the robotics landscape for years, its successor, ROS 2, addresses critical limitations like real-time performance, security, and multi-robot support. Industries like autonomous vehicles, industrial automation, and healthcare robotics are rapidly adopting ROS 2 for building the next generation of intelligent machines.

100daysofcode lebanon-mug

Day 44: Quantum Computing in Drug Discovery: A Game Changer in Medicine

The process of discovering new medicines is notoriously complex, expensive, and time-consuming. Traditional computational methods, while powerful, often fall short when dealing with the intricate molecular interactions that define drug efficacy and safety. Quantum computing, with its ability to process massive amounts of information in parallel, offers a revolutionary approach to drug discovery.

The Challenge of Drug Discovery

Drug discovery involves identifying molecules that can interact with specific biological targets to treat diseases. This process requires extensive computational simulations to predict molecular behavior, binding affinities, and potential side effects. Current classical computing methods rely on approximations and brute-force calculations, which can take years and cost billions of dollars.

How Quantum Computing Enhances Drug Discovery

Quantum computing leverages the principles of superposition and entanglement to solve complex problems exponentially faster than classical computers. Here’s how it can revolutionize drug discovery:

1. Molecular Simulation Accuracy

Quantum computers excel at simulating quantum mechanical systems, making them ideal for accurately modeling molecular interactions at an atomic level. Unlike classical computers that rely on approximations, quantum algorithms like the Variational Quantum Eigensolver (VQE) and Quantum Phase Estimation (QPE) can precisely calculate molecular energy states, leading to better predictions of drug effectiveness.

2. Faster Screening of Drug Candidates

Currently, drug candidates are screened using high-throughput methods that require extensive computing resources. Quantum algorithms, such as quantum machine learning (QML), can rapidly analyze molecular structures and predict promising candidates, significantly reducing the time needed to identify viable drugs.

3. Optimizing Drug Formulation

Quantum optimization techniques can be used to refine drug formulations by analyzing numerous variables simultaneously, such as solubility, bioavailability, and interaction with biological environments. This leads to the creation of more effective drugs with fewer side effects.

4. Personalized Medicine

With its ability to analyze vast datasets efficiently, quantum computing can support the development of personalized medicine. By processing genetic and molecular data, quantum algorithms can predict how an individual’s body will respond to certain drugs, leading to more targeted and effective treatments.

Challenges and Future Prospects

While quantum computing holds immense promise, challenges remain. Current quantum hardware is still in its early stages, with limited qubits and error rates that need improvement. However, advancements in quantum error correction, hybrid quantum-classical algorithms, and quantum cloud computing are making practical applications increasingly viable.

Conclusion

Quantum computing has the potential to transform drug discovery, making it faster, more accurate, and cost-effective. As hardware and algorithms continue to evolve, we can expect quantum-driven breakthroughs in medicine, leading to better treatments and improved healthcare outcomes. The fusion of quantum computing and pharmaceutical research may very well redefine the future of medicine.

100daysofcode lebanon-mug

Day 45: Mastering Data Structures and Algorithms: A Guide for Computer Science Students

Data Structures and Algorithms (DSA) are fundamental to computer science. Whether you’re preparing for coding interviews, working on software projects, or aiming for a deep understanding of computational efficiency, mastering DSA is a crucial step. In this guide, we’ll explore the key concepts, why they matter, and how to effectively study them.

Why Are Data Structures and Algorithms Important?

  1. Problem-Solving Efficiency – Understanding DSA helps you write optimized and scalable code, reducing time complexity.
  2. Coding Interviews – Companies like Google, Amazon, and Microsoft emphasize DSA in their technical interviews.
  3. Performance Optimization – Efficient algorithms ensure that applications run smoothly and scale well.
  4. Competitive Programming – Platforms like LeetCode, Codeforces, and HackerRank test your ability to solve problems quickly using DSA.
  5. Building Core Programming Skills – A strong grasp of DSA makes learning new programming languages and technologies easier.

Essential Data Structures

1. Arrays and Strings

  • Usage: Storing data in a contiguous memory space, fast access via indexing.
  • Common Problems: Sliding window problems, two-pointer techniques, searching, and sorting.

2. Linked Lists

  • Types: Singly, Doubly, and Circular Linked Lists.
  • Use Cases: Implementing stacks and queues, efficient insertion/deletion.

3. Stacks and Queues

  • Stack: Last In, First Out (LIFO) – Used for function calls, undo mechanisms.
  • Queue: First In, First Out (FIFO) – Used in scheduling, caching.

4. Hash Tables (Hash Maps)

  • Usage: Fast lookups, avoiding duplicate elements.
  • Common Problems: Anagrams, frequency counting, caching mechanisms.

5. Trees and Graphs

  • Binary Trees & Binary Search Trees (BSTs): Used for hierarchical data representation, fast searching.
  • Graphs: Useful for network routing, social media algorithms, pathfinding (Dijkstra’s, BFS, DFS).

Must-Know Algorithms

1. Sorting Algorithms

  • Bubble Sort, Selection Sort, Insertion Sort – Basic sorting, slow for large datasets.
  • Merge Sort, Quick Sort, Heap Sort – Efficient, commonly used in libraries.

2. Searching Algorithms

  • Linear Search – O(n) time complexity, used for unsorted data.
  • Binary Search – O(log n) time complexity, requires sorted data.

3. Recursion and Backtracking

  • Recursion: Solving problems by breaking them into subproblems (e.g., Fibonacci sequence, Tower of Hanoi).
  • Backtracking: Used in problems like N-Queens, Sudoku solver, and generating permutations.

4. Dynamic Programming (DP)

  • Usage: Solving complex problems by breaking them down into overlapping subproblems.
  • Examples: Fibonacci numbers, Knapsack problem, Longest Common Subsequence.

How to Study Data Structures and Algorithms Effectively

  1. Pick a Programming Language – Stick with one (Python, Java, C++, etc.) and get comfortable with syntax.
  2. Learn by Doing – Solve problems daily on platforms like LeetCode, CodeChef, and GeeksforGeeks.
  3. Visualize Data Structures – Use tools like VisuAlgo and Algorithm Visualizer to understand concepts better.
  4. Understand Time and Space Complexity – Use Big O notation to analyze and optimize algorithms.
  5. Implement from Scratch – Writing your own implementations of sorting, searching, and trees reinforces concepts.
  6. Join a Coding Community – Engage in coding competitions and discussions to stay motivated.

Conclusion

Mastering Data Structures and Algorithms is essential for any computer science student. It lays the foundation for efficient problem-solving and is a key skill for technical interviews and real-world applications. By consistently practicing, understanding core concepts, and participating in competitive programming, you can significantly improve your programming skills and career prospects.

Happy coding!

100daysofcode lebanon-mug

Day 46: Breaking Barriers in STEM—One Woman at a Time

Artificial Intelligence is one of the hottest fields in technology today, shaping everything from medicine to finance and beyond. As AI revolutionizes industries, the demand for skilled professionals continues to surge. Yet, women remain vastly underrepresented in this space, making up just 22% of AI professionals, 12% of AI researchers, and 16% of AI faculty members. The future of AI is being written now, and ensuring diverse voices contribute to its development is more critical than ever.

The Afghan Dreamers: A Story of Resilience

If there’s one story that embodies the power of women in STEM, it’s that of the Afghan Girls Robotics Team, known as the Afghan Dreamers. In a country where educational opportunities for girls remain scarce, these young women built robots with limited resources, teaching themselves engineering principles and problem-solving skills. They fought for visas, overcame countless obstacles, and made it to the FIRST Global Challenge, proving that talent and determination know no borders.

Their journey is not just about robotics; it’s about breaking barriers—ones that persist differently across the world. While some face systemic restrictions on education, others navigate industries where they are still vastly underrepresented. The challenge may look different, but the need for inclusion remains the same.

Changing the Narrative

Empowerment starts with access. That’s why Microsoft and Founderz have teamed up to launch a free, self-paced AI training program—an initiative designed to equip anyone, regardless of background, with the tools to thrive in AI. Whether you’re looking to upskill, pivot careers, or simply explore the technology reshaping our world, this course is your chance to step in. Because the future of STEM—and AI in particular—should be shaped by diverse minds.

Your Turn to Lead

AI is not just for the privileged few; it’s for those ready to learn, adapt, and innovate. If the Afghan Dreamers could break through unimaginable barriers, then every woman, everywhere, deserves the chance to do the same. With free training now at our fingertips, the path is open. The only question is: will we take the first step?

Start your AI journey today: https://lnkd.in/d69vGvQb

100daysofcode lebanon-mug

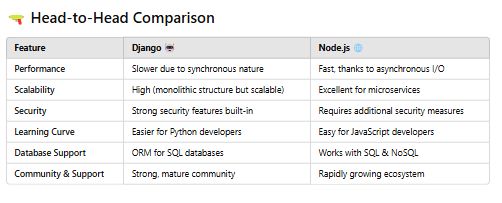
Day 47: Django vs Node.js: Which One Should You Choose?

In the ever-evolving landscape of web development, two back-end giants frequently dominate the discussion: Django :robot: and Node.js :globe_with_meridians:. If you’re a developer, startup founder, or CTO trying to decide which framework to adopt, this guide will help you understand the strengths, weaknesses, and best use cases of both technologies.

:hammer_and_wrench: Technology Overview

Django - The Python Powerhouse :robot:

Django is a high-level Python web framework that emphasizes rapid development and clean, pragmatic design.

Language: Python :man_technologist:

Architecture: MVT (Model-View-Template)

Key Features: Built-in authentication, ORM (Object-Relational Mapping), security-first approach, and scalability.

Used By: Instagram, Pinterest, Mozilla

Node.js - The JavaScript Juggernaut :globe_with_meridians:

Node.js is a runtime environment that allows JavaScript to run server-side, making it perfect for event-driven applications.

Language: JavaScript/TypeScript :man_artist:

Architecture: Event-driven, non-blocking I/O

Key Features: Asynchronous processing, microservices-friendly, high concurrency handling.

Used By: Netflix, PayPal, LinkedIn

:star2: When to Choose What?

Use Django If: :white_check_mark:

  • You need rapid development with built-in security features.

  • Your project requires complex relational databases.

  • You prefer Python and its extensive ecosystem.

  • You’re building an app that prioritizes data security (e.g., healthcare, banking).

Use Node.js If: :white_check_mark:

  • You need real-time applications (e.g., chat apps, live streaming).

  • You want to build highly scalable microservices.

  • Your team is already experienced in JavaScript.

  • You’re handling high concurrent requests.

Happy Coding!

100daysofcode lebanon-mug

:rocket: Day 48: Introduction to the MERN Stack

The MERN Stack (MongoDB, Express.js, React.js, Node.js) is one of the most powerful tech stacks for building modern full-stack web applications. It offers a seamless JavaScript-based development experience, making it a top choice for developers and businesses alike. But what makes MERN stand out? Let’s break it down.

:fire: Why is the MERN Stack So Popular?

:white_check_mark: JavaScript Everywhere: Developers can work with a single language across the frontend, backend, and database, reducing complexity and improving productivity.

:white_check_mark: Fast & Scalable: MongoDB’s NoSQL structure enables rapid data retrieval, Node.js handles thousands of requests efficiently, and React optimizes rendering performance.

:white_check_mark: Full Flexibility: MERN allows developers to create everything from small apps to enterprise-level solutions, from static sites to dynamic applications.

:white_check_mark: Huge Community Support: With an extensive ecosystem of libraries, tools, and frameworks, developers can find solutions, templates, and best practices easily.

:bulb: How the MERN Stack Works

A MERN application follows a structured workflow where all components work together to handle frontend interactions, backend processing, and database management. Here’s how the data flows:

:one: React Frontend – Users interact with the UI. React handles user input and makes API calls.

:two: Express.js & Node.js Backend – Express processes requests, applies business logic, and interacts with the database.

:three: MongoDB Database – Data is stored and retrieved in a flexible, JSON-like format.

:four: API Response Cycle – Data is sent back to React, which dynamically updates the UI.

:sparkles: Real-World Applications of MERN

Many successful startups and enterprises use the MERN stack due to its efficiency. Some common use cases include:

:pushpin: E-commerce Platforms: MERN enables seamless shopping experiences with dynamic product catalogs, real-time inventory updates, and secure payment integrations.

:pushpin: Social Media Applications: Features like user authentication, live updates, and messaging can be efficiently managed using MERN.

:pushpin: SaaS Products: Subscription-based platforms rely on MERN for interactive dashboards and cloud-based functionalities.

:pushpin: Project Management & Collaboration Tools: MERN’s flexibility makes it perfect for building real-time apps like Trello and Notion clones.

:crystal_ball: Future of the MERN Stack

With JavaScript evolving and frameworks like Next.js and Remix gaining traction, MERN continues to adapt. The integration of serverless functions, GraphQL, and AI-driven automation will further enhance its capabilities.

:thought_balloon: Ready to start your MERN journey? Stay tuned for Part 2: Setting Up a MERN Project from Scratch!

100daysofcode lebanon-mug

:rocket: Day 49: Setting Up the MERN Stack – The Right Way with Vite!

The MERN stack (MongoDB, Express, React, Node.js) is one of the most powerful full-stack combinations. But setting it up right is key! And let’s face it—Create React App is dead :rotating_light:. The best way to set up React now is with Vite :zap:.

Here’s a step-by-step guide to setting up a full MERN stack project from scratch.


:wrench: Step 1: Installing Node.js & npm

First, install Node.js from :point_right: nodejs.org (choose the latest LTS version).

Once installed, check if it’s working by running:
node -v
npm -v

If both return version numbers, you’re good to go :white_check_mark:.


:open_file_folder: Step 2: Setting Up the Backend (Express.js)

Now, let’s set up Node.js & Express.

:one: Create a new project folder:
mkdir mern-app && cd mern-app

:two: Initialize a Node.js project:
npm init -y

:three: Install Express:
npm install express

:four: Create a new file called index.js and add this:

javascript

CopyEdit

const express = require('express');  
const app = express();  

app.get('/', (req, res) => {  
    res.send('MERN Backend is running!');  
});  

app.listen(5000, () => {  
    console.log('Server is running on port 5000');  
});  

:five: Start the server:
node index.js

If you see “Server is running on port 5000”, your backend is working! :tada:


:oil_drum: Step 3: Connecting MongoDB

Now, let’s connect MongoDB. You can use MongoDB Compass (local) or MongoDB Atlas (cloud-based).

:one: Install Mongoose:
npm install mongoose

:two: In index.js, connect MongoDB:

javascript

CopyEdit

const mongoose = require('mongoose');  

mongoose.connect('mongodb://localhost:27017/mernapp', {  
    useNewUrlParser: true,  
    useUnifiedTopology: true  
})  
.then(() => console.log('MongoDB Connected'))  
.catch(err => console.error(err));  

If it logs “MongoDB Connected”, your database is now linked! :white_check_mark:


:atom_symbol: Step 4: Setting Up React with Vite

Forget Create React App—Vite is faster and better.

:one: Inside mern-app, create a React app with Vite:
npm create vite@latest client -- --template react

:two: Navigate into the client folder:
cd client

:three: Install dependencies:
npm install

:four: Start the React app:
npm run dev

Your frontend should now be running at localhost:5173! :rocket:


:link: Step 5: Connecting Frontend & Backend

To allow React to communicate with Express, you need to set up a proxy.

:one: Open client/vite.config.js and add this:

php

CopyEdit

export default defineConfig({  
  server: {  
    proxy: {  
      '/api': 'http://localhost:5000'  
    }  
  }  
});  

Now, React can make API calls to Express without CORS issues!

100daysofcode lebanon-mug

:file_folder: Day 50: Structuring a MERN Project for Scalability :rocket:

The MERN stack (MongoDB, Express.js, React, Node.js) is great for building full-stack apps, but if your project is poorly structured, it will lead to bugs, messy code, and maintenance nightmares.

A well-structured backend makes your code more scalable, readable, and secure. This post will guide you through structuring your MERN backend properly using the MVC (Model-View-Controller) pattern.

:one: Why Structure Your Backend Properly?
:small_blue_diamond: Separation of concerns → Business logic is separate from database & routes
:small_blue_diamond: Scalability → Adding features is easy
:small_blue_diamond: Better collaboration → Multiple developers can work efficiently
Recommended Folder Structure

/server
├── controllers/ → Handles logic
├── models/ → Defines data structure
├── routes/ → API endpoints
├── middleware/ → Security & validation
├── config/ → Database & environment variables
├── utils/ → Reusable helper functions
├── index.js → Main server file

:two: Models: Defining Data Structure
Models define how data is stored in MongoDB.
Example: User Model (models/User.js)
Defines user schema
Encrypts passwords
Adds timestamps automatically
:small_red_triangle_down:
const mongoose = require(‘mongoose’);
const UserSchema = new mongoose.Schema({
name: { type: String, required: true },
email: { type: String, required: true, unique: true },
password: { type: String, required: true },
role: { type: String, enum: [“user”, “admin”], default: “user” }
}, { timestamps: true });
module.exports = mongoose.model(“User”, UserSchema);
:small_red_triangle:
:three: Controllers: Handling Business Logic
Controllers process requests and interact with models.
Example: User Controller (controllers/userController.js)
:small_blue_diamond: Registers a user
:small_blue_diamond: Hashes passwords
:small_blue_diamond: Handles login authentication
:small_red_triangle_down:
const User = require(‘…/models/User’);
const bcrypt = require(‘bcrypt’);
const jwt = require(‘jsonwebtoken’);
exports.registerUser = async (req, res) => {
try {
//Code Logic Here
} catch (error) { res.status(500).json({ error: error.message }); }
};
:small_red_triangle:
:four: Routes: Managing API Endpoints
Routes define API paths and call controllers.
Example: User Routes (routes/userRoutes.js)
:small_blue_diamond: Links API endpoints to controllers
:small_blue_diamond: Keeps routing separate from business logic
:small_red_triangle_down:
const express = require(‘express’);
const { registerUser, loginUser } = require(‘…/controllers/userController’);
const router = express.Router();
router.post(‘/register’, registerUser);
router.post(‘/login’, loginUser);
module.exports = router;
:small_red_triangle:
:five: Bringing It All Together: The Main Server File (index.js)
:small_blue_diamond: Loads environment variables
:small_blue_diamond: Connects to MongoDB
:small_blue_diamond: Sets up routes

100daysofcode lebanon-mug

Day 51: Securing Your Node.js Application: Best Practices for Environment Variables, Authentication, and Middleware Security

In today’s digital landscape, security is non-negotiable. Whether you’re building a small side project or an enterprise-level application, securing your Node.js application should be a top priority. Exposing sensitive credentials, neglecting authentication protocols, or ignoring middleware security can lead to devastating consequences, including data breaches and unauthorized access.

In this guide, we’ll explore three crucial aspects of Node.js security:

:one: Environment Variables: Keeping Credentials Safe

One of the most common security mistakes developers make is hardcoding sensitive credentials directly into their source code. Exposing database connection strings, API keys, or secret tokens in your codebase is a major security risk.

Use .env Files to Store Secrets

A better approach is to use environment variables. The dotenv package allows you to load environment variables from a .env file into process.env.

Install dotenv:

npm install dotenv

Configure dotenv in your application:

require(‘dotenv’).config(); const mongoURI = process.env.MONGO_URI;

This ensures that sensitive data is never exposed in your repository. Best practice: Add .env to .gitignore to prevent it from being committed.

:two: Secure Authentication & Authorization with JWT

Authentication ensures that users are who they claim to be, while authorization determines what they can access. A widely used method for secure authentication in Node.js applications is JSON Web Tokens (JWT).

Install JWT:

npm install jsonwebtoken

Generate a JWT Token

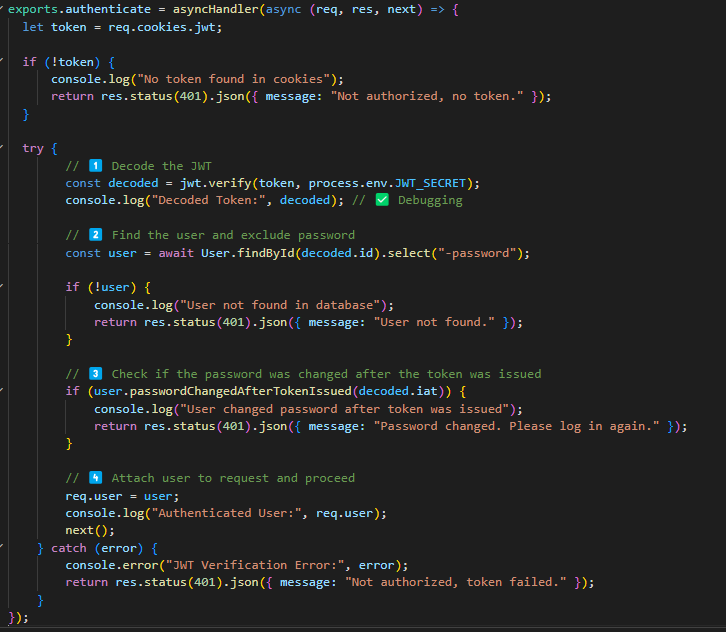
When a user logs in, issue a signed token that can be used for subsequent requests. const jwt = require(“jsonwebtoken”); const token = jwt.sign({ userId }, process.env.JWT_SECRET, { expiresIn: “7d” });

Middleware to Verify JWT

To protect routes, use a middleware function to validate JWTs before processing requests. Check the picture for relavent code.

Protecting Routes

Use the authentication middleware to secure sensitive routes.

:three: Middleware Security: Helmet & CORS

Middleware plays a crucial role in securing your Node.js application by protecting it from common web vulnerabilities.

:shield: Helmet: Secure HTTP Headers

Helmet helps protect your app by setting various HTTP headers that prevent cross-site scripting (XSS), clickjacking, and other attacks.

Install Helmet:

npm install helmet

Use Helmet in Your App:

const helmet = require(“helmet”); app.use(helmet());

:arrows_counterclockwise: CORS: Controlling Cross-Origin Requests

Cross-Origin Resource Sharing (CORS) determines how your web app handles requests from different domains. By default, browsers block cross-origin requests, but in some cases, you may need to allow them.

Install CORS:

npm install cors

Configure CORS:

const cors = require(“cors”); app.use(cors({ origin: “https://yourfrontend.com” }));

100daysofcode lebanon-mug

:rocket: Day 52: Microsoft’s TypeScript Gets a Go-Powered Upgrade!

Microsoft is rewriting the TypeScript compiler in Go (codenamed Corsa)—and the performance gains are massive:
:zap: 10x faster builds
:rocket: 8x faster project load times
:brain: AI-powered developer tools

If you’ve ever felt frustrated by slow TypeScript builds, this could be a game-changer. But wait… why is Microsoft moving away from JavaScript?

Why Not Just Speed Up JavaScript?
JavaScript is fantastic for UI and web apps, but when it comes to compute-heavy workloads like compilers, it hits a major roadblock: single-threading.

:bulb: JS runs on a single core and lacks true multi-threading support. While features like Shared Structs are in development, they’re not ready yet. On the other hand, Go and Rust have native multi-threading. They can fully utilize multiple CPU cores, massively improving performance. That’s why Microsoft had to look beyond JavaScript.

Why Go? Not Rust? Not C++?
Many expected Rust (like Deno, Turbo, and Rolldown), but Microsoft chose Go for three key reasons:
:heavy_check_mark: Ease of porting – Go allows a structured, line-by-line conversion from the existing TypeScript codebase.
:heavy_check_mark: Garbage collection – Unlike Rust, Go’s memory management is automatic, simplifying implementation.
:heavy_check_mark: Simplicity – Go is easy to write, read, and maintain.

What This Means for Developers
:pushpin: Blazing-fast TypeScript compilation – Say goodbye to long build times.
:pushpin: Lower memory usage – The Go-based compiler will use ~50% less memory than today’s JS version.
:pushpin: AI-powered coding assistance – Faster TypeScript means smarter dev tools.

The JS-based TypeScript (6.x) will continue, but TypeScript 7.0 (native Go) is the future. Expect a preview by mid-2025 and a full rollout by year-end.

100daysofcode lebanon-mug typescript

Day 53: Axios vs. React Query, Which One Should You Use in Your React App?

When building a React app, fetching data is a must. But how do you do it efficiently? Two popular options are Axios and React Query. While both can get the job done, they serve different purposes. Let’s break it down for beginners. :rocket:

Axios: The Classic Choice :satellite:
Axios is a promise-based HTTP client that simplifies making requests to APIs. It’s widely used for sending GET, POST, PUT, DELETE requests and handling responses.

:white_check_mark: Why use Axios?
Simple API for making HTTP requests (like axios.get(url))
Supports request/response interception
Allows setting global headers (like authentication tokens)
Works with Node.js as well

:x: What it lacks:
No built-in caching or data synchronization
You need to manually manage loading, error states, and retries
Doesn’t handle automatic background refetching
Example usage:
import axios from ‘axios’;

const fetchData = async () => {
try {
const response = await axios.get(‘url’);
console.log(response.data);
} catch (error) {
console.error(error);
}
};

React Query: The Smart Choice? :robot:
React Query is a data-fetching and state management library that abstracts away the complexity of handling API requests. It makes working with server-side data more powerful and efficient.
:white_check_mark: Why use React Query?
Built-in caching :convenience_store: (reduces unnecessary API calls)
Auto-refetching when data becomes stale
Background updates (users always get fresh data)
Error handling & retries out of the box
Infinite scrolling & pagination support

:x: What it lacks:
Slightly steeper learning curve for beginners
Adds extra dependencies (though lightweight)
Might be overkill for simple projects
Example usage:
import { useQuery } from ‘react-query’;
import axios from ‘axios’;

const fetchData = async () => {
const { data } = await axios.get(‘LinkedIn’);
return data;
};

const MyComponent = () => {
const { data, isLoading, error } = useQuery(‘myData’, fetchData);

if (isLoading) return

Loading…

;
if (error) return

Error: {error.message}

;

return

{JSON.stringify(data)}
;
};

Which One Should You Use? :person_shrugging:
It depends on your needs! Here’s a quick comparison:
FeatureAxiosReact QuerySimple API Requests​:white_check_mark::white_check_mark:Global Headers​:white_check_mark::x: (but can be set via Axios)Caching​:x::white_check_mark:Auto-Refetching​:x::white_check_mark:Error HandlingManual​:white_check_mark: Built-inBackground Sync​:x::white_check_mark:Pagination Support​:x::white_check_mark:

:rocket: Use Axios if:
You just need to fetch data without advanced state management.
Your app is small, and you don’t need caching or auto-refetching.
You want full control over API requests and responses.

:zap: Use React Query if:
You want automatic caching, retries, and background refetching.
Your app relies on real-time or frequently updated data.
You need built-in pagination or infinite scrolling.

And as always, happy coding!

100daysofcode lebanon-mug

Day 54 | Understanding CORS: Why Your API Might Be Rejecting Requests

Ever tried to fetch data from an API, only to see a frustrating error in the console—something about “CORS policy” blocking your request? If you’re developing web applications, you’ve likely encountered this issue. Let’s break it down.

What is CORS?
Cross-Origin Resource Sharing (CORS) is a security mechanism implemented by web browsers that controls which domains can access resources on a server. By default, browsers enforce the Same-Origin Policy (SOP), which blocks requests between different origins to prevent malicious attacks.

:small_blue_diamond: Origin? In the web context, an “origin” is defined by three components:
Protocol (HTTP or HTTPS)
Domain (e.g., example.com)
Port (e.g., :3000 for development)

If any of these differ between the frontend and backend, the request is considered cross-origin and may be blocked unless explicitly allowed.

How CORS Works
When a browser sends a cross-origin request, it checks whether the server allows such requests by including special CORS headers in the response.

:white_check_mark: If the response contains Access-Control-Allow-Origin: * (or the specific requesting domain), the browser permits the request.
:x: Otherwise, the request is blocked, leading to the infamous CORS error.

Types of CORS Requests
:one: Simple Requests – Directly sent without a preflight check (e.g., GET requests without custom headers).
:two: Preflight Requests – When using POST, PUT, DELETE, or custom headers, the browser first sends an OPTIONS request to check if the actual request is allowed.

Fixing CORS Issues
If you’re dealing with CORS errors, here are some common solutions:
:small_blue_diamond: Server-Side Configuration: Modify the backend to allow cross-origin requests using appropriate headers, e.g.,
Access-Control-Allow-Origin: [your frontend url]
Access-Control-Allow-Methods: GET, POST, PUT
Access-Control-Allow-Headers: Content-Type

:small_blue_diamond: Use a Proxy: If modifying the backend isn’t an option, configure a proxy on your frontend (e.g., in webpack.config.js or API Gateway).

:small_blue_diamond: CORS Middleware: If using Express.js, add:
javascript
const cors = require(‘cors’);
app.use(cors({ origin: '[your frontend url] });

Final Thoughts
CORS isn’t a bug—it’s a security feature. Understanding how it works helps in designing secure, scalable web applications without unnecessary headaches.
Have you run into CORS issues before? Let’s discuss your workarounds in the comments! :rocket:

100daysofcode lebanon-mug

Day 55: RTK Query & Store.js: Simplifying API State Management in Redux Toolkit

Modern React applications need efficient data fetching and caching. Instead of manually managing API calls with useEffect and useState, RTK Query simplifies this by integrating API state directly into Redux Toolkit.

:small_blue_diamond: What is RTK Query?
RTK Query is a data-fetching and caching tool within Redux Toolkit. It automates caching, refetching, and state updates, making API interactions more efficient.

:small_blue_diamond: Configuring Redux Store (store.js)
To integrate RTK Query, the Redux store is configured with configureStore, where the API service is added to the reducers and middleware.
Example: The store includes authApi.reducerPath in the reducers and appends authApi.middleware to handle caching and async requests efficiently.

:small_blue_diamond: Defining an API Service
A typical RTK Query API service uses createApi, specifying a base URL and defining API endpoints. These endpoints can be queries (for fetching data) or mutations (for sending data).
For example, an authentication API service might have:
A mutation for logging in (loginUser) that sends a POST request.
A query for fetching user details (getUserProfile).
RTK Query automatically generates React hooks for these, such as useLoginUserMutation and useGetUserProfileQuery, making it easy to interact with APIs in components.

:small_blue_diamond: Using RTK Query in Components
Once the API service is set up, these hooks can be used in React components. Calling useLoginUserMutation triggers a login request, while useGetUserProfileQuery automatically fetches user data and handles loading and error states.

:small_blue_diamond: Why Use RTK Query?
Reduces Boilerplate: No need for managing state, useEffect, or additional API handling.

Automatic Caching & Re-fetching: Avoids redundant API calls and keeps data fresh.

Built-in Error Handling: Simplifies network request management.
By structuring the Redux store with RTK Query, applications become more scalable, maintainable, and performant, ensuring a better developer and user experience. :rocket:

100daysofcode lebanon-mug

:rocket: Day 56 | Mastering React Router: Navigating the Web Like a Pro

Building a seamless single-page application (SPA)? Then React Router should be your best friend. It’s the go-to library for managing navigation in React apps, ensuring users move between views effortlessly without full-page reloads.

But here’s the catch—many developers underutilize or misconfigure React Router, leading to sluggish performance, broken navigation, or confusing user experiences. Let’s break down some key insights:
:small_blue_diamond: React Router: The Core Features You Need to Know
:white_check_mark: Dynamic Routing: Unlike traditional static routing, React Router uses component-based routing, meaning routes are determined at runtime, adapting dynamically.
:white_check_mark: Nested Routes: Components can have child routes, keeping your UI structured and your code organized. Example:

jsx
<Route path=“/dashboard” element={}>
<Route path=“settings” element={} />

:white_check_mark: Protected Routes: Need authentication before accessing certain pages? Wrap your routes in a higher-order component (HOC) to check for user permissions.
:white_check_mark: URL Parameters & Query Strings: Fetch dynamic data based on URL parameters.
jsx
Copy code
<Route path=“/profile/:userId” element={} />
Then access userId using useParams().
:white_check_mark: Lazy Loading with Suspense: Speed matters. Load components only when needed using React.lazy().

jsx
const Dashboard = React.lazy(() => import(“./Dashboard”));

:zap: Common Mistakes That Slow You Down
:x: Using Hash Routing When You Don’t Need It
:point_right: Unless you’re building for legacy browsers, stick with BrowserRouter for clean URLs.
:x: Forgetting Instead of in v6+
:point_right: If you recently upgraded, remember Switch is deprecated—use Routes instead.
:x: Not Handling 404s Properly
:point_right: Always include a wildcard route for unmatched paths:

jsx
<Route path=“*” element={} />

:pushpin: The Bottom Line
React Router is more than just “links and paths”—it’s a powerful tool that can make or break user experience. Optimize routing logic, leverage performance boosters, and avoid common pitfalls to build apps that feel fluid and intuitive.

What are your biggest challenges with React Router? Drop your thoughts below! :point_down:

100daysofcode lebanon-mug

Day 57 | The Problem with Vibe Coding: Why Students Should Still Learn to Code :rocket:

There’s a growing narrative that students shouldn’t bother learning to code because AI can do it for them. This idea, often disguised as “vibe coding” (where people rely on AI-generated code without understanding how it works), is dangerous. The reasoning? Just as calculators perform math, kids don’t need to learn arithmetic, right? Wrong.

Learning to Code is Not About Typing Code

People misunderstand the purpose of coding education. It’s not about memorizing syntax—it’s about problem-solving, logic, and breaking down complex tasks. Great developers aren’t just code generators; they are problem solvers who understand system design, efficiency, and optimization.

Just because an AI can generate code snippets doesn’t mean it can build maintainable, scalable, and secure software on its own. If students rely on AI without understanding the underlying logic, they become copy-paste engineers, not actual software engineers.

The Future of Software Engineering is Changing—But Not in the Way You Think

Yes, AI is evolving. Yes, AI-assisted coding (GitHub Copilot, ChatGPT, etc.) is making development faster. But rather than replacing programmers, AI is augmenting them.

AI is great at: :white_check_mark: Generating boilerplate code :white_check_mark: Suggesting fixes for common errors :white_check_mark: Speeding up development workflows

But it’s terrible at: :x: Understanding the business logic behind software :x: Debugging complex, system-wide issues :x: Writing code that is reliable and secure without human oversight

Andrew Ng, one of the most respected AI researchers and professors, shares this viewpoint: AI isn’t replacing programmers—it’s making them 10x more effective. But to take advantage of this, developers need strong fundamentals.

Telling Students “Don’t Learn to Code” is Bad Advice

Imagine telling an aspiring writer not to learn grammar because spellcheck exists. Or telling a surgeon they don’t need anatomy because robotic assistants exist. It’s the same logic when people argue students shouldn’t learn to code.

Yes, AI-generated code is impressive. But without foundational knowledge, how do you know if that code is efficient, secure, and actually works?

The best engineers of the future won’t just know how to code. They’ll know how to think in code—leveraging AI as a tool, not a crutch.

The bottom line? Students should absolutely keep learning to code. But they should also learn how to code with AI, not instead of AI.

:bulb: What’s your take on AI-assisted coding? Is it making people better engineers or just making them dependent on AI? Let’s discuss! :point_down:

100daysofcode lebanon-mug

Day 58: :rocket: Mastering Backend Testing with Postman

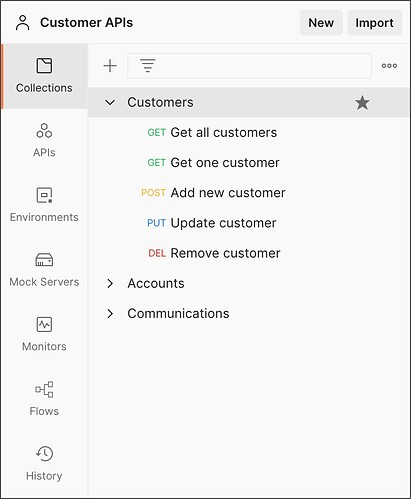
One of the most powerful tools in a developer’s arsenal is Postman. It helps track down the source of issues by simulating API requests and verifying responses before integrating with the frontend. Let’s break down how Postman makes backend testing efficient and how to seamlessly transition from backend to frontend testing.

:hammer_and_wrench: How Postman Simplifies Backend Testing
Postman is more than just an API testing tool—it’s a comprehensive platform that can be used to test endpoints, validate responses, and debug issues. Here’s how it helps identify the root cause of bugs:

  1. Isolate Backend Issues Early
    By directly hitting backend APIs, you can determine whether an issue is rooted in the backend or arises from frontend integration. For instance, if an API call fails in Postman but works on the frontend, the issue likely lies in how the frontend handles the response.

  2. Test with Precision and Efficiency
    Instead of blindly navigating the entire system, use Postman to make precise API calls with various inputs and observe how the backend responds. This saves time and gives clarity on where the problem originates.

  3. End-to-End API Testing
    Postman supports testing complete user flows by chaining multiple API requests. This is particularly useful when simulating multi-step processes such as user registration and login.

:books: Best Practices for Effective Testing
To make your testing organized and effective, here are some essential practices:

  1. Organize Endpoints with Collections
    Group your endpoints into collections based on functionality:
    User Management Collection: Test all user-related endpoints like registration, login, and profile updates.

Product Management Collection: Group product CRUD operations.
Order Processing Collection: Include endpoints related to placing and tracking orders.

By structuring your collections this way, you’ll maintain clarity and make it easier to test related endpoints in bulk.

  1. Follow the Happy Path First :green_circle:
    Start by testing the happy path—the optimal scenario where everything works as intended. Once validated, move on to edge cases and negative testing to see how the system handles unexpected inputs.

  2. Use Environment Variables
    Instead of hardcoding URLs or credentials, use environment variables. This makes it simple to switch between development, staging, and production environments without manually editing every request.

  3. Automate with Test Scripts
    Postman’s scripting feature allows you to run assertions after every request. For instance:
    javascript
    pm.test(“Status code is 200”, function () {
    pm.response.to.have.status(200);
    });

This simple script checks that the response status is 200 OK and alerts you if it’s not, making error tracking more manageable.

  1. Document Your Tests
    Good documentation not only helps you but also your team. Add descriptions to your requests and collections to explain their purpose and how to use them.

100daysofcode lebanon-mug

:rocket: Day 59 | Understanding Different SWE Career Paths

Breaking into software engineering can be overwhelming, especially with roles like backend, frontend, full-stack, DevOps, mobile, and data engineering. Understanding the differences early on can set you up for success in interviews and unlock better opportunities.

:mag: Why Does It Matter? Imagine preparing for a backend engineering role by mastering frontend frameworks—sounds counterproductive, right? Knowing the differences helps you focus your learning and prep strategically. Each role demands unique skills and coding practices, and understanding them can save you time and effort.

:brain: Backend Engineers: Leetcode Kings Backend engineers handle logic and data management. They master algorithms and data structures (Leetcode is essential) and work with languages like Python, Java, or Go. System design and scalability are crucial skills. Focus on complex problem-solving and competitive programming.

:art: Frontend Engineers: UX Artists Frontend engineers bring visual elements to life and ensure smooth user interaction. They excel in HTML, CSS, JavaScript frameworks (React, Angular), and UI/UX design. Interviews often test dynamic interfaces and DOM manipulation.

:link: Full-Stack Engineers: Versatile Builders Full-stack engineers handle both frontend and backend tasks. They know frameworks like MERN or LAMP, API design, and integration. Interviews cover building full applications and bridging client-server logic.

:gear: DevOps Engineers: Deployment Experts DevOps engineers maintain smooth software deployment and CI/CD processes. They master tools like Docker, Jenkins, and cloud platforms (AWS, GCP). Be ready to discuss automated testing and server reliability.

:iphone: Mobile Engineers: App Builders Mobile engineers develop apps for iOS and Android using Swift, Kotlin, or cross-platform frameworks (Flutter, React Native). Key topics include performance optimization and hybrid vs. native approaches.

:dart: Final Thoughts Understanding software engineering roles early on gives you a major edge. Target your learning, build relevant projects, and practice role-specific interview questions. Master the right skills to become the software engineer you aspire to be! :muscle:

100daysofcode lebanon-mug

:rocket:Day 60 | Boost Performance Without Breaking the Bank: Server Optimization Tips for SWE

When your application starts slowing down, the knee-jerk reaction is to pay for more server space. But why not first squeeze every bit of performance out of your existing setup? Here’s a technical deep dive into some crucial optimizations that can make a world of difference before you open your wallet.

  1. :mag_right: Indexing Matters
    Poor indexing is one of the primary culprits behind sluggish database queries. Before investing in bigger servers, take a close look at your database schema:
    Create Indexes on Frequently Queried Fields: Identify columns that are frequently involved in WHERE, JOIN, and ORDER BY clauses.
    Composite Indexes: Combine multiple columns when they are commonly used together.
    Clustered vs. Non-Clustered: Choose wisely based on your data retrieval patterns.
    Regularly Update Statistics: Keep the query optimizer informed about data distribution.

  2. :vertical_traffic_light: Optimize Your Queries
    Even well-indexed databases can struggle if your queries are inefficient.
    Use Query Profiling Tools: PostgreSQL’s EXPLAIN, MySQL’s EXPLAIN ANALYZE, or SQL Server’s Query Analyzer are invaluable.
    Minimize Select Statements: Instead of SELECT *, specify only the columns you need.
    Avoid Subqueries When Possible: Use joins or common table expressions (CTEs) instead.
    Batch Your Updates: Instead of executing multiple small updates, combine them into one.
    Prepared Statements: Leverage them to improve performance and security.

  3. :bar_chart: Caching Is Your Best Friend
    If your application constantly retrieves the same data, you’re wasting server resources. Implement caching at multiple levels:
    In-Memory Caching: Use Redis or Memcached for rapid data retrieval.
    HTTP Caching: Leverage response caching and cache headers for static resources.
    Application-Level Caching: Cache expensive computations and frequently accessed data.
    Database Query Caching: Store the results of common queries.

  4. :gear: Efficient Data Storage
    Bloated databases can drastically slow performance. Keep your data lean and mean:
    Archive Old Data: Move less frequently accessed data to cheaper storage solutions.
    Partitioning: Split large tables to reduce the scanning effort.
    Data Compression: Compress old logs and rarely accessed datasets.
    Garbage Collection: Periodically clean up temporary tables and expired data.

  5. :computer: Load Balancing and Traffic Distribution
    If your application is highly trafficked, distributing the load can significantly improve performance:
    Reverse Proxying: Use NGINX or HAProxy to balance incoming requests.
    Horizontal Scaling: Add more instances rather than increasing individual server specs.
    Content Delivery Networks (CDN): Serve static assets from edge locations for quicker delivery.

Stay tuned for a part 2!

100daysofcode lebanon-mug