In a previous post, we talked briefly about using MongoDB and Databricks together. In this post, we'll cover the different ways to integrate these systems, and why.
Modern business demands expedited decision-making, highly-personalized customer experiences, and increased productivity. Analytical solutions need to evolve constantly to meet this demand of these changing needs, but legacy systems struggle to consolidate the data necessary to service these business needs. They silo data across multiple databases and data warehouses. They also slow turnaround speeds due to high maintenance and scaling issues. This performance hit becomes a significant bottleneck as the data grows into terabytes and petabytes.
To overcome the above challenges, enterprises need a solution that can easily handle high transaction volume, paired with a scalable data warehouse (increasingly known as a "lakehouse") that performs both traditional Business Intelligence (BI) and advanced analytics like serving Machine Learning (ML) models. In our previous blog post “Start your journey-operationalize AI enhanced real-time applications: mongodb-databricks” we discussed how MongoDB Atlas and the Databricks Lakehouse Platform can complement each other in this context.
In this blog post, we will deep dive on the various ways to integrate MongoDB Atlas and Databricks for a complete solution to manage and analyze data to meet the needs of modern business.
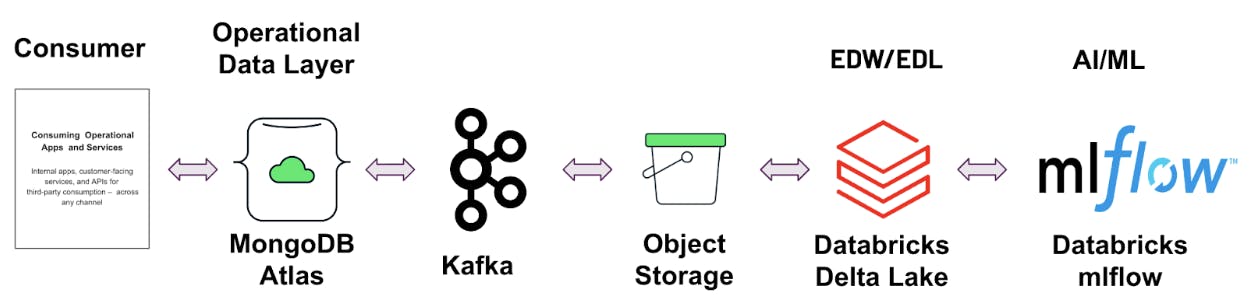
Integration architecture
Databricks Delta Lake is a reliable and secure storage layer for storing structured and unstructured data that enables efficient batch and streaming operations in the Databricks Lakehouse. It is the foundation of a scalable lakehouse solution for complex analysis. Data from MongoDB Atlas can be moved to Delta Lake in batch/real-time and can be aggregated with historical data and other data sources to perform long-running analytics and complex machine learning pipelines. This yields valuable insights. These Insights can be moved back to MongoDB Atlas so they can reach the right audience at the right time to be actioned. The data from MongoDB Atlas can be moved to Delta Lake in the following ways:
One-time data load
Real-time data synchronization
One-time data load
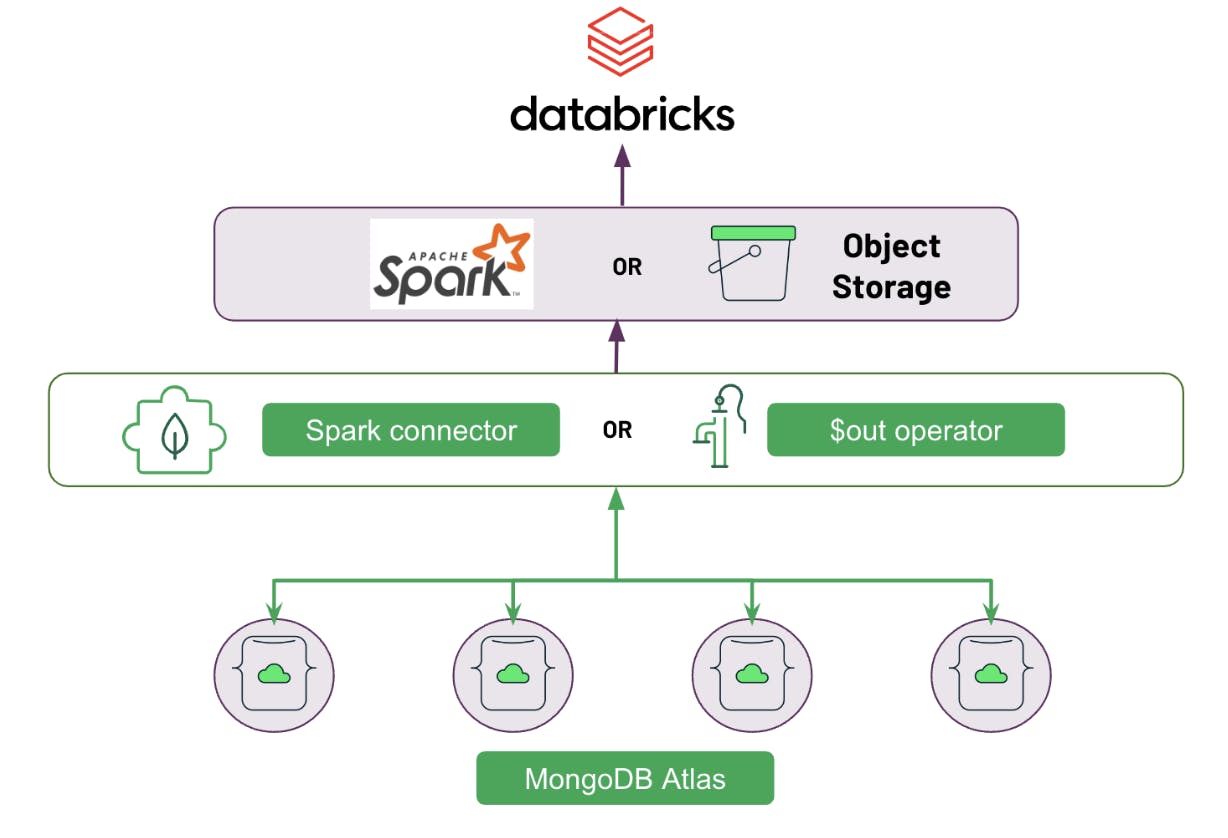
1. Using Spark Connector
The MongoDB Connector for Apache Spark allows you to use MongoDB as a data source for Apache Spark. You can use the connector to read data from MongoDB and write it to Databricks using the Spark API. To make it even easier, MongoDB and Databricks recently announced Databricks Notebooks integration, which gives you an even easier and more intuitive interface to write complex transformation jobs.
- Login to Databricks cluster, Click on New > Data.
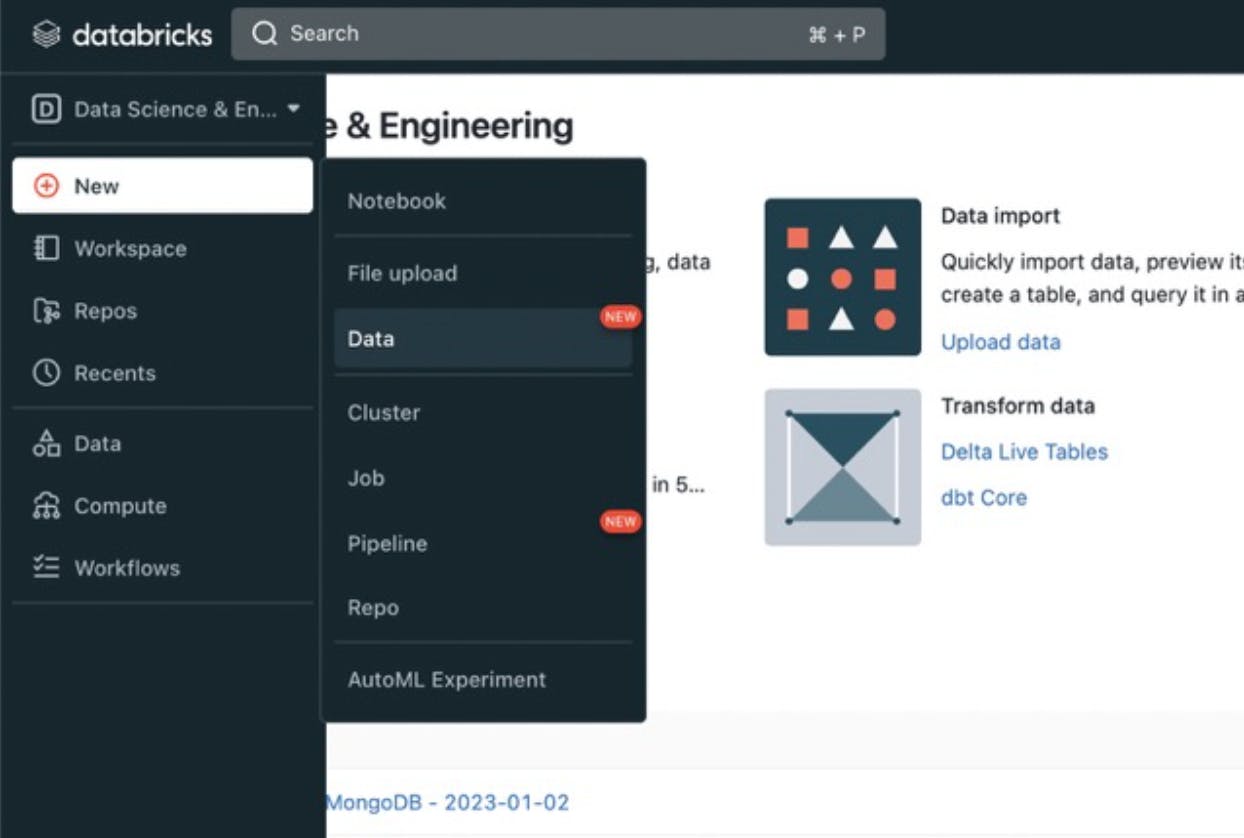
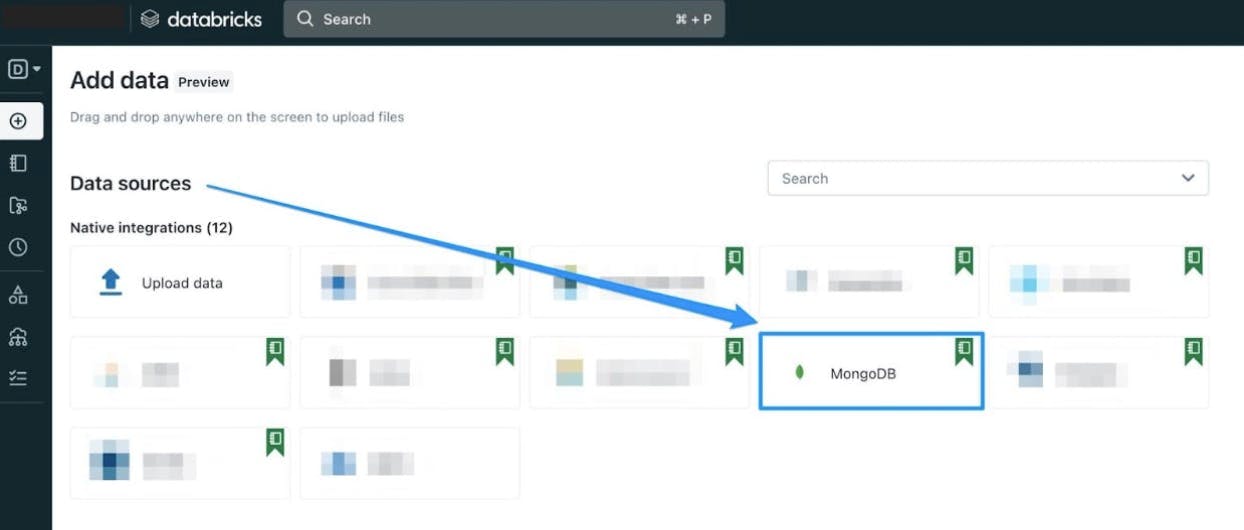
- Click on MongoDB which is available under Native Integrations tab. This loads the pyspark notebook which provides a top-level introduction in using Spark with MongoDB.
- Follow the instructions in the notebook to learn how to load the data from MongoDB to Databricks Delta Lake using Spark.
2. Using $out operator and object storage
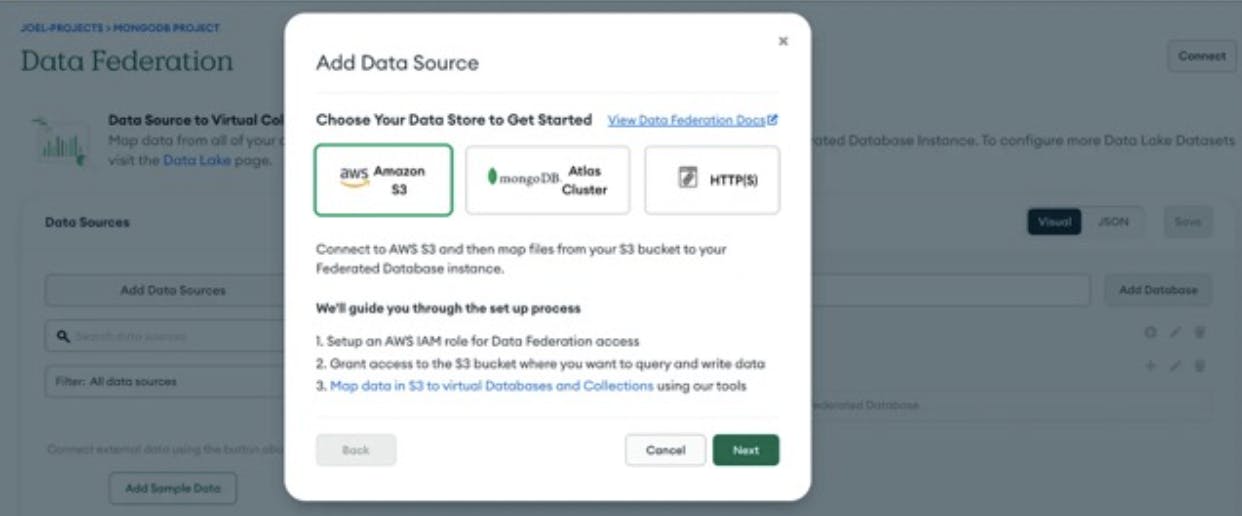
This approach involves using the $out stage in the MongoDB aggregation pipeline to perform a one-time data load into object storage. Once the data is in object storage, it can be configured as the underlying storage for a Delta Lake. To make this work, you need to set up a Federated Database Instance to copy our MongoDB data and utilize MongoDB Atlas Data Federation's $out to S3 to copy MongoDB Data and land it in an S3 bucket.
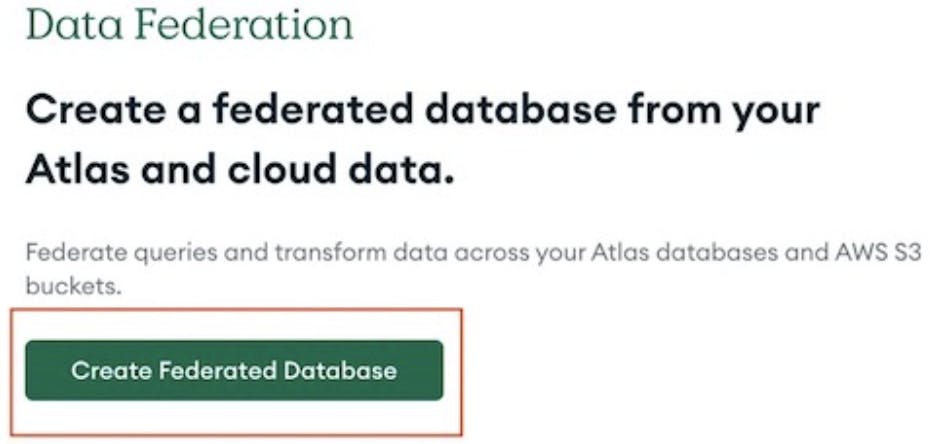
- The first thing you'll need to do is navigate to "Data Federation" on the left-hand side of your Atlas Dashboard and then click "Create Federated Database Instance" or "Configure a New Federated Database Instance."
- Connect your S3 bucket to your Federated Database Instance. This is where we will write the MongoDB data. The setup wizard should guide you through this pretty quickly, but you will need access to your credentials for AWS.
- Select an AWS IAM role for Atlas.
- If you created a role that Atlas is already authorized to read and write to your S3 bucket, select this user.
- If you are authorizing Atlas for an existing role or are creating a new role, be sure to refer to the documentation for how to do this.
- Enter the S3 bucket information.
- Enter the name of your S3 bucket.
- Choose Read and write, to be able to write documents to your S3 bucket.
- Assign an access policy to your AWS IAM role.
- Follow the steps in the Atlas user interface to assign an access policy to your AWS IAM role.
Your role policy for read-only or read and write access should look similar to the following: Define the path structure for your files in the S3 bucket and click Next. Now you've successfully configured S3 bucket with Atlas Data Federation.
Connect to your MongoDB instance using the MongoDB shell. This command prompts you to enter the password.
mongosh "mongodb+srv://server.example.mongodb.net" --username usernameSpecify the database and collection that you want to export data from using the following commands.
use db_name;db.collection_name.find()
Replace db_name and collection_name with actual values and verify the data exists by running the above command.Use the $out operator to export the data to an S3 bucket.
db.[collection_name].aggregate([{$out:
"s3://[bucket_name]/[folder_name]"}])
Make sure to replace [collection_name], [bucket_name] and [folder_name] with the appropriate values for your S3 bucket and desired destination folder.- Download and Install the MongoDB Source connector plugin in your Kafka Cluster from here.
- Update the following in the mongodb-source-connector.properties connector configuration file.
- CONNECTION-STRING - MongoDB Cluster Connection String
- DB-NAME - Database Name
- COLLECTION-NAME - Collection Name
Deploy the connector configuration file in your Kafka Cluster. This will enable real time data synchronization from MongoDB to Kafka Topic.
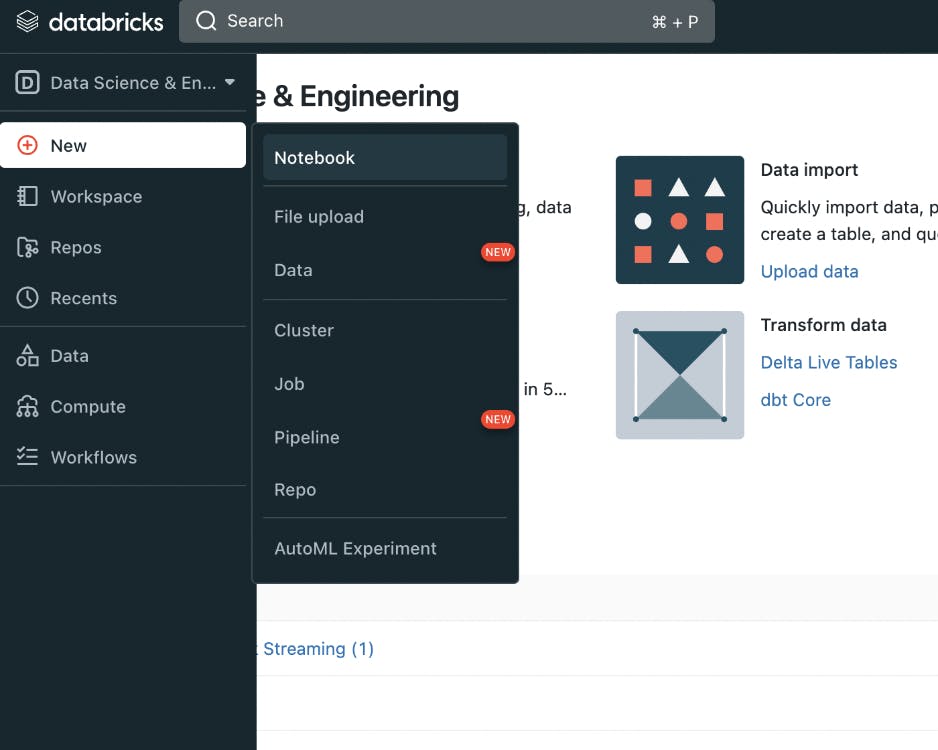
Login to Databricks cluster, Click on New > Notebook.
In create a notebook dialog, enter a Name, select Python as the default language, and choose the Databricks cluster. Then click on Create.
Obtain the IPython notebook for DLT pipeline from here.
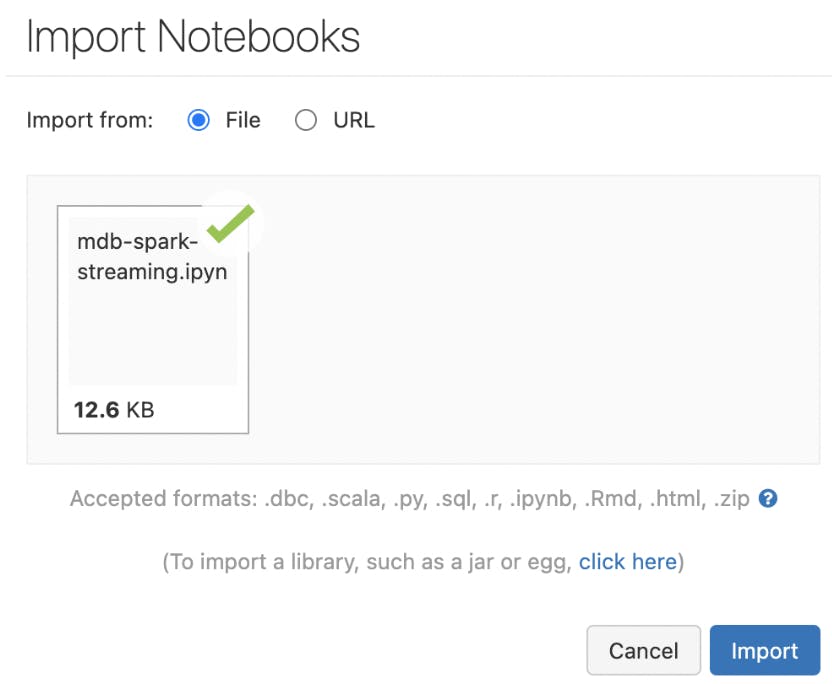
Go to File > Import, and navigate to the notebook you downloaded in the previous step
Click on Import to add the data streaming notebook to your workspace.
Update the following variables in the notebook and save.
- TOPIC - Kafka Topic Name (i.e DB.COLLECTION name)
- KAFKA_BROKER - Kafka Bootstrap Server details
- API_KEY - Kafka Server API Key
- SECRET - Kafka Server Secret
Now, Navigate to the sidebar and select the Workflows option.
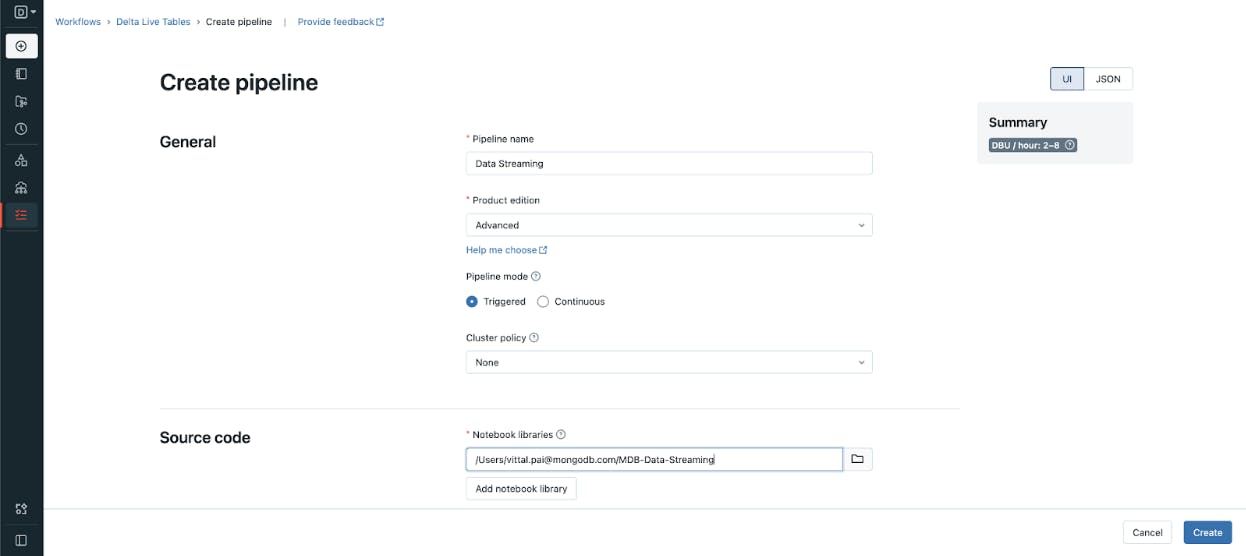
Within Workflows, choose the Delta Live Tables tab and select Create Pipeline.
Give your pipeline a name and select Advanced for the product edition. Choose Continuous for the Pipeline Mode.
Set the cluster_policy to none and select the notebook you created under Notebook Libraries.
Optionally, you can choose to enter a storage location for the output data from the pipeline. If you leave the Storage location field blank, the system will use the default location.
You can leave the settings in the Compute section at their default values.
Click the Create button to create the pipeline.
Run the pipeline to stream the data from Kafka to Delta Live Table. Refer to this documentation to learn more about Delta Live table.
- Login to Databricks cluster, Click on New > Notebook.
In create a notebook dialog, enter a Name, select Python as the default language, and choose the Databricks cluster. Then click on Create.
Obtain the Spark streaming IPython notebook from here.
Go to File > Import, and navigate to the notebook you downloaded in the previous step.
Click on Import to add the data streaming notebook to your workspace.
- Follow the instructions in the notebook to learn how to stream the data from MongoDB to Databricks Delta Lake using Spark connector for MongoDB.
Download and Install the MongoDB Source and AWS Sink Connector Plugin in your Kafka Cluster
Update the following in the mongodb-source-connector.properties connector configuration file.
CONNECTION-STRING - MongoDB Cluster Connection String
DB-NAME - Database Name
COLLECTION-NAME - Collection Name
Update the following in the s3-sink-connector.properties connector configuration file.
TOPIC-NAME - Kafka Topic Name (i.e DB.COLLECTION name)
S3-REGION - AWS S3 Region Name
S3-BUCKET-NAME - AWS S3 Bucket Name where you wish to push the data.
Deploy the connector configuration files in your Kafka Cluster. This will enable real-time data synchronization from MongoDB to AWS S3 Buckets. Note: The above connector pushes the data to the S3 bucket at a regular interval of time. These configuration can be modified based on the use case. Refer to the following documentation for more details.
Load the data from S3 buckets to Databricks Delta lake using Databricks Autoloader feature. Refer to this documentation for more details.
Note: The $out operator will overwrite any existing data in the specified S3 location, so make sure to use a unique destination folder or bucket to avoid unintended data loss.
Real-time data synchronization
Real-time data synchronization needs to happen immediately following the one-time load process. This can be achieved in multiple ways, as shown below.
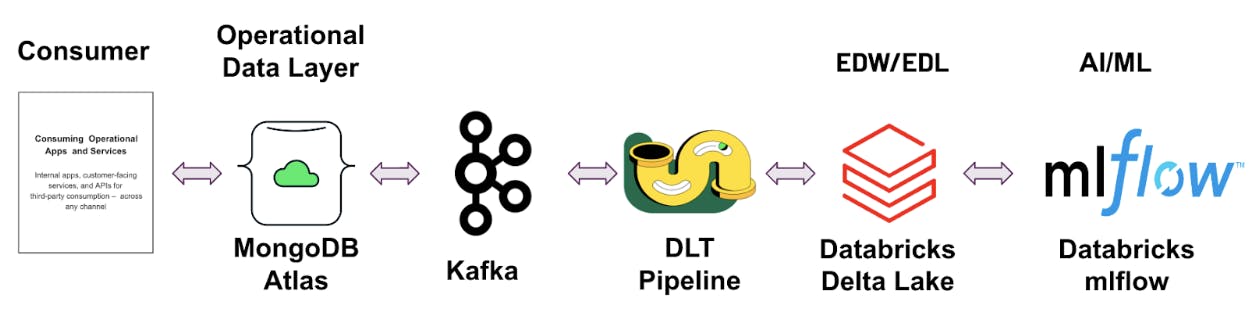
1. Using Apache Kafka and Delta Live Table
Streaming data from MongoDB to Databricks using Kafka and Delta Live Table Pipeline is a powerful way to process large amounts of data in real-time. This approach leverages Apache Kafka, a distributed event streaming platform, to receive data from MongoDB and forward it to Databricks in real-time. The data can then be processed using Delta Live Tables (DLT), which makes it easy to build and manage reliable batch and streaming data pipelines that deliver high-quality data on the Databricks Lakehouse Platform.
Note: These configurations can be modified based on the use case. Refer to this documentation for more details.
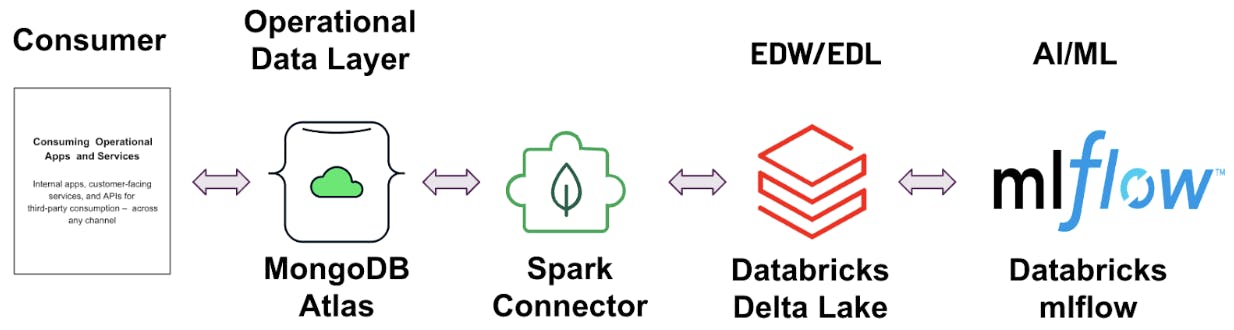
2. Using Spark streaming
MongoDB has released a version of the MongoDB Connector for Apache Spark that leverages the new Spark Data Sources API V2 with support for Spark Structured Streaming. MongoDB Connector for Apache Spark enables real-time micro-batch processing of data, enabling you to synchronize data from MongoDB to Databricks using Spark Streaming. This allows you to process data as it is generated, with the help of MongoDB's change data capture (CDC) feature to track all changes. By utilizing Spark Streaming, you can make timely and informed decisions based on the most up-to-date information available in Delta Lake. More details about the streaming functionality can be found here.
3. Using Apache Kafka and Object Storage
Apache Kafka can be utilized as a buffer between MongoDB and Databricks. When new data is added to the MongoDB database, it is sent to the message queue using the MongoDB Source Connector for Apache Kafka. This data is then pushed to object storage using sink connectors, such as the Amazon S3 Sink connector. The data can then be transferred to Databricks Delta Lake using the Autoloader option, which allows for incremental data ingestion. This approach is highly scalable and fault-tolerant, as Kafka can process large volumes of data and recover from failures.
In conclusion, the integration between MongoDB Atlas and the Databricks Lakehouse Platform can offer businesses a complete solution for data management and analysis. The integration architecture between these two platforms is flexible and scalable, ensuring data accuracy and consistency. All the data you need for analytics is in one place in the Lakehouse. Whether it's through one-time data load or real-time data synchronization, the combination of MongoDB Atlas as an Operational Data Store (ODS) and Databricks Lakehouse as an Enterprise Data Warehouse/Lake (EDL) provides the ideal solution for modern enterprises looking to harness the value of their data. So, if you're struggling with the challenges of siloed data, slow decision-making, and outdated development processes, the integration of MongoDB Atlas and Databricks Lakehouse may be the solution you need to take your business to the next level. Please reach out to the partners team for any questions.