The emergence of 5G networking signals future growth for low-latency business opportunities. Whether it’s the ever-popular world of gaming, AR/VR, AI/ML, or the more critical areas of autonomous vehicles or remote surgery, there’s never been a better opportunity for companies to leverage low latency application services and connectivity.
This kind of instantaneous communication through the power of 5G is still largely in its nascent development, but customers are adapting to its benefits quickly. New end-user expectations mean back-end service providers must meet growing demand. At the same time, business customers expect to have the ability to seamlessly deploy the same cloud-based back-end services that they’re familiar with, close to their data sources or end users. With MongoDB Realm and AWS Wavelength, you can now develop applications that take advantage of the low latency and higher throughput of 5G—and you can do it with the same tools you’re familiar with.
The following blog post explores the benefits of AWS Wavelength, MongoDB Atlas, and Realm, as well as how to set up and use each service in order to build better web and mobile applications and evolve user experience. We’ll also walk through a real-world use case, featuring a smart factory as the example.
Introduction to MongoDB Atlas & Realm on AWS
MongoDB Atlas is a global cloud database service for modern applications. Atlas is the best way to run MongoDB on AWS because, as a fully managed database-as-a-service, it offloads the burden of operations, maintenance, and security to the world’s leading MongoDB experts while running on industry-leading and reliable AWS infrastructure.
MongoDB Atlas enables you to build applications that are highly available, performant at a global scale, and compliant with the most demanding security and privacy standards. When you use MongoDB Atlas on AWS, you can focus on driving innovation and business value instead of managing infrastructure. Services like Atlas Search, Realm, Atlas Data Lake and more are also offered, making MongoDB Atlas the most comprehensive data platform in the market.
MongoDB Atlas seamlessly integrates with many AWS products. Click here to learn more about common integration patterns.
Why use AWS Wavelength?
AWS Wavelength is an AWS Infrastructure offering that is optimized for mobile edge computing applications. Wavelength Zones are AWS infrastructure deployments that embed AWS compute and storage services within communications service providers’ (CSP) data centers.
AWS Wavelength allows customers to use industry-leading and familiar AWS tools while moving user data closer to them in 13 cities in the US as well as London, UK, Tokyo and Osaka, Japan, and Daejeon, South Korea. Pairing Wavelength with MongoDB’s flexible data model and responsive Realm database for mobile and edge applications, customers get a familiar platform that can run anywhere and scale to meet changing demands.
Why use Realm?
Realm’s integrated application development services make it easy for developers to build industry-leading apps on mobile devices and the web.
Realm comes with three key features:
Cross-platform mobile and edge database
Cross-platform mobile and edge sync solution
Time-saving application development services
1. Mobile & edge database
Realm’s mobile database is an open source, developer-friendly alternative to CoreData and SQLite. With Realm’s open source database, mobile developers can build offline-first apps in a fraction of the time. Supported languages include Swift, C#, Xamarin, JavaScript, Java, ReactNative, Kotlin, and Objective-C.
Realm’s Database was built with a flexible, object-oriented data model, so it’s simple to learn and mirrors the way developers already code. Because it was built for mobile, applications built on Realm are reliable, highly performant, and work across platforms.
2. Mobile and edge sync solution
Realm Sync is an out-of-the-box synchronization service that keeps data up-to-date between devices, end users, and your backend systems, all in real-time. It eliminates the need to work with REST, simplifying your offline-first app architecture. Use Sync to backup user data, build collaborative features, and keep data up to date whenever devices are online—without worrying about conflict resolution or networking code.
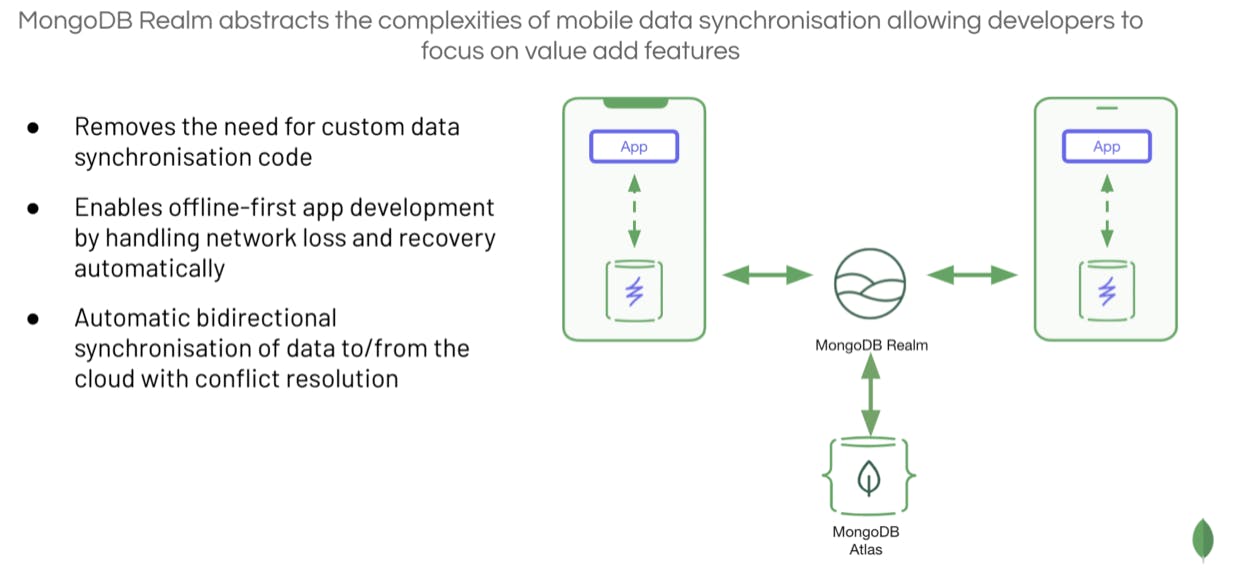
Powered by the Realm Mobile and Edge Database on the client-side and MongoDB Atlas on the backend, Realm is optimized for offline use and capable of scaling with you. Building a first-rate app has never been easier.
3. Application development services
With Realm app development services, your team can spend less time integrating backend data for your web apps, and more time building the innovative features that push your business initiatives forward. Services include:
GraphQL
Functions
Triggers
Data access controls
User authentication
Reference Architecture
High-level design
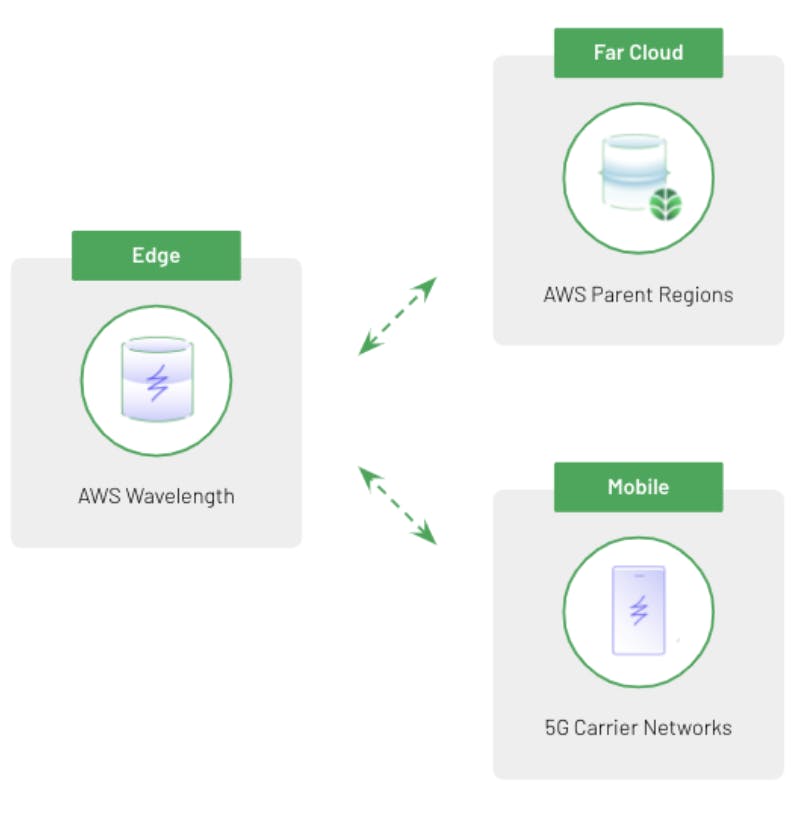
Terminology wise, we will be discussing three main tiers for data persistence: Far Cloud, Edge, and Mobile/IOT. The Far Cloud is the traditional cloud infrastructure business customers are used to. Here, the main parent AWS regions (such as US-EAST-1 in Virginia, US-WEST-2 in Oregon, etc) are used for centralized retention of all data.
While these regions are well known and trusted, the issue is that not many users or IOT devices are located in close proximity to these massive data centers and internet-routed traffic is not optimized for low latency. As a result, we use AWS Wavelength regions as our Edge Zones. An Edge Zone will synchronize the relevant subset of data from the centralized Far Cloud to the Edge. Partitioning principles are used such that users’ data will be stored closer to them in one or a handful of these Edge Wavelength Zones, typically located in major metropolitan areas.
The last layer of data persistence is on the mobile or IOT devices themselves. If on modern 5G infrastructure, data can be synchronized to a nearby Edge zone with low latency. For less latency-critical applications or in areas where the Parent AWS Regions are closer than the nearest Wavelength Zone, data can also go directly to the Far Cloud.
Smart factory use case: Using Wavelength, MQTT, & Realm Sync
Transitioning from the theoretical, let’s dig one level deeper into a reference architecture. One common use case for 5G and low-latency applications is a smart factory. Here, IOT devices in a factory can connect to 5G networks for both telemetry and command/control.
Typically signaling over MQTT, these sensors can send messages to a nearby Wavelength Edge Zone. Once there, machine learning and analysis can occur at the edge and data can be replicated back to the Far Cloud Parent AWS Regions. This is critical as compute capabilities at the edge, while low-latency, are not always full-featured. As a result, centralizing many factories together makes sense for many applications as it relates to long term storage, analytics, and multi-region sync.
Once data is in the Edge or the Far Cloud, consumers of this data (such as AR/VR headsets, mobile phones, and more) can access this with low-latency for needs such as maintenance, alerting, and fault identification.
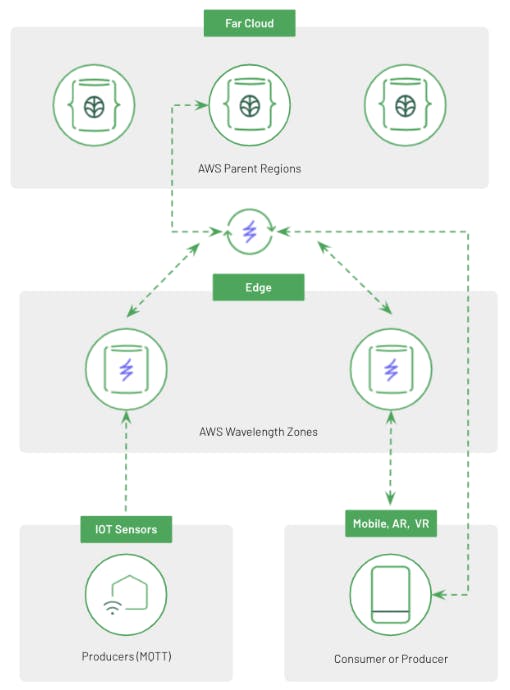
Latency-sensitive applications cannot simply write to Atlas directly. Alternatively, Realm is powerful here as it can run on mobile devices as well as on servers (such as in the Wavelength Zone) and provide low-latency local reads and writes. It will seamlessly synchronize data in real-time from its local partition to the Far Cloud, and from the Far Cloud back or to other Edge Zones. Developers do not need to write complex sync logic; instead they can focus on driving business value through writing applications that provide high performance and low latency.
For highly available applications, AWS services such as Auto Scaling Groups can be used to meet the availability and scalability requirements of the individual factory. Traditionally, this would be fronted by a load-balancing service from AWS or an open-source solution like HAProxy. Carrier gateways are deployed in each Wavelength zone and the carrier or client can handle nearest Edge Zone routing.
Setting up Wavelength
Deploying your application into Wavelength requires the following AWS resources:
A Virtual Private Cloud (VPC) in your region
Carrier Gateway — a service that allows inbound/outbound traffic to/from the carrier network.
Carrier IP — address that you assign to a network interface that resides in a Wavelength Zone
A public subnet
An EC2 instance in the public subnet
An EC2 instance in the Wavelength Zone with a Carrier IP address
We will be following the “Get started with AWS Wavelength” tutorial located here. At least one EC2 compute instance in a Wavelength zone will be required for the subsequent Realm section below. The high level steps to achieve that are:
Enable Wavelength Zones for your AWS account
Configure networking between your AWS VPC and the Wavelength zone
Launch an EC2 instance in your public subnet. This will serve as a bastion host for the subsequent steps.
Launch the Wavelength application
Test connectivity
Setting up Realm
The Realm components we listed above can be broken out into three independent steps:
Set up a Far Cloud MongoDB Atlas Cluster on AWS
Configure the Realm Serverless Infrastructure (including enabling sync)
Write a reference application utilizing Realm
1. Deploying your Far Cloud with Atlas on AWS
For this first section, we will be using a very basic Atlas deployment. For demonstration purposes, even the MongoDB Atlas Free Tier (called an M0) suffices. You can leverage the AWS MongoDB Atlas Quickstart to launch the cluster, so we will not enumerate the steps in specific detail. However, the high-level instructions are:
Sign up for MongoDB Atlas account at cloud.mongodb.com and then sign in
Click the Create button to display the Create New Database Deployment dialog
Choose a “Shared” cluster, then choose the size of M0 (free)
Be sure to choose AWS as the cloud and here we will be using US-EAST-1
Deploy and wait for the cluster to complete deployment
2. Configuring Realm and Realm Sync
Once the Atlas cluster has completed deploying, the next step is to create a Realm Application and enable Realm Sync. Realm has a full user interface inside of the MongoDB Cloud Platform at cloud.mongodb.com however it also has a CLIand API which allows connectivity to CI/CD pipelines and processes, including integration with GitHub. The steps we are following will be a high-level overview of a reference application located here. Since Realm configurations can be exported, the configuration can be imported into your environment from that repository.
The high level steps to create this configuration are as follows:
While viewing your cluster at cloud.mongodb.com, click the Realm tab at the top
Click “Create a New App” and give it a name such as RealmAndWavelength
Choose the target cluster for sync to be the cluster you deployed in the previous step
Now we have a Realm app deployed. Next, we need to configure the app to enable sync. Sync requires credentials for each sync application. You can learn more about authentication here. Our application will use API Key Authentication.To turn that on:
Click Authentication on the left
On the Authentication Providers tab, find API Keys, and click Edit
Turn on the provider and Save
If Realm has Drafts enabled, a blue bar will appear at the top where you need to confirm your changes. Confirm and deploy the change.
You can now create an API key by pressing the “Create API Key” button and giving it a name.
Be sure to copy this down for our application later as it cannot be retrieved again for security reasons
Also, in the top left of the Realm UI there is a button to copy the Realm App ID. We will need this ID and API key when we write our application shortly.
Lastly, we can enable Sync. The Sync configuration relies on a Schema of the data being written. This allows the objects (i.e. C# or Node.JS objects) from our application we are writing in the next step to be translated to MongoDB Documents. You can learn more about schemas here.
We also need to identify a partition key. Partition keys are used to decide what subset of data should reside on each Edge node or each mobile device. For Wavelength deployments, this is typically a variation on the region name. A good partition key could be a unique one per API key or the name of the Wavelength Region (e.g. “BOS” or “DFW”).
For this latter example, it would mean that your Far Cloud retains data for all zones, but the Wavelength zone in Boston will only have data tagged with “BOS” in the _pk field.
The two ways to define a schema are either to write the JSON by hand or automatic generation. For the former, we would go to the Sync configuration, edit the Configuration tab, choose the cluster we deployed earlier, define a partition key (such as _pk as a string), then define the rules of what that user is allowed to read and write. Then you must write the schema on the Schema section of the Realm UI.
However, it is often easier to let Realm auto-detect and write the schema for you. This can be done by putting the Sync into “Development Mode.” While you still choose the cluster and partition key, you only need to specify what database you want to sync all of your data to. After that, your application written below is where you can define classes, and upon connection to Realm Sync, the Sync Engine will translate the class you defined in your application into the underlying JSON representing that schema automatically.
3. Writing an application using Realm Sync: MQTT broker for a Smart Factory
Now that the back-end data storage is configured, it is time to write the application. As a reminder, we will be writing an MQTT broker for a smart factory. IOT devices will write MQTT messages to this broker over 5G and our application will take that packet of information and insert it into the Realm database. After that, because we completed the sync configuration above, our Edge-to-Far-Cloud synchronization will be automatic. It also works bidirectionally.
The reference application mentioned above is available in this GitHub repository. It is based on creating a C# Console application with the documentation here.
The code is relatively straightforward:
Create a new C# Console Application in Visual Studio
Like any other C# Console Application, have it take in as CLI arguments the Realm App ID and API Key. These should be passed in via a Docker environment variable later and the values of these were the values you recorded in the previous Sync setup step
Define the RealmObject which is the data model to write to Realm
Process incoming MQTT messages and write them to Realm
The data model for Realm Objects can be as complex as makes sense for your application. To prove this all works, we will keep a basic model:
To sync an object, it must inherit from the RealmObject class. After that, just define getters and setters for each data point you want to sync.
The C# implementation of this will vary depending on what MQTT Library you choose. Here we have used MQTTNet so we simply create a new broker with MqttFactory().CreateMqttServer() then start this with specific MqttServerOptionsBuilder where we need to define anything unique to your setup such as port, encryption, and other basic Broker information. However, we need to hook the incoming messages with .WithApplicationMessageInterceptor() so that way any time a new MQTT packet comes into the Broker, we send it to a method to write it to Realm.
The actual Realm code is also simple:
Create an App with App.Create() and it takes in the argument of the App ID which we are passing in as a CLI argument
Log in with app.LogInAsync(Credentials.ApiKey()) and the API Key argument is again passed in as a CLI argument from what we generated before
To insert into the database, all writes for Realm need to be done in a transaction. The syntax is straight forward: instantiate an object based on the RealmObject class we defined previously then do the write with a realm.Write(()=>realm.Add({message)})
Finally, we need to wrap this up in a docker container for easy distribution. Microsoft has a good tutorial on how to run this application inside of a Docker container with auto-generated Dockerfiles. On top of the auto-generated Dockerfile, be sure to pass in the arguments of the Realm App ID and API Key to the application as we defined earlier.
Learning the inner workings of writing a Realm application is largely outside the scope of this blog post. However there is an excellent tutorial within MongoDB University if you would like to learn more about the Realm SDK.
Now that the application is running, and in Docker, we can deploy it in a Wavelength Edge Zone as we created above.
Bringing Realm and Wavelength together
In order to access the application server in the Wavelength Zone, we must go through the bastion host we created earlier. Once we’ve gone through that jump box to get to the EC2 instance in the Wavelength Zone, we can install any prerequisites (such as Docker), and start the Docker container running the Realm Edge Database and MQTT application. Any new inbound messages received to this MQTT broker will be first written to the Edge and seamlessly synced to Atlas in the Far Cloud. There is a sample MQTT random number generator container suitable for testing this environment located in the GitHub repository mentioned earlier.
Our smart factory reference application is complete! At this point:
Smart devices can write to a 5G Edge with low latency courtesy of AWS Wavelength Zones
MQTT Messages written to that Broker in the Wavelength Zone have low latency writes and are available immediately for reads since it is happening at the Edge through MongoDB Realm
Those messages are automatically synchronized to the Far Cloud for permanent retention, analysis, or synchronization to other Zones via MongoDB Realm Sync and Atlas
What's Next
Get started with MongoDB Realm on AWS for free.
Deploy a MongoDB backend in the cloud with a few clicks
Start building with Realm
Deploy AWS Wavelength in your AWS Account