Docs Home → Atlas App Services
Tutorial: Atlas Device Sync for .NET with MAUI
On this page
- Prerequisites
- Start with the Template
- Set up the Template App
- Open the App
- Explore the App Structure
- Run the App
- Check the Backend
- Modify the Application
- Add a New Property
- Add the Priority Property
- Set the Priority when Creating or Modifying an Item
- Update the UI Elements
- Run and Test
- Change the Subscription
- Update the subscription
- Run and Test
- Conclusion
- What's Next?
Estimated time to complete: 30 minutes, depending on your experience with MAUI
Realm provides a .NET SDK for creating multi-platform applications in C# with
MAUI. This tutorial is based on the
.NET Flexible Sync Template App, named maui.todo.flex, which illustrates
the creation of a Todo application in MAUI. This application enables users to:
Register their email as a new user account.
Sign in to their account with their email and password (and sign out).
View, create, modify, and delete tasks.
In this tutorial, you will add a new Priority field
to the existing Item model and update the
Flexible Sync subscription to only show items within
a range of priorities.
Note
Check Out the Quick Start
If you prefer to get started with your own application rather than follow a guided tutorial, check out the .NET Quick Start. It includes copyable code examples and the essential information that you need to set up an Atlas App Services backend.
Prerequisites
Ensure that you have the necessary software installed. Select the tab for your development environment:
You need previous experience deploying a MAUI or Xamarin app to an Android Emulator, iOS Simulator, and/or a physical device.
This tutorial starts with a Template App. You need an Atlas Account, an API key, and appservices to create a Template App.
You can learn more about creating an Atlas account in the Atlas Getting Started documentation. For this tutorial, you need an Atlas account with a free-tier cluster.
You also need an Atlas API key for the MongoDB Cloud account you wish to log in with. You must be a Project Owner to create a Template App using appservices.
To learn more about installing appservices, see Install App Services CLI. After installing, run the login command using the API key for your Atlas project.
Start with the Template
This tutorial is based on the MAUI Flexible Sync Template App named
maui.todo.flex. We start with the default app and build new features
on it.
To learn more about the Template Apps, see Template Apps.
If you don't already have an Atlas account, sign-up to deploy a Template App.
Set up the Template App
Open the App
Navigate to the directory where the Realm CLI created the template app
and open the realm-todo-app.sln solution in Visual Studio.
Explore the App Structure
In Visual Studio, take a few minutes to explore how the solution is organized. This is a organized like a standard MAUI MVVM solution, with a single project containing the views, models, and view models.
The app uses a single model, Item, which implements IRealmObject.
We have three views, one for logging in (LoginPage), another for
viewing Items (ItemsPage), and a third for editing and creating new
items. Each view has a corresponding view model.
In addition to the standard MVVM structure, we have centralized all of the Realm logic into a RealmService class, which is found in the "Services" folder. This architecture ensures we are sharing the same realm throughout.
Run the App
Without making any changes to the code, you should be able to run the app
in either the Android emulator or the iOS Simulator, or on a physical device.
You don't need to make any changes because, when you set up the template in
the App Services UI or with the CLI, Atlas App Services also set up a new
backend. If you downloaded the template app, you will need to add your App
Services app's ID. To do so, open the Services/RealmService.cs file and add
your ID to the private const string appId = "appId"; line.
Run the app, register a new user account, and then add a new Item to your todo list.
Check the Backend
Log in to Atlas App Services. In the Data Services tab, click on Browse Collections. In the list of databases, find and expand the todo database, and then the Item collection. You should see the document you created in this collection.
Modify the Application
Add a New Property
Now that you have confirmed everything is working as expected, we can add changes. In this tutorial, we have decided that we want to add a "Priority" property to each Item so that we can filter Items by their priorities. The Priority property will be mapped to a PriorityLevel enum to constrain the possible values.
To do this, follow these steps:
Add the Priority Property
In the
RealmTodoproject, expand theModelsfolder and open theItemclass file.Add the following public property:
[] public int? Priority { get; set; } Note that we have set this property as nullable, which will ensure that existing Items in our database (which do not have a Priority property) will continue to be available.
Set the Priority when Creating or Modifying an Item
The
EditItemViewModelViewModel is used to both create new items and to modify existing items. When creating or modifying an item, the user needs the UI (and code) to set the Priority of an item.Add an ObservableProperty to hold the priority:
[] private int? priority; Note
[ObservableProperty] Attribute
The
[ObservableProperty]attribute is a feature provided by the MVVM Toolkit to simplify data binding.The
ApplyQueryAttributesmethod acts as a bit of a "constructor" for this view model, checking to see if an existing item is being passed to this view for editing. In here, we capture any existing values to display in the view.If we are editing an existing item, we want to set the Priority of the existing item:
Priority = InitialItem.Priority;.Likewise, if we're creating a new item, set the default priority to "Medium":
Priority = 2;.When complete this method should now look like the following:
public void ApplyQueryAttributes(IDictionary<string, object> query) { if (query.Count > 0 && query["item"] != null) // we're editing an Item { InitialItem = query["item"] as Item; Summary = InitialItem.Summary; Priority = InitialItem.Priority; PageHeader = $"Modify Item {InitialItem.Id}"; } else // we're creating a new item { Summary = ""; Priority = 2; PageHeader = "Create a New Item"; } } Finally, in the
SaveItem()method, we want to persist the Priority value. Since we are creating or modifying a managed object, the changes are wrapped in arealm.WriteAsynccall.For the existing item, set the
InitialItem.Priorityon the existing object, and for a new item, set the property in theAdd()call. Your completedWriteAsyncblock should look like this:await realm.WriteAsync(() => { if (InitialItem != null) // editing an item { InitialItem.Summary = Summary; InitialItem.Priority = Priority; } else // creating a new item { realm.Add(new Item() { OwnerId = RealmService.CurrentUser.Id, Summary = summary, Priority = Priority }); } });
Update the UI Elements
The final task is to add the UI elements needed to set and show the priority.
First, in the
ItemsPage.xaml, we'll add a label to the ListView that shows the priority. Within the ViewCell, add a Label to display the item's priority:<Label Text="{Binding Priority}" HorizontalOptions="Center" VerticalOptions="Center"/> In the
EditItemsPage.xaml, we will add two UI elements: a Picker that enables the user to choose which priority level to set on the new Item and a label for the picker. Find theEntryelement for setting the Summary and add the following elements below it:<Label Text="Priority:"/> <Picker x:Name="newItemPriority" SelectedIndex="{Binding Priority}"> <Picker.Items> <x:String>Severe</x:String> <x:String>High</x:String> <x:String>Medium</x:String> <x:String>Low</x:String> </Picker.Items> </Picker>
Run and Test
At this point, you can run the application again. Log in using the account
you created earlier in this tutorial. You will see the one Item you
previously created. Add a new Item, and you will see that you can now
set the priority. Choose High for the priority and save the Item.
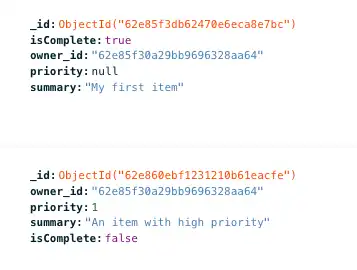
Now switch back to the Atlas data page in your browser, and refresh the
Item collection. You should now see the new Item with the priority
field added and set to 1. You will also notice that the existing Item
now also has a priority field, and it is set to null, as shown in
the following screenshot:

Note
Why Didn't This Break Sync?
Adding a property to a Realm object is not a breaking change and therefore does not require a client reset. The template app has Development Mode enabled, so changes to the client Realm object are reflected in the server-side schema. For more information, see Development Mode and Update Your Data Model.
Change the Subscription
Update the subscription
In the RealmService.cs file, we define two Flexible Sync subscriptions.
One shows only the items created by the current user, while the other shows
all items from all users.
We're going to add a new subscription that shows the current user's items that have a priority of 0 or 1.
At the bottom of the
RealmServiceclass, add an entry to theSubscriptionTypeenum called "MyHighPriority":public enum SubscriptionType { Mine, MyHighPriority, All, } Scroll up to find the
GetQueryForSubscriptionTypemethod. It is here that we define the subscriptions.Copy the first one, where
subType == SubscriptionType.Mine, and paste it in anelse ifblock immediately below.Set the new conditional to
subType == SubscriptionType.MyHighPriority.Modify this new subscription query to insert a LINQ query that still filters by OwnerId and also by Priority values less than 2.
4. Change the name of the new query to "myHighPri". Your code will look like the following:
if (subType == SubscriptionType.Mine) { query = realm.All<Item>() .Where(i => i.OwnerId == CurrentUser.Id) .Where(i => i.Priority < 2); queryName = "mine"; } else if (subType == SubscriptionType.MyHighPriority) { query = realm.All<Item>() .Where(i => i.OwnerId == CurrentUser.Id && i.Priority < 2); queryName = "myHighPri"; } else if (subType == SubscriptionType.All) { query = realm.All<Item>(); queryName = "all"; } In the
GetCurrentSubscriptionTypemethod immediately above, add the new subscription name to the switch statement, so it looks like this:return activeSubscription.Name switch { "all" => SubscriptionType.All, "mine" => SubscriptionType.Mine, "myHighPri" => SubscriptionType.MyHighPriority, _ => throw new InvalidOperationException("Unknown subscription type") }; Finally, open the
ItemsViewModelclass and find theOnIsShowAllTasksChangedmethod. Rather than change the UI to enable 3 subscriptions, we'll just replace the existing "mine" subscription with the new one. Change theSetSubscriptionmethod so it looks like the following:await RealmService.SetSubscription(realm, value ? SubscriptionType.All : SubscriptionType.MyHighPriority);
Run and Test
Run the application again. If prompted to do so, log in in using the account you created earlier in this tutorial.
You should expect to see any Items you have created that have a priority of "High" (1) or "Severe" (0). If you toggle the "Show all tasks" switch, all tasks by all users should appear.
Conclusion
Adding a property to an existing Realm object is a non-breaking change, and Development Mode ensures that the schema change is reflected server-side.
What's Next?
Read our .NET SDK documentation.
Find developer-oriented blog posts and integration tutorials on the MongoDB Developer Hub.
Join the MongoDB Community forum to learn from other MongoDB developers and technical experts.
Explore engineering and expert-provided example projects.
Note
Share Feedback
How did it go? Use the Share Feedback tab at the bottom right of the page to let us know if this tutorial was helpful or if you had any issues.