Introducing the MongoDB Enterprise Operator for Kubernetes and OpenShift


Rate this announcement


Today more DevOps teams are leveraging the power of containerization,
and technologies like Kubernetes and Red Hat OpenShift, to manage
containerized database clusters. To support teams building cloud-native
apps with Kubernetes and OpenShift, we are introducing a Kubernetes
Operator (beta) that integrates with Ops Manager, the enterprise
management platform for MongoDB. The operator enables a user to deploy
and manage MongoDB clusters from the Kubernetes API, without having to
manually configure them in Ops Manager.
With this Kubernetes integration, you can consistently and effortlessly
run and deploy workloads wherever they need to be, standing up the same
database configuration in different environments, all controlled with a
simple, declarative configuration. Operations teams can also offer
developers new services like MongoDB-as-a-Service, that could provide
for them a fully managed database, alongside other products and
services, managed by Kubernetes and OpenShift.
In this blog, we'll cover the following:
- Brief discussion on the container revolution
- Overview of MongoDB Ops Manager
- How to Install and configure the MongoDB Enterprise Operator for Kubernetes
- Troubleshooting
- Where to go for more information
If you ever visited an international shipping port or drove down an
interstate highway you may have seen large rectangular metal containers
generally referred to as intermodal containers. These containers are
designed and built using the same specifications even though the
contents of these boxes can vary greatly. The consistent design not only
enables these containers to freely move from ship, to rail, and to
truck, they also allow this movement without unloading and reloading the
cargo contents.
This same concept of a container can be applied to software applications
where the application is the contents of the container along with its
supporting frameworks and libraries. The container can be freely moved
from one platform to another all without disturbing the application.
This capability makes it easy to move an application from an on-premise
datacenter server to a public cloud provider, or to quickly stand up
replica environments for development, test, and production usage.
MongoDB 4.0 introduces the MongoDB Enterprise Operator for Kubernetes
which enables a user to deploy and manage MongoDB clusters from the
Kubernetes API, without the user having to connect directly to Ops
Manager or Cloud Manager
(the hosted version of Ops Manager, delivered as a
service.
While MongoDB is fully supported in a containerized environment, you
need to make sure that the benefits you get from containerizing the
database exceed the cost of managing the configuration. As with any
production database workload, these containers should use persistent
storage and will require additional configuration depending on the
underlying container technology used. To help facilitate the management
of the containers themselves, DevOps teams are leveraging the power of
orchestration technologies like Kubernetes and Red Hat OpenShift. While
these technologies are great at container management, they are not aware
of application specific configurations and deployment topologies such as
MongoDB replica sets and sharded clusters. For this reason, Kubernetes
has Custom Resources and Operators which allow third-parties to extend
the Kubernetes API and enable application aware deployments.
Later in this blog you will learn how to install and get started with
the MongoDB Enterprise Operator for Kubernetes. First let's cover
MongoDB Ops Manager, which is a key piece in efficient MongoDB cluster
management.
Ops Manager is an
enterprise class management platform for MongoDB clusters that you run
on your own infrastructure. The capabilities of Ops Manager include
monitoring, alerting, disaster recovery, scaling, deploying and
upgrading of replica sets and sharded clusters, and other MongoDB
products, such as the BI Connector. While a thorough discussion of Ops
Manager is out of scope of this blog it is important to understand the
basic components that make up Ops Manager as they will be used by the
Kubernetes Operator to create your deployments.

A simplified Ops Manager architecture is shown in Figure 2 below. Note
that there are other agents that Ops Manager uses to support features
like backup but these are outside the scope of this blog and not shown.
For complete information on MongoDB Ops Manager architecture see the
online documentation found at the following URL:
https://docs.opsmanager.mongodb.com/current/
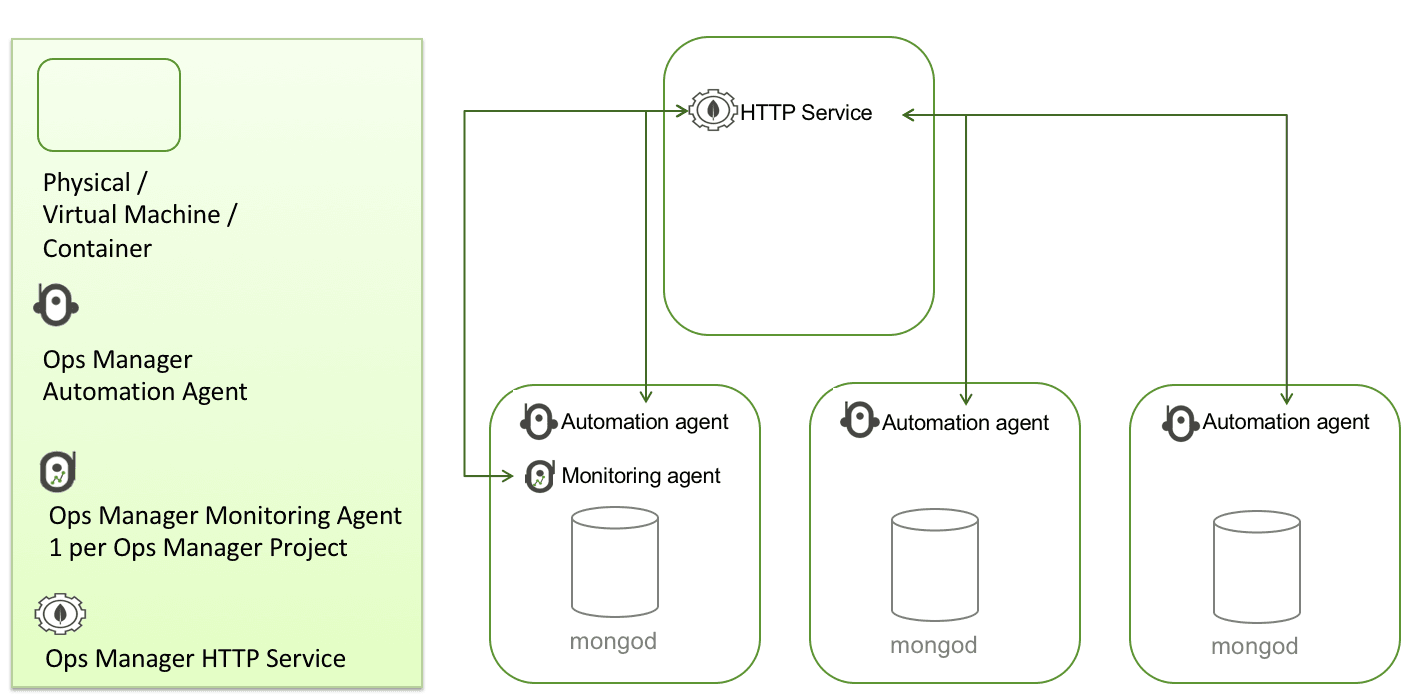
The MongoDB HTTP Service provides a web application for administration.
These pages are simply a front end to a robust set of Ops Manager REST
APIs that are hosted in the Ops Manager HTTP Service. It is through
these REST
APIs that
the Kubernetes Operator will interact with Ops Manager.
With a typical Ops Manager deployment there are many management options
including upgrading the cluster to a different version, adding
secondaries to an existing replica set and converting an existing
replica set into a sharded cluster. So how does Ops Manager go about
upgrading each node of a cluster or spinning up new MongoD instances? It
does this by relying on a locally installed service called the Ops
Manager Automation Agent which runs on every single MongoDB node in the
cluster. This lightweight service is available on multiple operating
systems so regardless if your MongoDB nodes are running in a Linux
Container or Windows Server virtual machine or your on-prem PowerPC
Server, there is an Automation Agent available for that platform. The
Automation Agents receive instructions from Ops Manager REST APIs to
perform work on the cluster node.
When Ops Manager shows statistics such as database size and inserts per
second it is receiving this telemetry from the individual nodes running
MongoDB. Ops Manager relies on the Monitoring Agent to connect to your
MongoDB processes, collect data about the state of your deployment, then
send that data to Ops Manager. There can be one or more Monitoring
Agents deployed in your infrastructure for reliability but only one
primary agent per Ops Manager Project is collecting data. Ops Manager is
all about automation and as soon as you have the automation agent
deployed, other supporting agents like the Monitoring agent are deployed
for you. In the scenario where the Kubernetes Operator has issued a
command to deploy a new MongoDB cluster in a new project, Ops Manager
will take care of deploying the monitoring agent into the containers
running your new MongoDB cluster.
Ops Manager is an integral part of automating a MongoDB cluster with
Kubernetes. To get started you will need access to an Ops Manager 4.0+
environment or MongoDB Cloud Manager.
The MongoDB Enterprise Operator for Kubernetes is compatible with
Kubernetes v1.9 and above. It also has been tested with Openshift
version 3.9. You will need access to a Kubernetes environment. If you do
not have access to a Kubernetes environment, or just want to stand up a
test environment, you can use minikube which deploys a local single node
Kubernetes cluster on your machine. For additional information and setup
instructions check out the following URL:
https://kubernetes.io/docs/setup/minikube.
The following sections will cover the three step installation and
configuration of the MongoDB Enterprise Operator for Kubernetes. The
order of installation will be as follows:
- Step 1: Installing the MongoDB Enterprise Operator via a helm or yaml file
- Step 2: Creating and applying a Kubernetes ConfigMap file
- Step 3: Create the Kubernetes secret object which will store the Ops Manager API Key
To install the MongoDB Enterprise Operator for Kubernetes you can use
helm, the Kubernetes package manager, or pass a yaml file to kubectl.
The instructions for both of these methods is as follows, pick one and
continue to step 2.
To install the operator via Helm:
To install with Helm you will first need to clone the public repo
https://github.com/mongodb/mongodb-enterprise-kubernetes.git
Change directories into the local copy and run the following command on
the command line:

To install the operator via a yaml file:
Run the following command from the command line:
At this point the MongoDB Enterprise Operator for Kubernetes is
installed and now needs to be configured. First, we must create and
apply a Kubernetes ConfigMap file. A Kubernetes ConfigMap file holds
key-value pairs of configuration data that can be consumed in pods or
used to store configuration data. In this use case the ConfigMap file
will store configuration information about the Ops Manager deployment we
want to use.
For the Kubernetes Operator to know what Ops Manager you want to use you
will need to obtain some properties from the Ops Manager console and
create a ConfigMap file. These properties are as follows:
- Base Url: The URL of your Ops Manager or Cloud Manager.
- Project Id: The id of an Ops Manager Project which the Kubernetes Operator will deploy into.
- User: An existing Ops Manager username.
- Public API Key: Used by the Kubernetes Operator to connect to the Ops Manager REST API endpoint.
- Base Url: The Base Uri is the URL of your Ops Manager or Cloud Manager.
If you already know how to obtain these fellows, copy them down and
proceed to Step 3.
Note: If you are using Cloud Manager the Base Url is
https://cloud.mongodb.com
To obtain the Base Url in Ops Manager copy the Url used to connect to
your Ops Manager server from your browser's navigation bar. It should be
something similar to http://servername:8080. You can also perform the
following:
Login to Ops Manager and click on the Admin button. Next select the "Ops
Manager Config" menu item. You will be presented with a screen similar
to the figure below:
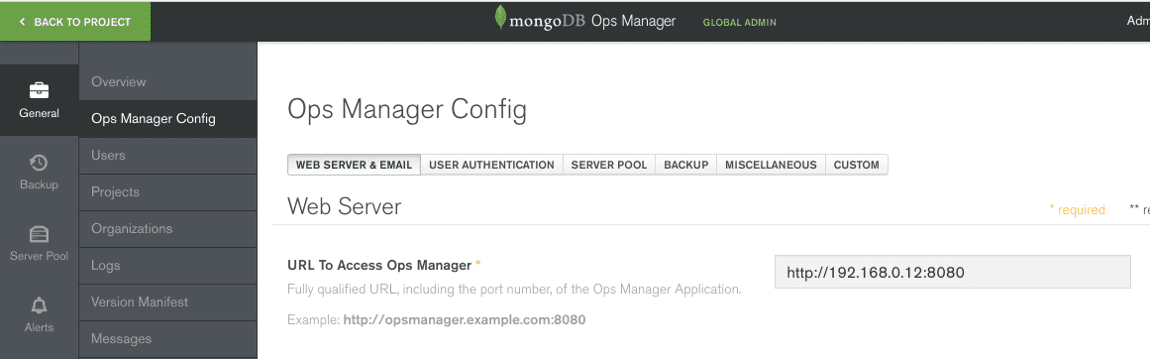
Copy down the value displayed in the URL To Access Ops Manager box.
Note: If you don't have access to the Admin drop down you will have to
copy the Url used to connect to your Ops Manager server from your
browser's navigation bar.
Project Id
The Project Id is the id of an Ops Manager Project which the Kubernetes
Operator will deploy into.
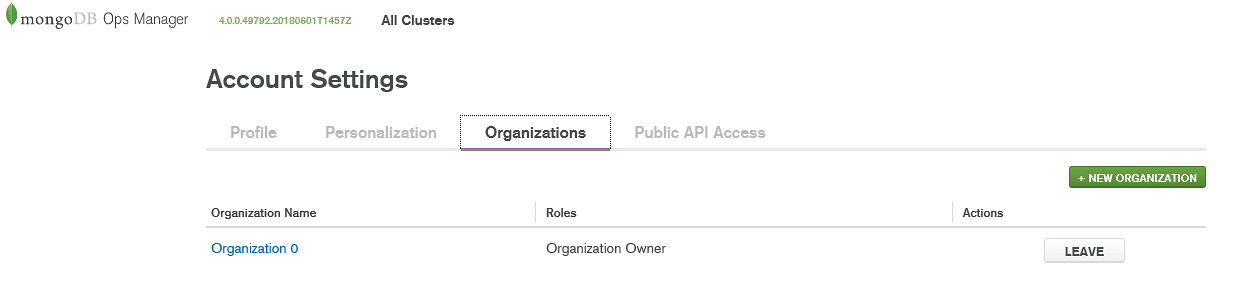
An Ops Manager Project is a logical organization of MongoDB clusters and
also provides a security boundary. One or more
Projects
are apart of an Ops Manager Organization. If you need to create an
Organization click on your user name at the upper right side of the
screen and select, "Organizations". Next click on the "+ New
Organization" button and provide a name for your Organization. Once you
have an Organization you can create a Project.
To create a new Project, click on your Organization name. This will
bring you to the Projects page and from here click on the "+ New
Project" button and provide a unique name for your Project. If you are
not an Ops Manager administrator you may not have this option and will
have to ask your administrator to create a Project.
Once the Project is created or if you already have a Project created on
your behalf by an administrator you can obtain the Project Id by
clicking on the Settings menu option as shown in the Figure below.
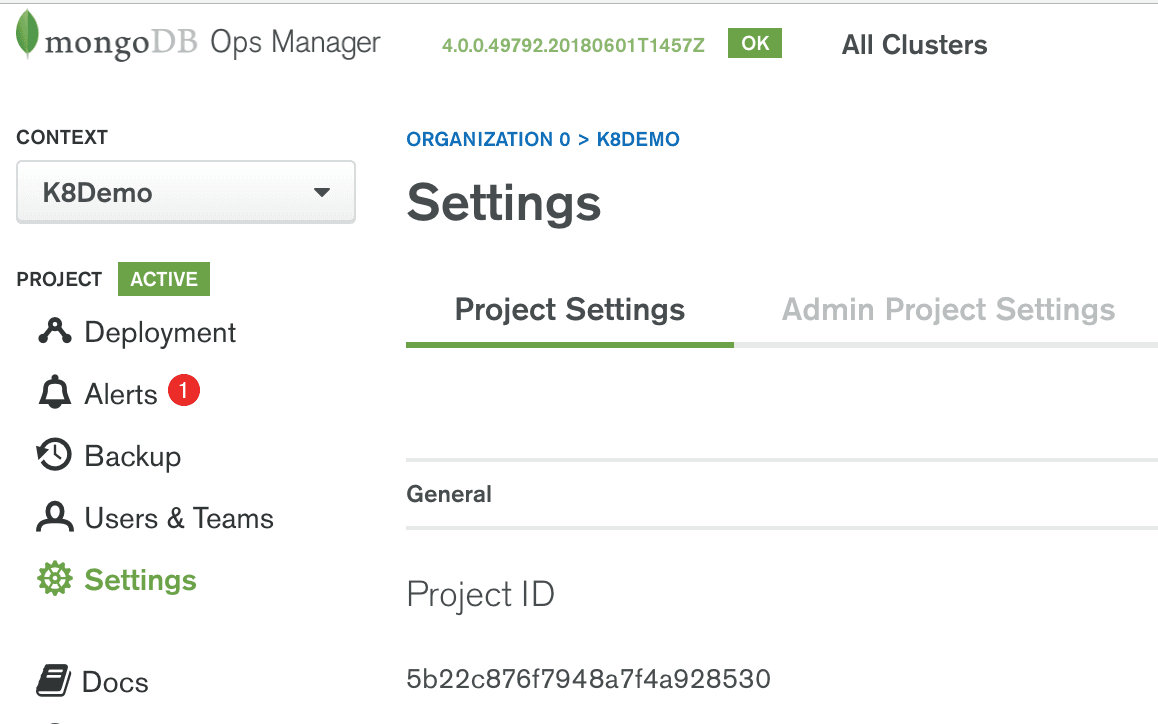
Copy the Project ID.
User
The User is an existing Ops Manager username.
To see the list of Ops Manager users return to the Project and click on
the "Users & Teams" menu. You can use any Ops Manager user who has at
least Project Owner access. If you'd like to create another username
click on the "Add Users & Team" button as shown in Figure 6.
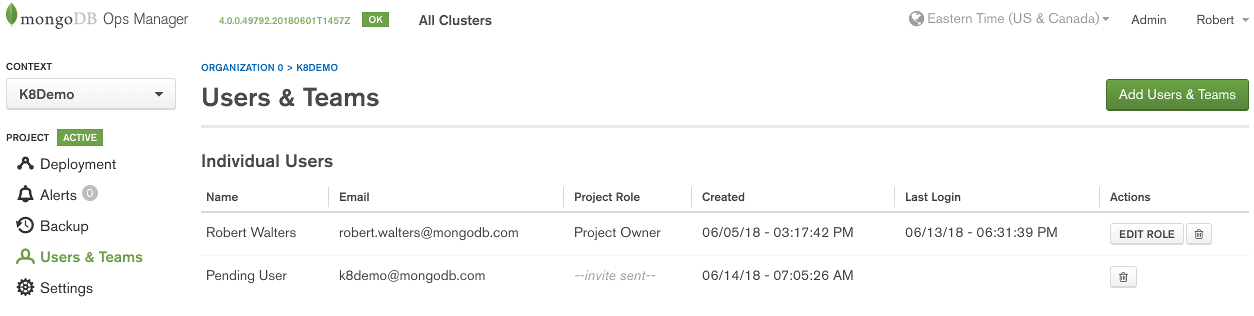
Copy down the email of the user you would like the Kubernetes Operator
to use when connecting to Ops Manager.
Public API Key
The Ops Manager API Key is used by the Kubernetes Operator to connect to
the Ops Manager REST API endpoint. You can create a API Key by clicking
on your username on the upper right hand corner of the Ops Manager
console and selecting, "Account" from the drop down menu. This will open
the Account Settings page as shown in Figure 7.
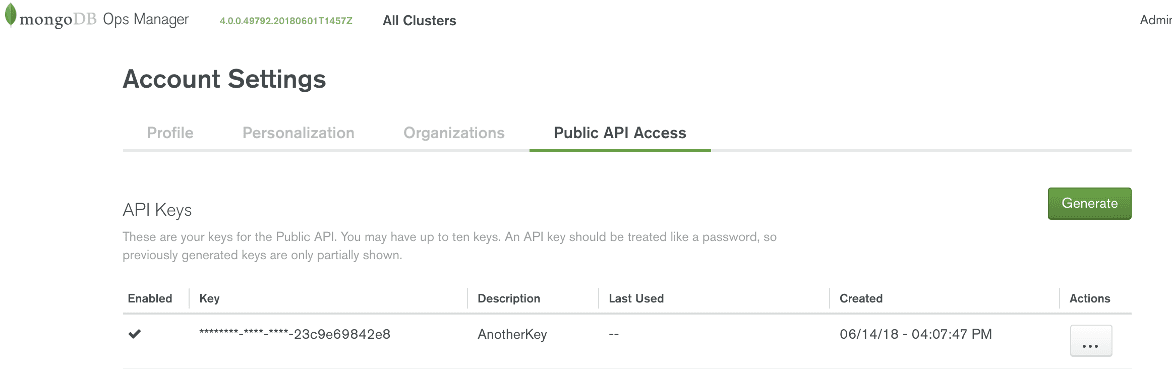
Click on the "Public API Access" tab. To create a new API key click on
the "Generate" button and provide a description. Upon completion you
will receive an API key as shown in Figure 8.
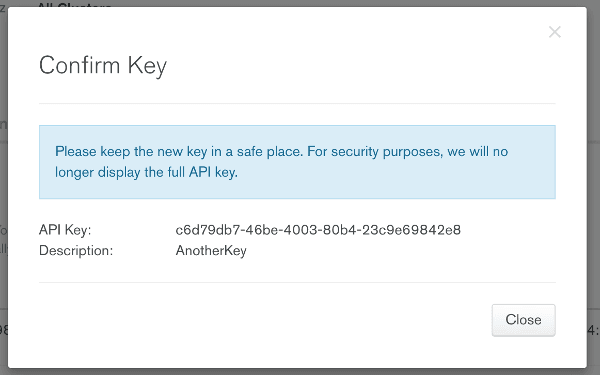
Be sure to copy the API Key as it will be used later as a value in a
configuration file. It is important to copy this value while the
dialog is up since you can not read it back once you close the dialog.
If you missed writing the value down you will need to delete the API Key
and create a new one.
Note: If you are using MongoDB Cloud Manager or have Ops Manager
deployed in a secured network you may need to allow the IP range of your
Kubernetes cluster so that the Operator can make requests to Ops Manager
using this API Key.
Now that we have acquired the necessary Ops Manager configuration
information we need to create a Kubernetes ConfigMap file for the
Kubernetes Project. To do this use a text editor of your choice and
create the following yaml file, substituting the bold placeholders for
the values you obtained in the Ops Manager console. For sample purposes
we can call this file "my-project.yaml".
Figure 9: Sample ConfigMap file
Note: The format of the ConfigMap file may change over time as features
and capabilities get added to the Operator. Be sure to check with the
MongoDB documentation if you are having problems submitting the
ConfigMap file.
Once you create this file you can apply the ConfigMap to Kubernetes
using the following command:
For a user to be able to create or update objects in an Ops Manager
Project they need a Public API Key. Earlier in this section we created a
new API Key and you hopefully wrote it down. This API Key will be held
by Kubernetes as a Secret object. You can create this Secret with the
following command:
Make sure you replace the User and Public API key values with those you
obtained from your Ops Manager console. You can pick any name for the
credentials - just make a note of it as you will need it later when you
start creating MongoDB clusters.
Now we're ready to start deploying MongoDB Clusters!
Kubernetes can deploy a MongoDB standalone, replica set or a sharded
cluster. To deploy a 3 node replica set create the following yaml file:
Figure 10: simple-rs.yaml file describing a three node replica set
The name of your new cluster can be any name you chose. The name of the
OpsManager Project config map and the name of credentials secret were
defined previously.
To submit the request for Kubernetes to create this cluster simply pass
the name of the yaml file you created to the following kubectl command:
After a few minutes your new cluster will show up in Ops Manager as
shown in Figure 11.
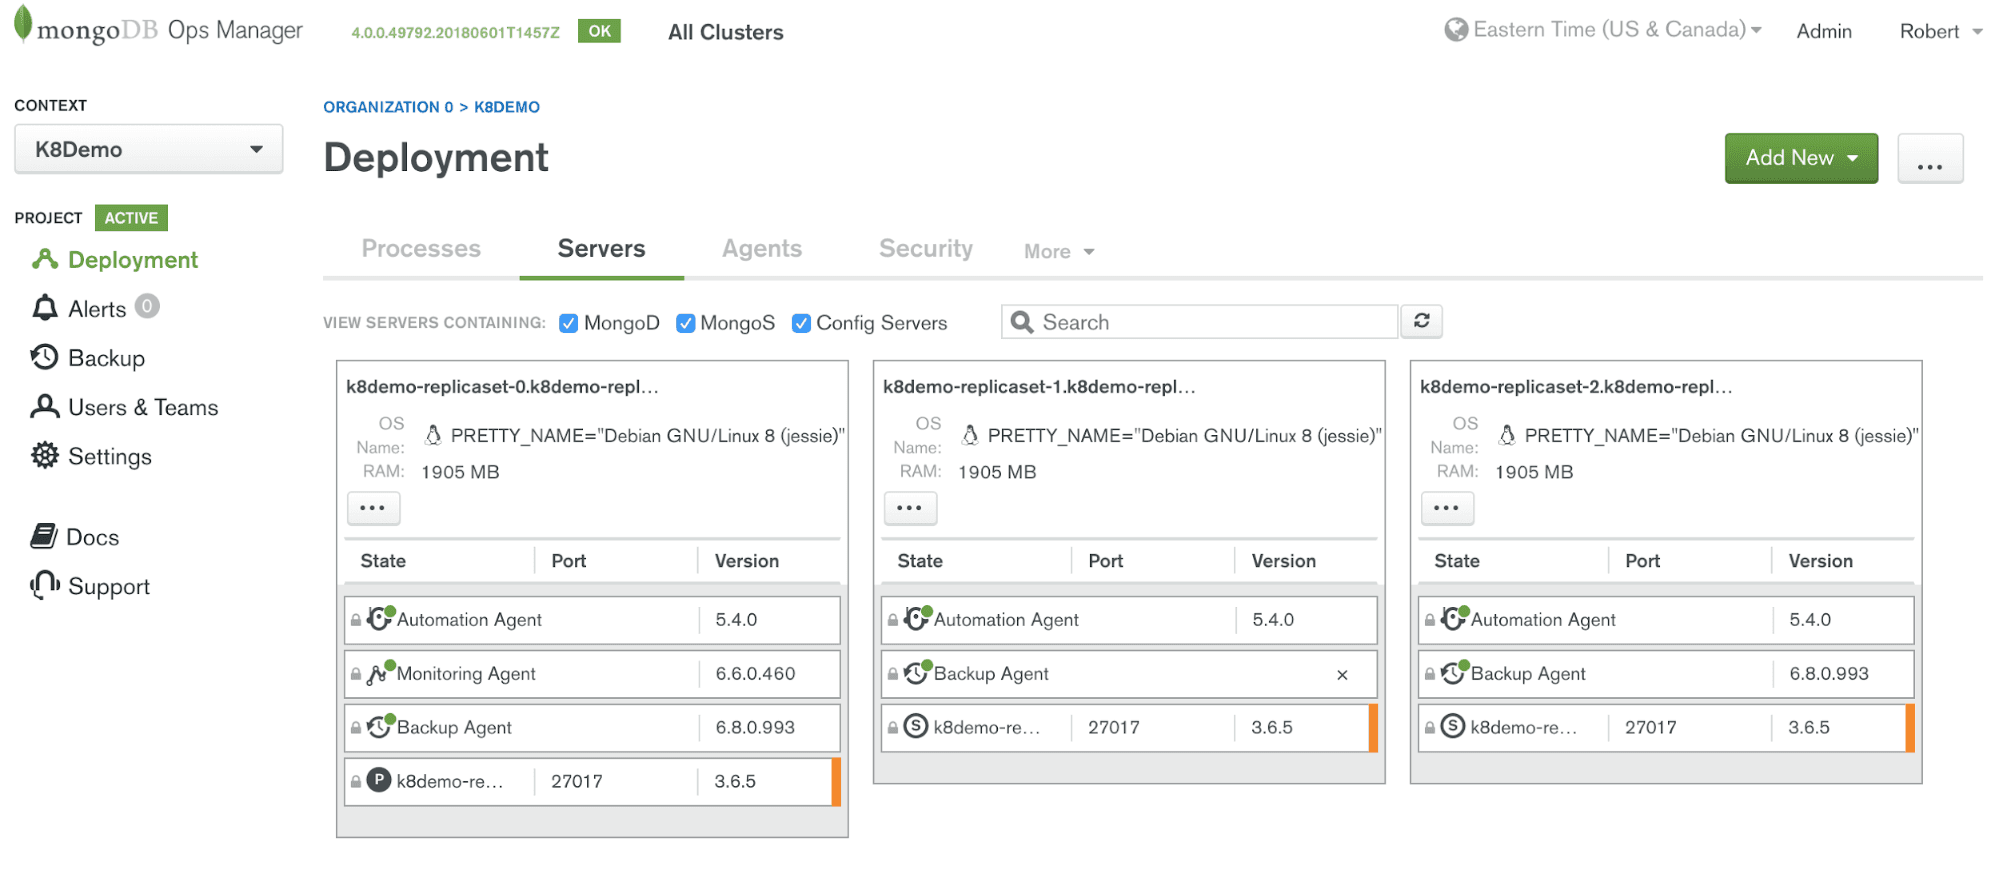
Notice that Ops Manager installed not only the Automation Agents on
these three containers running MongoDB, it also installed Monitoring
Agent and Backup Agents.
What good would a database be if anytime the container died your data
went to the grave as well? Probably not a good situation and maybe one
where tuning up the resumé might be a good thing to do as well. Up until
recently, the lack of persistent storage and consistent DNS mappings
were major issues with running databases within containers. Fortunately,
recent work in the Kubernetes ecosystem has addressed this concern and
new features like
PersistentVolumes and StatefulSets have emerged
allowing you to deploy databases like MongoDB without worrying about
losing data because of hardware failure or the container moved elsewhere
in your datacenter. Additional configuration of the storage is required
on the Kubernetes cluster before you can deploy a MongoDB Cluster that
uses persistent storage. In Kubernetes there are two types of persistent
volumes: static and dynamic. The Kubernetes Operator can provision
MongoDB objects (i.e. standalone, replica set and sharded clusters)
using either type.Connecting to MongoDB deployments in Kubernetes is no different than
other deployment topologies. However, it is likely that you'll need to
address the network specifics of your Kubernetes configuration. To
abstract the deployment specific information such as hostnames and ports
of your MongoDB deployment, the Kubernetes Enterprise Operator for
Kubernetes uses Kubernetes Services.
Each MongoDB deployment type will have two Kubernetes services generated
automatically during provisioning. For example, suppose we have a single
3 node replica set called "my-replica-set", then you can enumerate the
services using the following statement:
This statement yields the following results:
Note the appended string "-svc" to the name of the replica set.
The service with "-external" is a NodePort - which means it's exposed to
the overall cluster DNS name on port 30057.
Note: If you are using Minikube you can obtain the IP address of the
running replica set by issuing the following:
In our example which used minikube the result set contained the
following information: mongodb my-replica-set-svc-external
http://192.168.39.95:30057
Now that we know the IP of our MongoDB cluster we can connect using the
Mongo Shell or whatever application or tool you would like to use.
If you are having problems submitting a deployment you should read the
logs. Issues like authentication issues and other common problems can be
easily detected in the log files. You can view the MongoDB Enterprise
Operator for Kubernetes log files via the following command:
You can also use kubectl to see the logs of the database pods. The main
container processes is continually tailing the Automation Agent logs and
can be seen with the following statement:
Note: You can enumerate the list of pods using
Another common troubleshooting technique is to shell into one of the
containers running MongoDB. Here you can use common Linux tools to view
the processes, troubleshoot, or even check mongo shell connections
(sometimes helpful in diagnosing network issues).
An example output of this command is as follows:
From inside the container we can make a connection to the local MongoDB
node easily by running the mongo shell via the following command:
Note: The version of the automation agent may be different than 3.6.5,
be sure to check the directory path
More information will be available on the MongoDB documentation
website in the near future. Until
then check out these resources for more information:
To see all MongoDB operations best practices, download our whitepaper:
https://www.mongodb.com/collateral/mongodb-operations-best-practices
Rate this announcement