Real Time Data in a React JavaScript Front-End with Change Streams

Joel Lord6 min read • Published Oct 04, 2022 • Updated Oct 04, 2022


Rate this tutorial


In many applications nowadays, you want data to be displayed in real time. Whether an IoT sensor reporting a value, a stock value that you want to track, or a chat application, you will want the data to automatically update your UI. This is possible using MongoDB Change Streams with the Realm Web SDK.
In this tutorial, you will learn how to use the Realm Web SDK to display changes in a collection as they happen.
To follow this tutorial, you will need an Atlas cluster. The free tier will be more than enough for the needs of this tutorial. If you don't already have one, you can find the instructions on creating a cluster in the documentation.
You will also need an app from Application Services. The instructions to create a new application can also be found in the documentation. Follow the instructions to create a new app without a template.
This application will display any operation that is performed on a specific collection. To do so, we will need to configure rules about who has access to the data (everybody) and how the users will authenticate (anonymously).
You will need your application ID when you start building your application. When you first open the application (or by clicking the navigation bar item with the name of your application), you will see the home page with the information about this application. Right at the top, you will notice a field labelled "App ID." This is your application id.
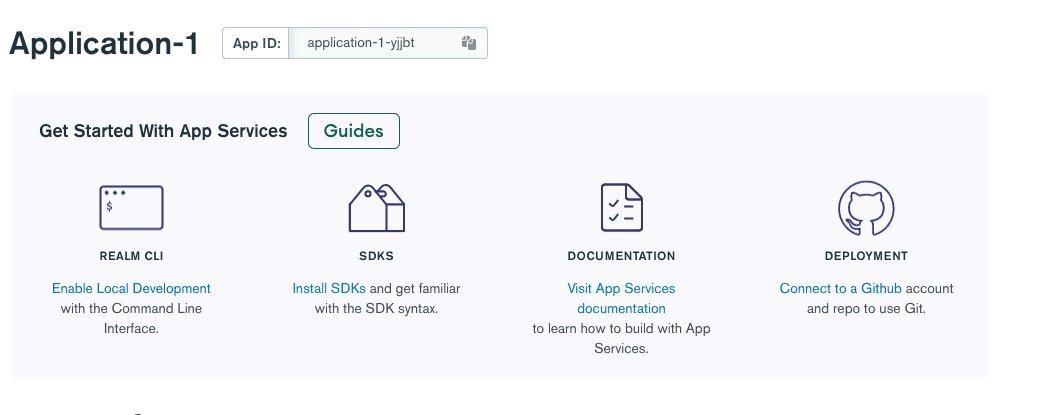 You can either copy and paste it somewhere or just come back to this screen later when you'll need it.
From the left navigation menu in Atlas App Services, look for the "Rules" item. This will list all your databases and collections in the cluster associated with this application. Choose the
data database and the changestream collection. You will be prompted to create a new role for this collection.
Use the
readAll preset, and then click on the "Add preset role" button. This will create a new role that will have complete read access to the data in this collection. If you wanted to create a role that has only access to data owned by the user, this could be done with a custom role here.For this application, we won't require authentication, which means that any visitor to this website will have access to all the data. In our case, this is what we want, but in a production application, you might want to configure a real authentication provider.
In the left navigation bar, click on the "Authentication" item. In the displayed table, look for the "Allow users to log in anonymously" row.
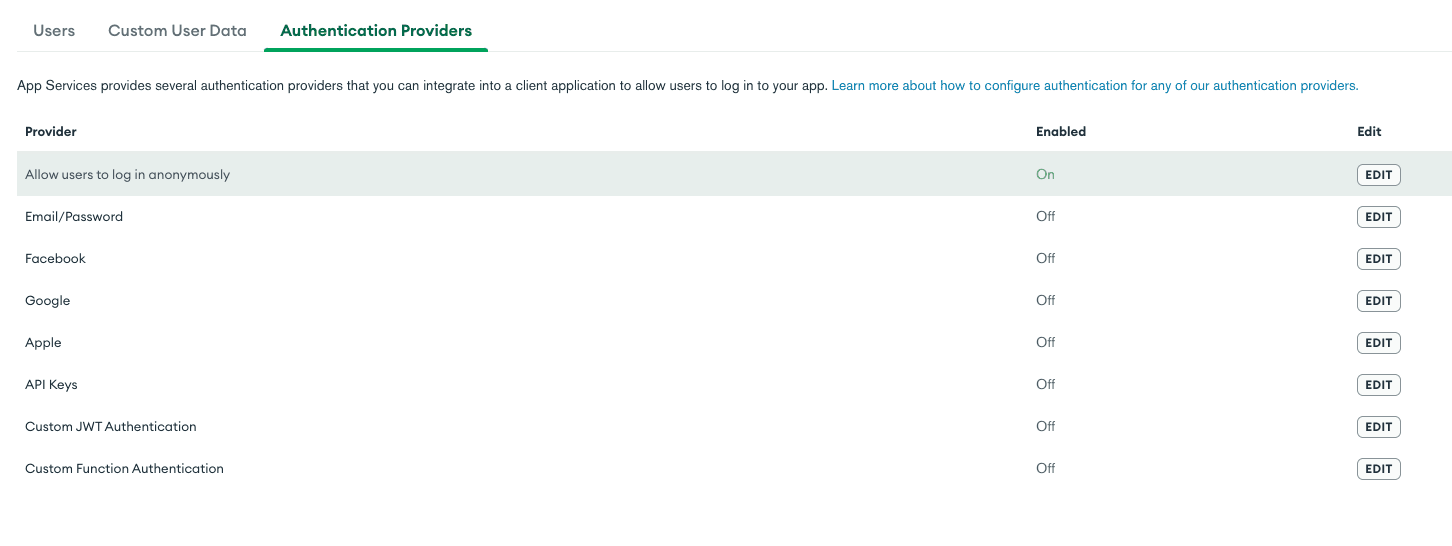
Click on the "Edit" button. On the next screen, toggle the "Provider Enabled" button to turn it on. After you click the Save button, go back to the authentication providers page and make sure it's enabled.
That's all you need in the Atlas App Services UI for now. Look for the blue bar at the top of the screen.

Click that "Review draft & deploy" button, and accept the changes.
Your application is now ready to be used.
We will start with a blank React application generated with the
create-react-app tool for this application.In your terminal, run the following command.

Next, install the required library to use the Realm Web SDK, and start the application.
This will open up a browser window with the application running in it. With your favourite code editor, open up the source code for this application, and look for the App.js file.
You will replace the entire content of this file so you can go ahead and delete everything there.
Now, start with this boilerplate code for your App.js file.
Under the comment Create the Application, enter the following.
This will instantiate your Atlas application. Don't forget to change the id to the identifier for your application.
Next, we will need two state variables. The first one —
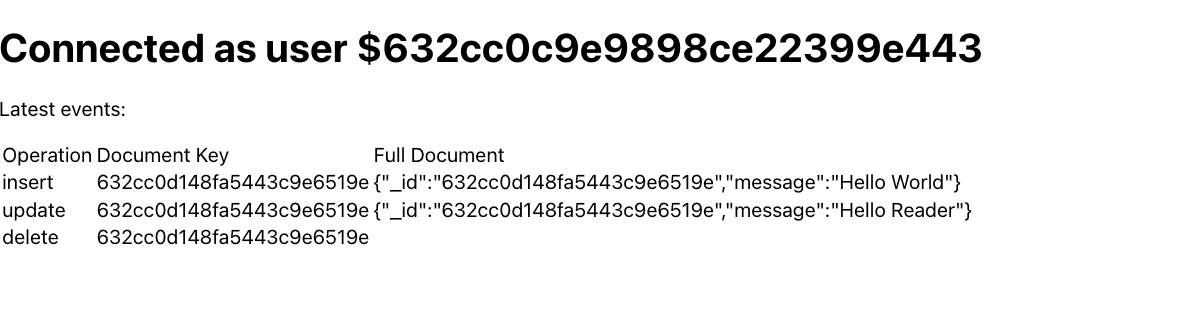
user— will contain the user object created by the Realm SDK once authenticated. The second one —events— will contain any new event from the database. Those events will be operations (create, update, or delete) performed on the database, along with the _id of the document and the full document.Add the following code after the Set state variables comment.
Next up is the
useEffect function. Here, you will create a function called login that will authenticate anonymously to the application. It will then update the user object in the state.Finally, change the JSX code to render a table with the events.
That's all you need for your application. If you look at your browser, you should see the application running.
In the Atlas UI, go ahead and create, edit, or delete items from the changestream collection. As you do those operations, you should see your new web application displaying each of those operations in real time as they happen.
Note: When running this application, you might notice that some of the events are duplicated. This is due to the React.StrictMode tool which does a second pass on your code to notify you of any errors. This only happens in production, and won't happen if you run
npm run build.The same application can be rewritten in plain old JavaScript under 50 lines. The main differences with the React application are that the
realm-web is loaded via a script tag and that the code to build the table doesn't use JSX.Change streams are a very powerful feature in MongoDB. They let you create applications that display and react to information in real time without needing a back-end.
If you want a little bit of an additional challenge, how about you build a chat application using Change Streams? Add a form that will use an Atlas HTTPS endpoint to add entries to the database, and then list the chat messages by listening for new changes in the collection.