MongoDB Atlas Data Federation Tutorial: Federated Queries and $out to AWS S3


Maxime Beugnet, Stanimira Vlaeva7 min read • Published Feb 07, 2022 • Updated Jan 23, 2024


Rate this tutorial


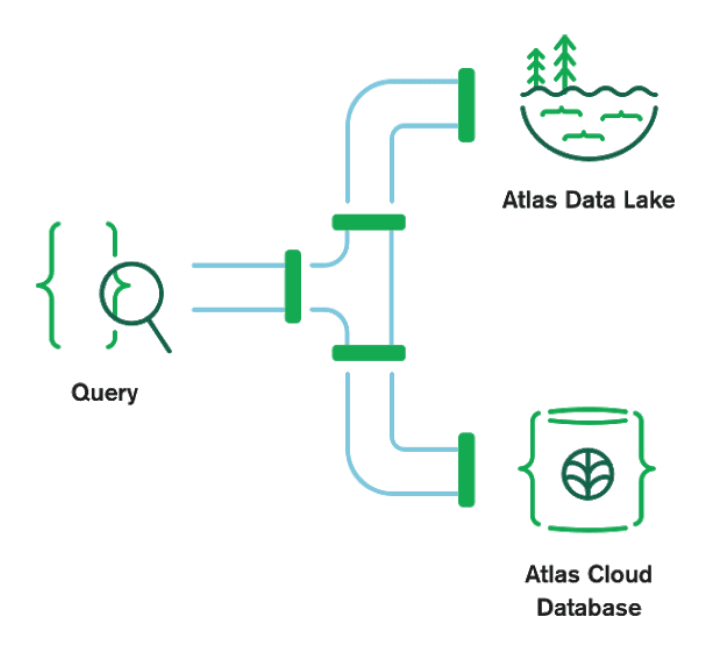
Data Federation is a MongoDB Atlas feature that allows you to query data from disparate sources such as:
- Atlas databases.
- Atlas Data Lake.
- HTTP APIs.
- AWS S3 buckets.
In this tutorial, I will show you how to access your archived documents in S3 and your documents in your MongoDB Atlas cluster with a single MQL query.
This feature is really amazing because it allows you to have easy access to your archived data in S3 along with your "hot" data in your Atlas cluster. This could help you prevent your Atlas clusters from growing in size indefinitely and reduce your costs drastically. It also makes it easier to gain new insights by easily querying data residing in S3 and exposing it to your real-time app.
Finally, I will show you how to use the new version of the $out aggregation pipeline stage to write documents from a MongoDB Atlas cluster into an AWS S3 bucket.
In order to follow along this tutorial, you need to:
- Create a MongoDB Atlas cluster. ✅ Already have an AWS account? Atlas supports paying for usage via the AWS Marketplace (AWS MP) without any upfront commitment — simply sign up for MongoDB Atlas via AWS Marketplace.
- Create a user in the Database Access menu.
- Add your IP address in the Network Access List in the Network Access menu.
- Have Python 3 with
pymongoanddnspythonlibs installed.
Log into your AWS account and create an S3 bucket. Choose a region close to your Atlas deployment to minimize data latency. The scripts in this tutorial use a bucket called
cold-data-mongodb in the region eu-west-1. If you use a different name or select another region, make sure to reflect that in the Python code you’ll see in the tutorial.Then, install the AWS CLI and configure it to access your AWS account. If you need help setting it up, refer to the AWS documentation.
To illustrate how
$out and federated queries work, I will use an overly simple dataset to keep things as easy as possible to understand. Our database “test” will have a single collection, “orders,” representing orders placed in an online store. Each order document will have a “created” field of type “Date.” We’ll use that field to archive older orders, moving them from the Atlas cluster to S3.I’ve written a Python script that inserts the required data in the Atlas cluster. You can get the script, along with the rest of the code we’ll use in the tutorial, from GitHub:

Then, go back to Atlas to locate the connection string for your cluster. Click on “Connect” and then “Connect your application.” Copy the connection string and paste it in the
insert_data.py script you just downloaded from GitHub. Don’t forget to replace the <username> and <password> placeholders with the credentials of your database user:insert_data.py
Finally, install the required libraries and run the script:
Now that we have a “massive” collection of orders, we can consider archiving the oldest orders to an S3 bucket. Let's imagine that once a month is over, we can archive all the orders from the previous month. We’ll create one JSON file in S3 for all the orders created during the previous month.
But first, we need to configure Atlas Data Federation correctly.
Navigate to “Data Federation” from the side menu in Atlas and then click “set up manually” in the "create new federated database" dropdown in the top right corner of the UI.
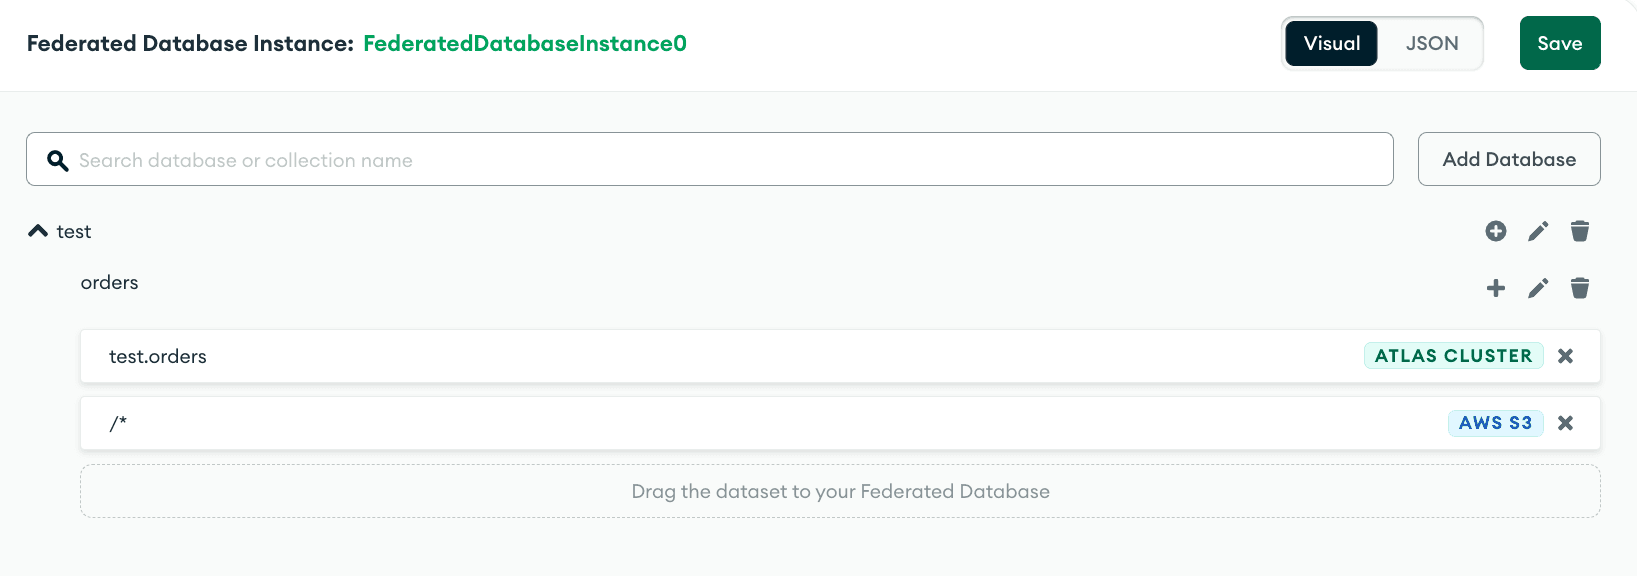
On the left, we see a panel with the data sources (we don’t have any yet), and on the right are the “virtual” databases and collections of the federated instance.
Let’s add the first data source — the orders from our Atlas cluster. Click “Add Data Sources,” select “Atlas Cluster,” and then select your cluster and database.
Click “Next” and you’ll see the “test.orders” collection as a data source. Click on the “test.orders” row, drag it underneath the “VirtualCollection0,” and drop it there as a data source.
Next, we’ll connect our S3 bucket. Click on “Add Data Sources” again and this time, select Amazon S3. Click “Next” and follow the instructions to create and authorize a new AWS IAM role. We need to execute a couple of commands with the AWS CLI. Make sure you’ve installed and linked the CLI to your AWS account before that. If you’re facing any issues, check out the AWS CLI troubleshooting page.
Once you’ve authorized the IAM role, you’ll be prompted for the name of your S3 bucket and the access policy. Since we'll be writing files to our bucket, we need to choose “Read and write.”
You can also configure a prefix. If you do, Data Federation will only search for files in directories starting with the specified prefix. In this tutorial, we want to access files in the root directory of the bucket, so we’ll leave this field empty.
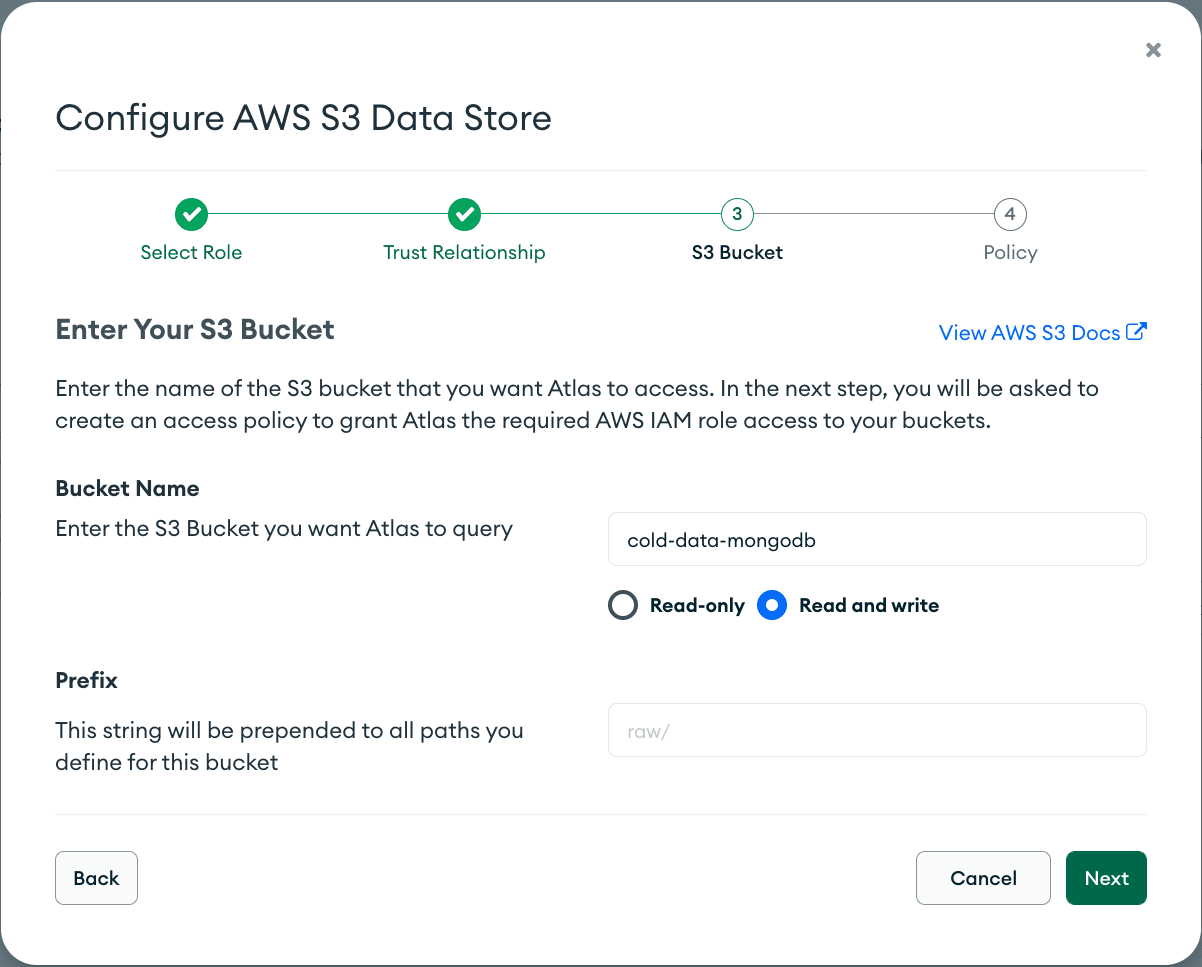
After that, we need to execute a couple more AWS CLI commands to make sure the IAM role has permissions for the S3 bucket. When you’re finished, click “Next.”
Finally, we’ll be prompted to define a path to the data we want to access in the bucket. To keep things simple, we’ll use a wildcard configuration allowing us to access all files. Set
s3://cold-data-mongodb/* as the path and any value (*) as the data type of the file.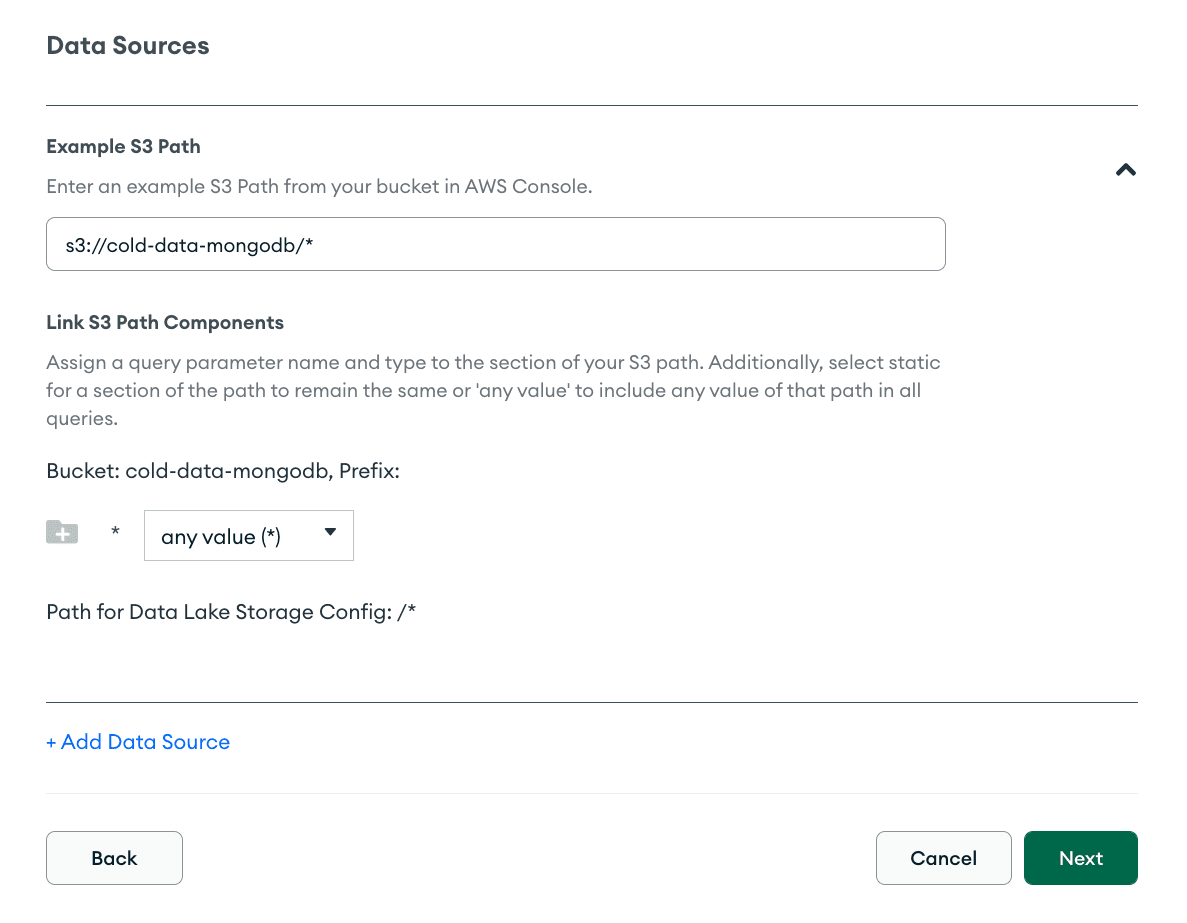
Data Federation also allows you to create partitions and parse fields from the filenames in your bucket. This can optimize the performance of your queries by traversing only relevant files and directories. To find out more, check out the Data Federation docs.
Once we’ve added the S3 bucket data, we can drag it over to the virtual collection as a data source.
The names “VirtualDatabase0” and “VirtualCollection0” don’t feel appropriate for our data. Let’s rename them to “test” and “orders” respectively to match the data in the Atlas cluster.
Finally, to make sure that our setup is correct, we can switch to the JSON view in the top right corner, right next to the “Save” button. Your configuration, except for the project ID and the cluster name, should be identical to this:
Once you've verified everything looks good, click the “Save” button. If your AWS IAM role is configured correctly, you’ll see your newly configured federated instance. We’re now ready to connect to it!
Let's now collect the URI we are going to use to connect to Atlas Data Federation.
Click on the “Connect” button, and then “Connect your application.” Copy the connection string as we’ll need it in just a minute.
Now let's use Python to execute our aggregation pipeline and archive the two orders from May 2020 in our S3 bucket.
Once you replace the connection string with your own, execute the script:
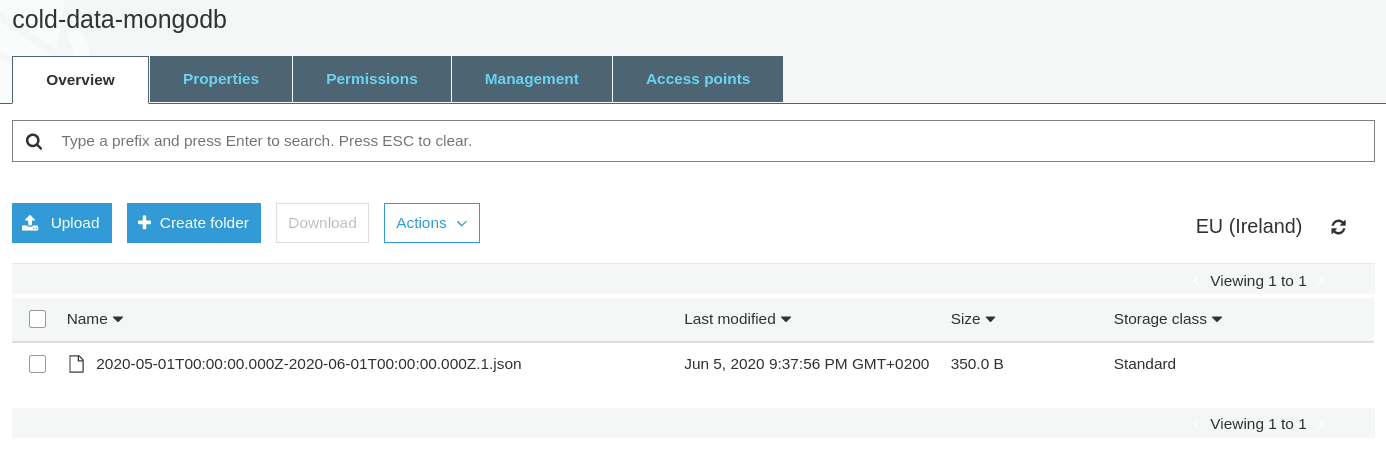
And now we can confirm that our archive was created correctly in our S3 bucket:
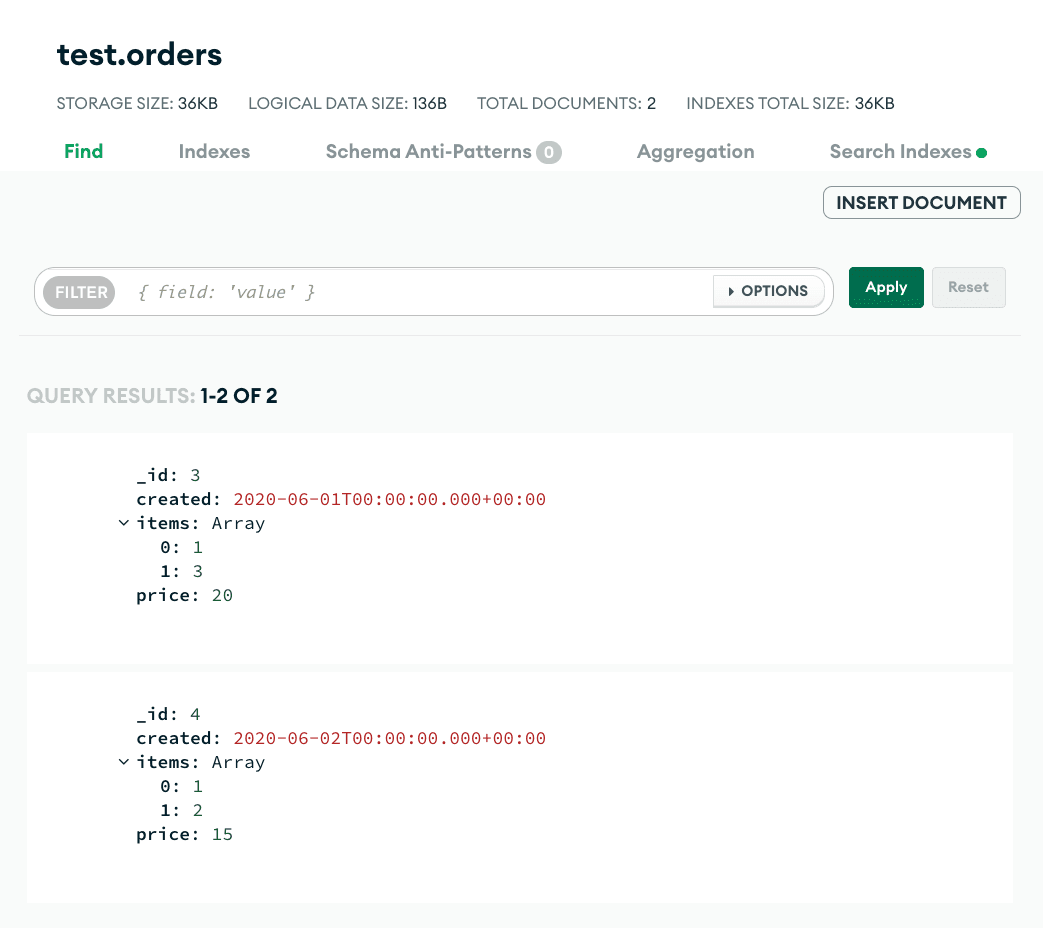
Now that our orders are safe in S3, I can delete these two orders from my Atlas cluster. Let's use Python again. This time, we need to use the URI from our Atlas cluster because the Atlas Data Federation URI doesn't allow this kind of operation.
Let's run this code:
Now let's double-check what we have in S3. Here is the content of the S3 file I downloaded:
And here is what's left in my MongoDB Atlas cluster.
As mentioned above already, with Data Federation, you can query data stored across Atlas and S3 simultaneously. This allows you to retain easy access to 100% of your data. We actually already did that when we ran the aggregation pipeline with the
$out stage.Let's verify this one last time with Python:
Execute the script with:
Here is the output:
If you have a lot of infrequently accessed data in your Atlas cluster but you still need to be able to query it and access it easily once you've archived it to S3, creating a federated instance will help you save tons of money. If you're looking for an automated way to archive your data from Atlas clusters to fully-managed S3 storage, then check out our new Atlas Online Archive feature!
Storage on S3 is a lot cheaper than scaling up your MongoDB Atlas cluster because your cluster is full of cold data and needs more RAM and storage size to operate correctly.
If you have questions, please head to our developer community website where the MongoDB engineers and the MongoDB community will give you a hand.
Rate this tutorial