G’Day, Folks,
I am super excited to share the BookLog Android Application that I created in continuation of the Realm Relationships topic we did a few weeks ago. It’s a basic application to show how the Relationships get synced to Atlas ![]()
I would absolutely love your participation and feedback on this application ![]()
I am assuming you already know the starting steps. If you are not comfortable with any of them, please feel free to raise a question below.
Part 01: Setting up Realm Backend
- Create an account on realm.mongodb.com
- Create an organization and a project
- Choose cluster tier and Cloud Provider. I chose M0 cluster, AWS in Ireland location
- Create a Realm Application from the Realm tab. I selected build from scratch, Ireland location, and local deployment model
- Enable Authentication Provider (I enabled email/password)
Now, the next step is to enable sync. I talked about Sync Types in a previous Realm Byte.
As I am developing the app from scratch, I will turn on development mode and will use partition sync.
Before I move on with Sync, let’s talk a little bit on Application use-case
What is BookLog Application
I am fond of books, so the idea was borne out of that, as well as the Relationship topic we talked about previously ![]() The application is maintaining a list of books and author names. There are three screens
The application is maintaining a list of books and author names. There are three screens
1. Add Author
This is a simple screen with an input component for the author and a button to add.
2. Add Book
This screen adds a book and selects the authors from the available list. If the author is not available, you will need to add the Author from the Author Screen. It also has a boolean variable if the book has been read.
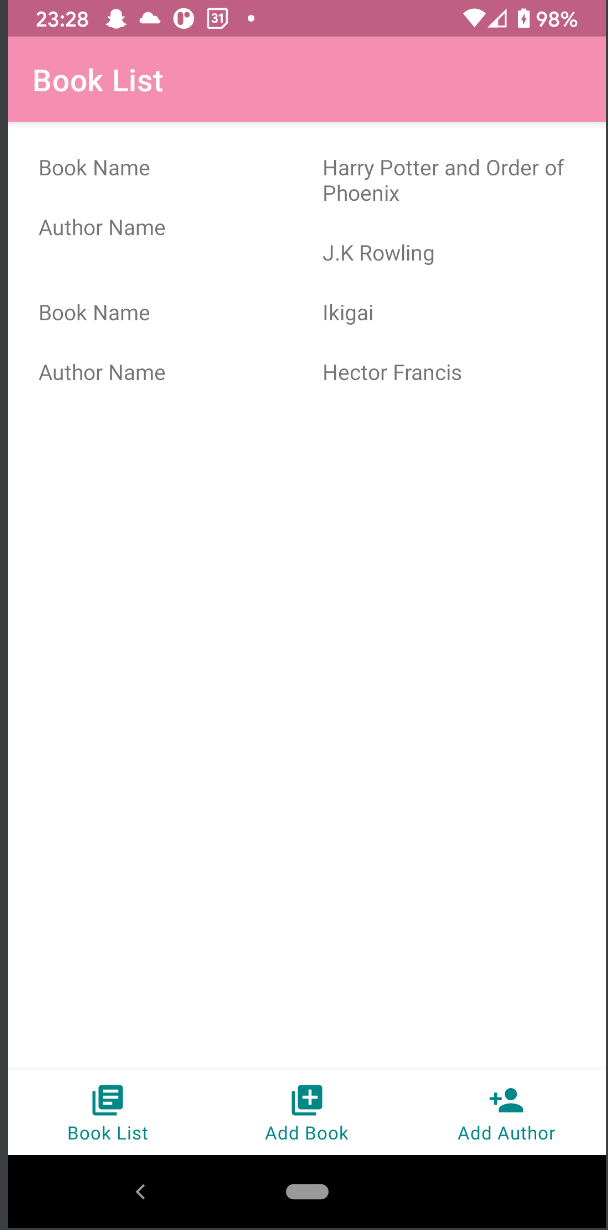
3. List of Books with Author Names
This displays the list of books and authors added in the BookLog
How do I decide the partition strategy
The Strategy will depend on how I want my application to be used:
-
If I want all users to see the list of books and authors added, and have the permissions to add them as well, I would need to have a public partition with both read and write permissions to True. This will be termed as Firehose strategy
-
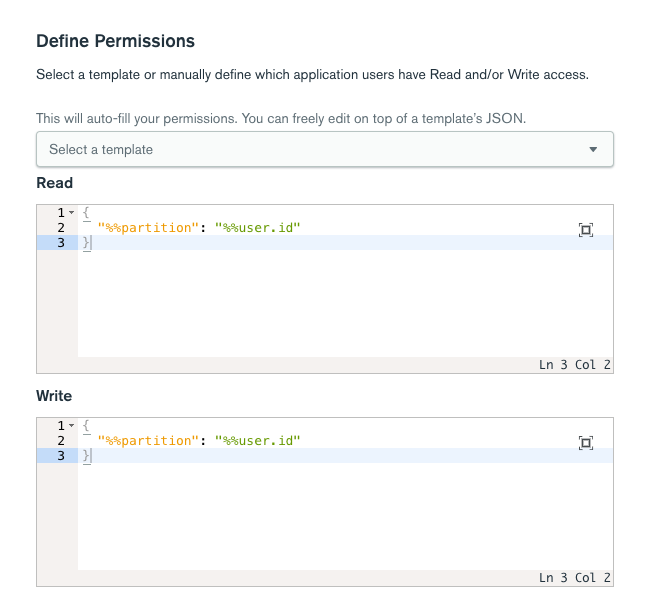
If I want users to create their own book log and add authors and books, then that will be read and write to a user-specific partition. With this setting, one user cannot read the booklist of another user. This is termed User Strategy.
For first, there is no partition at all i.e all data in Atlas will get synced to the device. It’s a public partition. The second is the most commonly used user-based partition. For the BookLog app, I am using the second option.
Permissions defined: Users can read and write to their own partitions, depicted in the diagram below:
With Development Mode on, this is all that needs to be done on the Realm Backend.
A sneak peek to your schema section will show you an empty schema (if this is your first application) or it will show the databases of your existing Realm apps.
Part 02: Setting up Android Application
Now the next step is to create the BookLog Android application, add dependencies, link to Realm Cloud and Sync data from Mobile to Atlas
I have mentioned some starting steps, but please feel free to ask below if you have any questions.
For adding Realm dependencies in your mobile application, please refer to Realm SDK docs as applicable.
- Add Realm dependencies to Gradle file
- Create an Application subclass and add the Realm App Id from the Realm Backend in this class.
- Create a Login Activity and implement code for email/password as that was enabled in previous steps.
Now, the next step is to create our Book and Author model classes. This is the same definition as mentioned in the Realm Relationships bytes a few weeks ago.
For brevity purposes, I will be limiting the coding to Schema Models and Queries and exclude any UI binding from this.
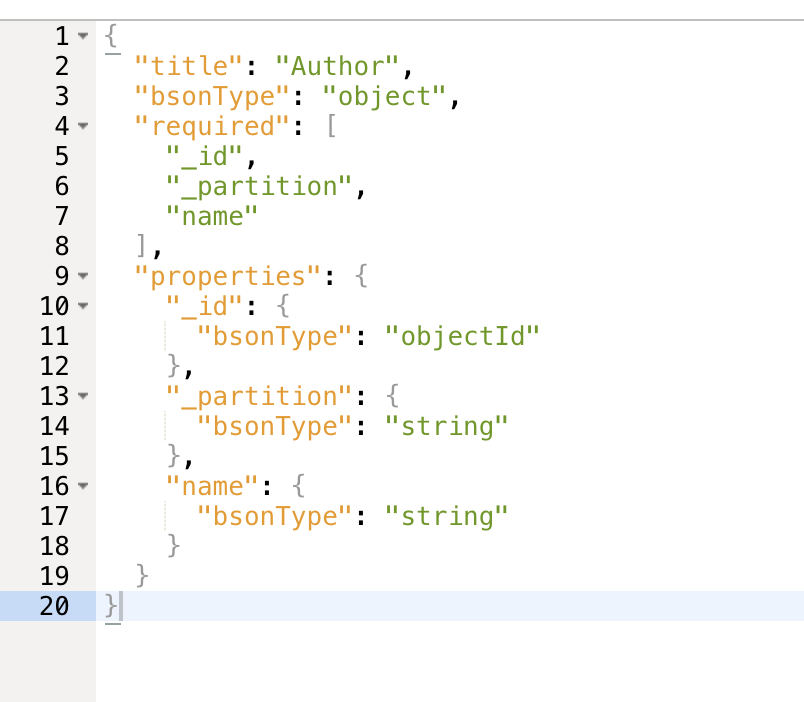
Author
open class Author(

   @PrimaryKey
   var _id: ObjectId = ObjectId(),

   @Required
   var name: String = "",

   @LinkingObjects("authors")
   val books: RealmResults<BookRealm>? = null
): RealmObject() { }
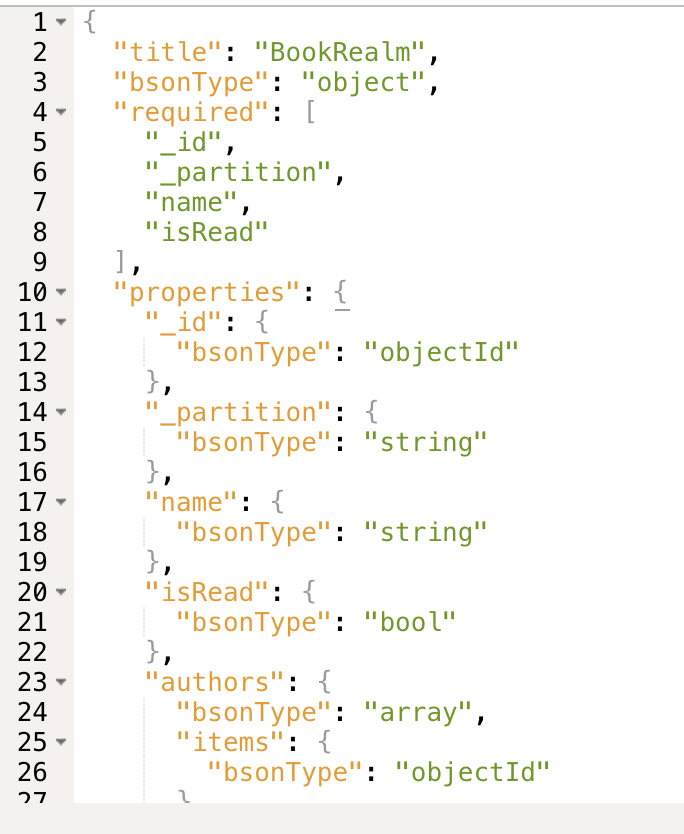
Book
open class BookRealm(
   @PrimaryKey
   var _id: ObjectId = ObjectId(),

   @Required
   var name: String = "",

   var isRead: Boolean = false,

   var _partition: String ="",

   var authors: RealmList<Author> = RealmList()
) : RealmObject() {}
If I want this schema to sync to Atlas, there are some additional points to take care of
- Every model will need
_idas the Primary Key of any type (ObjectId(), String, Int). This is a mandatory requirement as the MongoDB model identifies a document’s uniqueness with this identifier. Keeping any other field as the primary key will throw an error. - Every schema will need a
_partition(partition key field), with the same name as mentioned in Realm Cloud settings - Every model will be a subclass of the
RealmObjectclass. Another way is to implement the RealmModel and use @RealmClass annotation. Please follow RealmModel for more information.
Queries to add Author object to database
//1
var bookLogApp: App = App(AppConfiguration.Builder(appId).build())
//2
val config = SyncConfiguration.Builder(bookLogApp.currentUser(),
bookLogApp.currentUser()?.id)
   .waitForInitialRemoteData(500, TimeUnit.MILLISECONDS)
   .build()
//3
Realm.getInstanceAsync(config, object : Realm.Callback() {
   override fun onSuccess(realm: Realm) {
           realmClass = realm
        createAuthorObject(“J.K Rowling”)
   }
})
//4
private fun createAuthorObject(authorName: String) {

   realmClass.executeTransactionAsync({
       val author = it.createObject(Author::class.java, ObjectId())
       //configure the instance
       author.name = authorName
   }, {
       Log.d("Successfully Added")
   }, {error->
       Log.e("Error adding Author %s",error.localizedMessage)
   })
}

//5
realmClass.close()
The code explanation is as below:
-
This creates the Realm App instance,
appIdhere is the Realm App Id copied from the backend. -
Please note, for Synced Realms use the “SyncConfiguration” API to build sync configuration and method call takes in the current user logged in and the partition value as arguments.
-
This will create a Realm instance asynchronously i.e in a background thread and call a method to add Author name. This logic can vary based on a use-case and this is only a simple representation of it.
-
The Write operations should always happen in a transaction, and the transaction here is opened asynchronously so that it does not block the UI thread. The author object is created and the author is saved to the database.
-
It is important to close the Realm instance, otherwise it leads to memory leaks and increase in the size of the realm on disk.
Queries to add Book object to database
//1
Create app instance

//2
Create Sync config

//3
Create realm instance (no call to author func)

//4
realmClass.executeTransactionAsync ({realm ->
      //Option 1
    val bookToAdd:Book = realm.createObject(Book::class.java, ObjectId())
       bookToAdd.name = “Harry Potter and Chamber of Secrets”
       bookToAdd.isRead = true
       bookToAdd.authors.add(“J.K Rowling”)

      //Option 2
      realm.insertOrUpdate(bookObject)

      //Option 3
      realm.copyToRealmOrUpdate(bookObject)


}, {
   Log.d("Book Object Added Successfully")

}, {throwError ->
   Log.d("Error adding the bookObject to Database %s", throwError.localizedMessage)
   }
})

//5
realmClass.close()
The first three steps will be the same as in add Author section with the difference that no call will be made to the Author function
-
There are different options available to add the book object to the database depending on the workflow and architecture of your application.
-
Don’t forget to close the Realm instance.
Tomorrow I will show how I displayed the list of books and authors, some errors I faced while creating the application, and share the full application code with you ![]()
Cheers, ![]()